Dear Readers,
In this article, we will understand the step by step Migration from Oracle to SQL Server.
To complete this configuration we need to follow below steps.
I am using MSSQL Server 2012 and Oracle 12c R1 for this activity. You can use any version as per your requirements.
- Download the Microsoft SQL Server (version which meets the prerequisites).
- Download the SQL Server Migration Assistant 8.8 for Oracle.
- Download the Oracle Client Software for windows same as Oracle Database Version.
- Installation of Oracle Client Software.
- Installation of Microsoft SQL Server.
- Installation of SQL Server Migration Assistant for Oracle.
- Connect to the Oracle Database.
- Connect to the SQL Server Instance.
- Convert Schema from Oracle to SQL Server.
- Synchronize with the database.
- Migration from Oracle to SQL Server.
1. Download the Microsoft SQL Server (version which meets the prerequisites)
Please use below link to download the Microsoft SQL Server software
Link: – https://www.microsoft.com/en-in/download/details.aspx?id=29062
Before downloading the file please check the system requirements first so that you save your time for again doing the whole stuff which meets with your system.
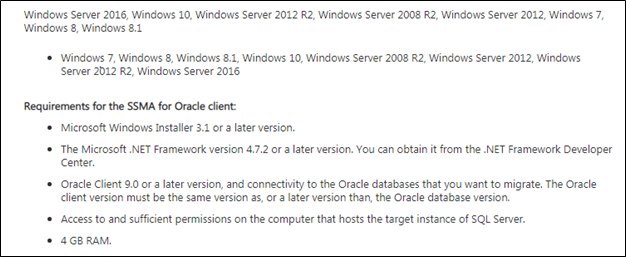
System Requirements for Microsoft SQL Server 2012: –

2. Download the SQL Server Migration Assistant for Oracle
Please use below link to download the SQL Server Migration Assistant 8.8 for Oracle software.
Link: – https://www.microsoft.com/en-us/download/details.aspx?id=54258
System Requirements for SQL Server Migration Assistant 8.8 for Oracle: –
3. Download the Oracle Client Software for windows same as Oracle Database Version
As I told you earlier that I am using Oracle 12c R1 for this activity, so I will also download Oracle Client and Oracle Database software of same versions as well.
Please use below link to download the Oracle Client Software software.
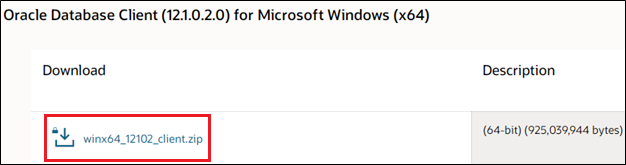
Oracle Client Software Link: https://www.oracle.com/database/technologies/database12c-win64-downloads.html
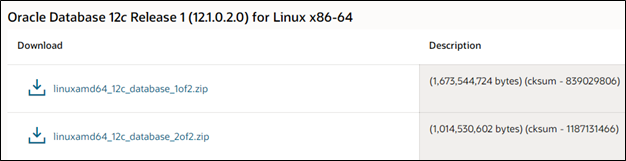
Oracle Database Software Link: – https://www.oracle.com/database/technologies/database12c-linux-downloads.html
4. Installation of Oracle Client Software
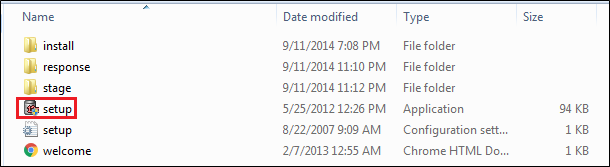
Step 1
First you need to extract the zip file and then execute the setup.exe file.
Step 2
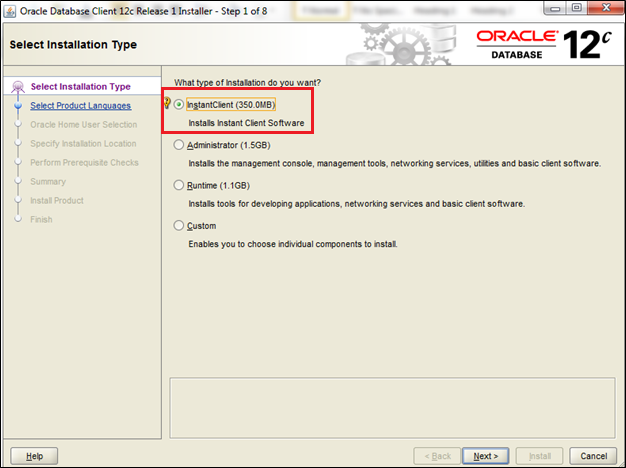
when you execute setup.exe file then GUI will get invoked, Choose Instant Client Option to install the basic client utilities.
Step 3
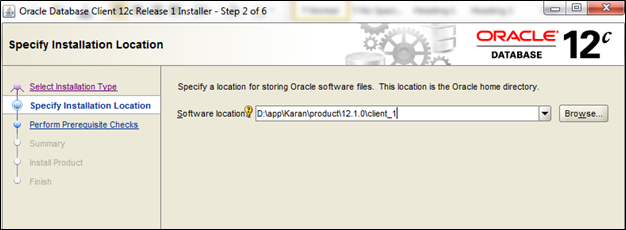
Choose the Software Location where binaries will get installed.
Step 4
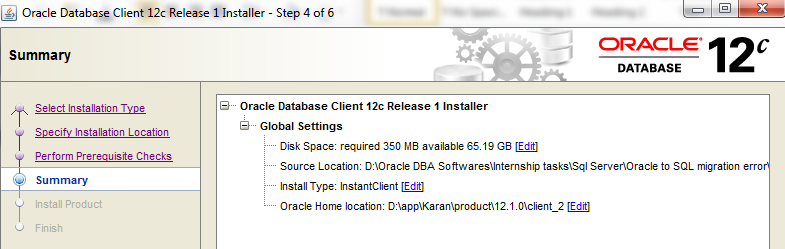
Look at the summary and if all looks good, press the install tab to proceed with the Installation.
Step 5
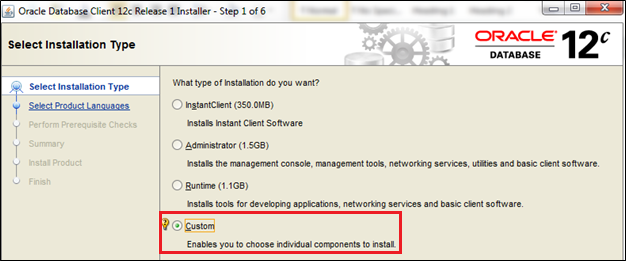
After Client Installation again execute the setup.exe file to install the OraOLEDB.Oracle.1 provider which is mandatory during the connection of Oracle database.
Note: – Now this time choose Custom option.
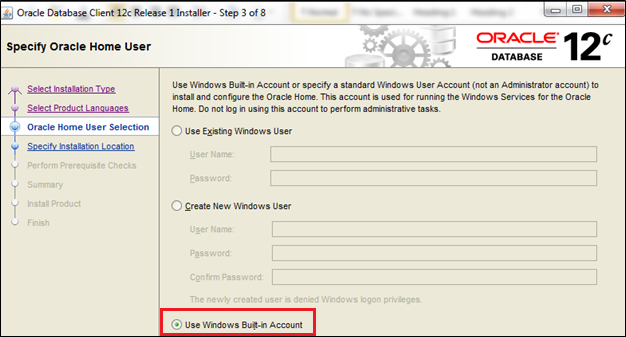
Step 6
Select Use Windows Built-in Account option under Oracle Home User tab.
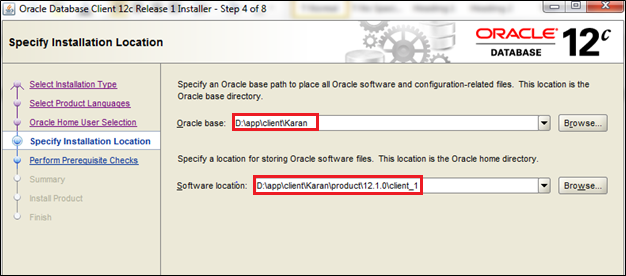
Steps 7
now specify Oracle Base and Oracle Software location.
Note: – It will automatically detect Oracle Software Location path because we have already mentioned during Client Installation.
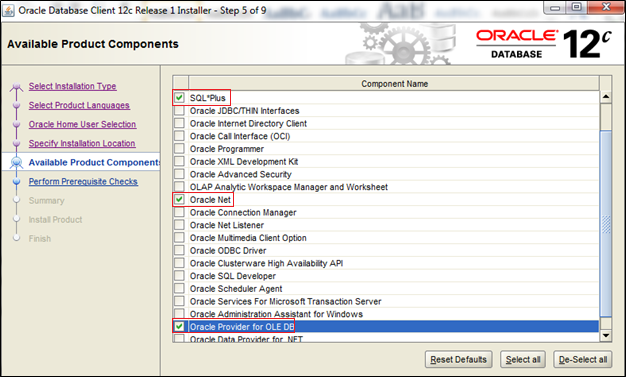
Step 8
Now choose the below components and make sure you don’t miss to check mandatory component Oracle Provider for OLE DB.
- Oracle Database Utilities.
- SQL*Plus.
- Oracle Net.
- Oracle Provider for OLE DB.
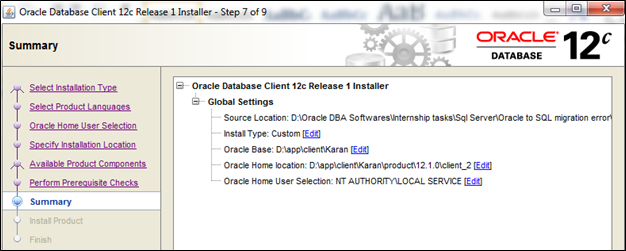
Step 9
Look at the Summary and if all looks good then press the install tab to proceed with the Installation.
5. Installation of Microsoft SQL Server
After Installation of Oracle Client, now we need to install the Microsoft SQL Server. I am using 2012 version.
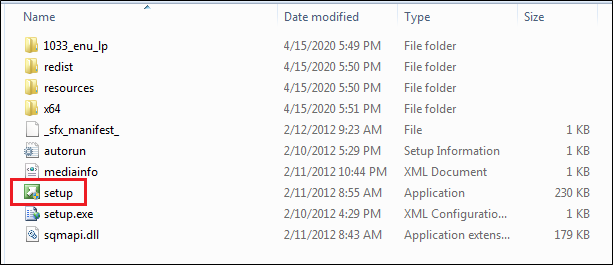
Step 1
Extract the files and execute the setup file.
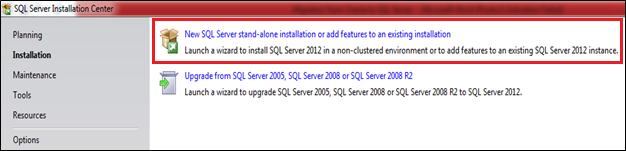
Step 2
Click on the New SQL Server standalone installation or add features to an existing installation link.
Step 3
Now First it will look for product updates and after that you can proceed further for Installation of setup files.
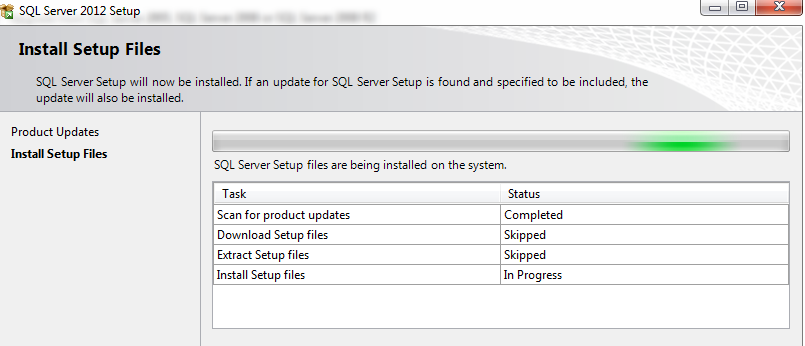
We can see from above output that 2 steps have been skipped because we have already downloaded the setup files and extract it.
Step 4
Select perform a new installation of SQL Server 2012.
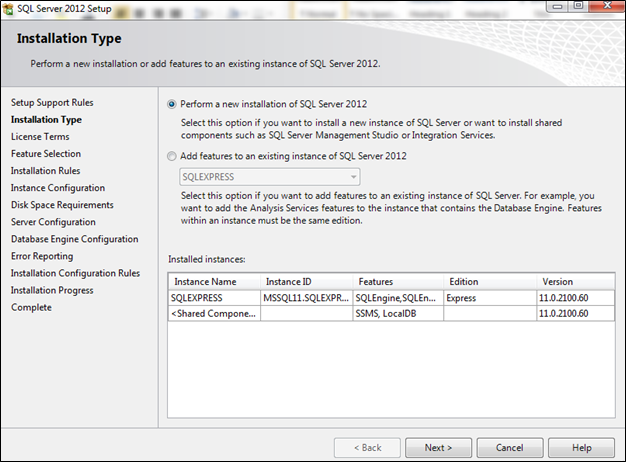
Note: – I have already Installed SQLEXPRESS instance, but in your case you have to choose first option.
Step 5
Accept the License Terms and Click on Next tab.
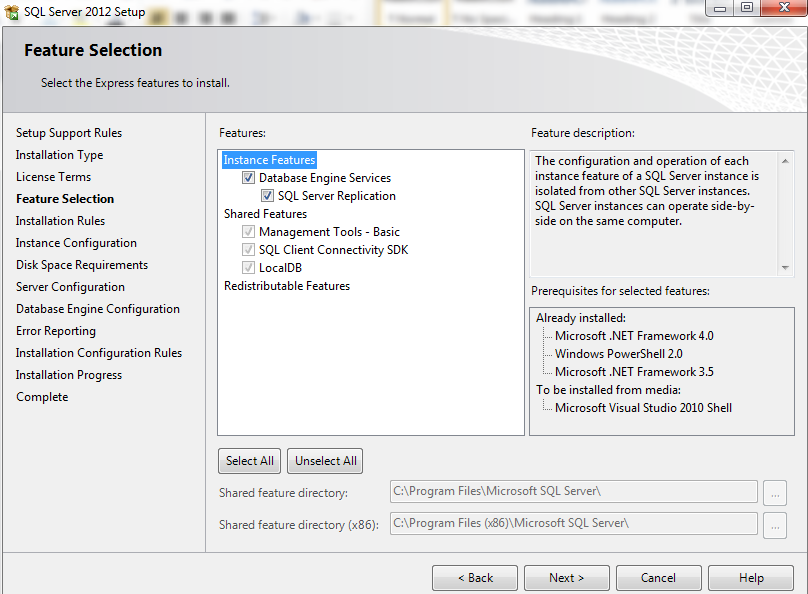
Step 6
Select all the options under Feature Selection and click on Next.
Step 7
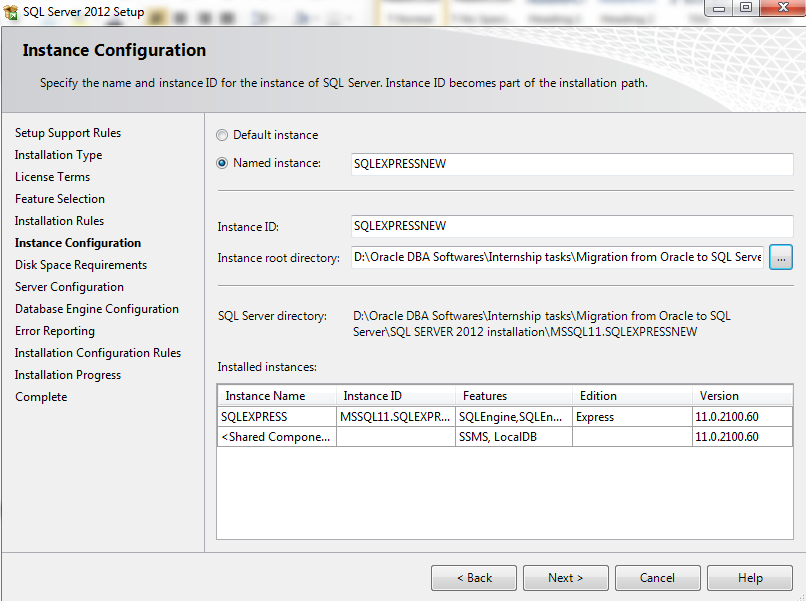
now you can choose Default Instance or Name instance as per your requirement, I am choosing named instance.
Step 8
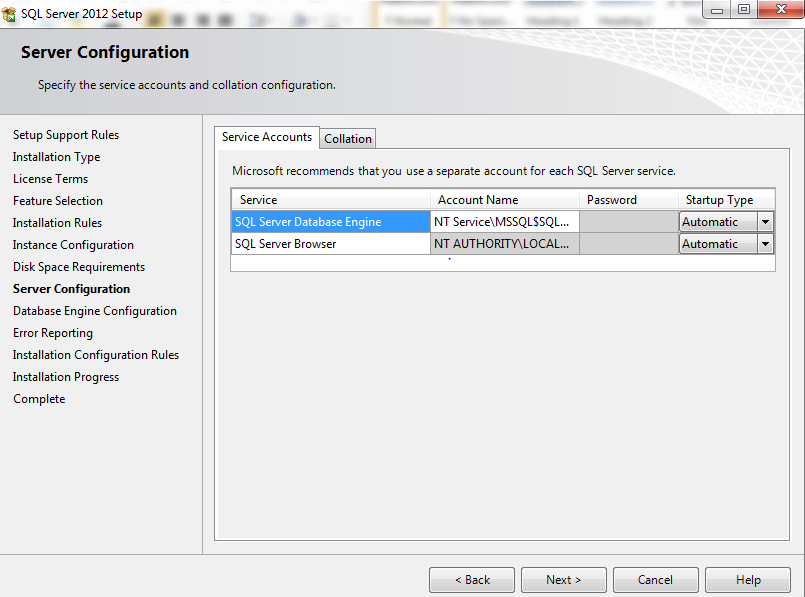
Keep Service Accounts setting as default one, if you want to change collation then you can change it as per your requirements.
I am using default collation: – SQL_Latin1_General_CP1_CI_AS
Step 9
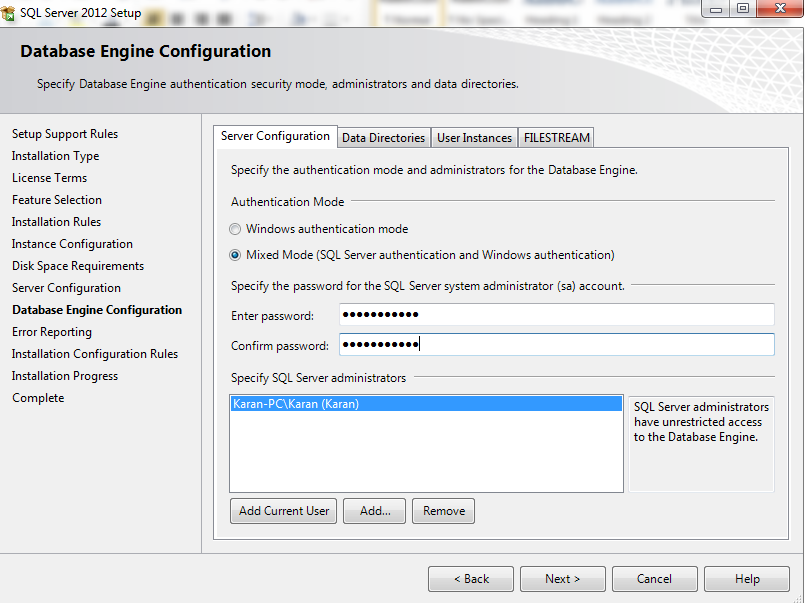
Specify Database Engine authentication security mode, administrators and data directories as per your requirements.
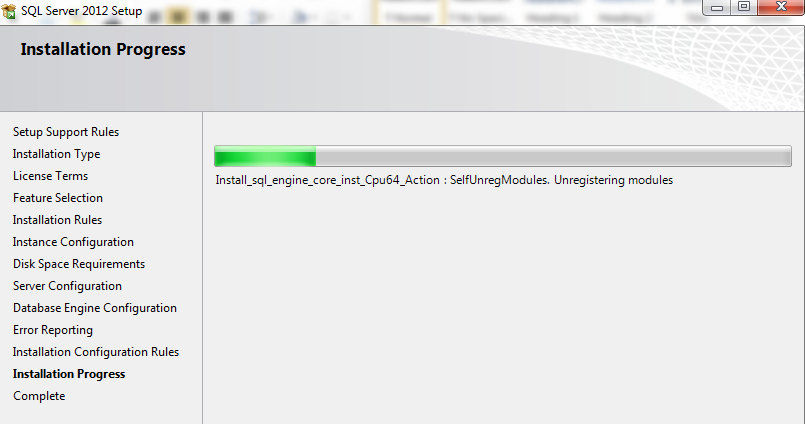
Step 10
Installation is in progress now.
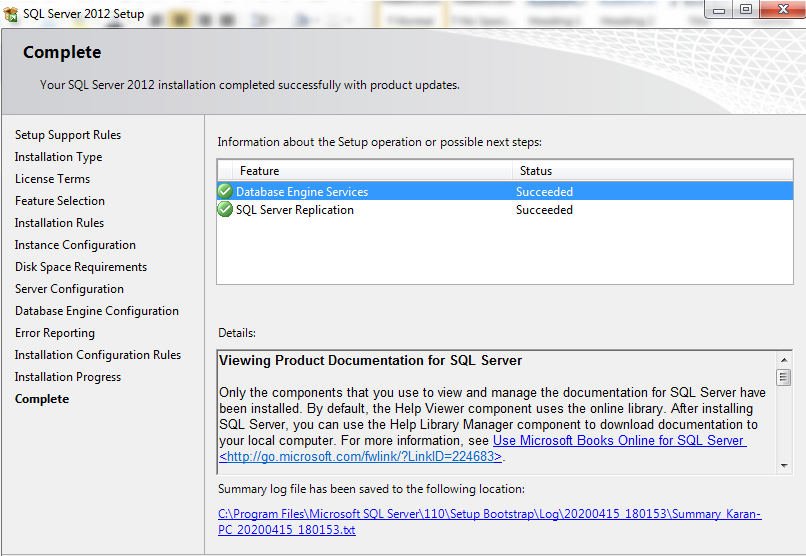
Step 11
Installation has been completed successfully.
6. Installation of SQL Server Migration Assistant for Oracle
Now we need to install the (SSMA) SQL Server Migration Assistant for Oracle which helps in Migration from Oracle to SQL Server.
Step 1
when you have downloaded the SSMA, you got below two files. Now we need to install both the files one by one.

Step 2
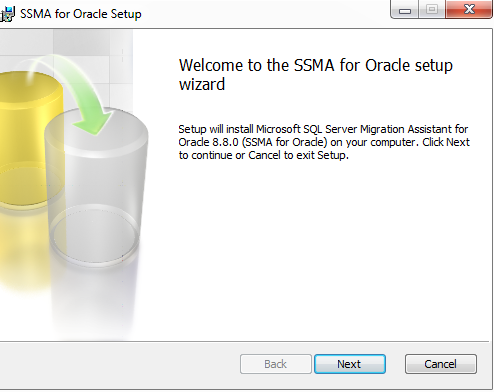
when you ran the first file then you will get below SSMA for Oracle setup wizard.
Step 3
Accept the License terms and click on Next.
Step 4
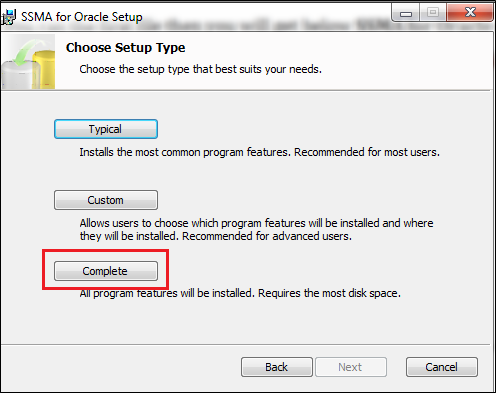
Choose setup types as Complete.
Step 5
Click on the Install button to proceed further.
Step 6
First file has been successfully installed, now need to install extension file.
Step 7
when you ran second file then also you will get Oracle setup wizard, click on next to proceed further
OracleSetup Wizard—->Accept License Terms—-> Choose Complete setup—->Install
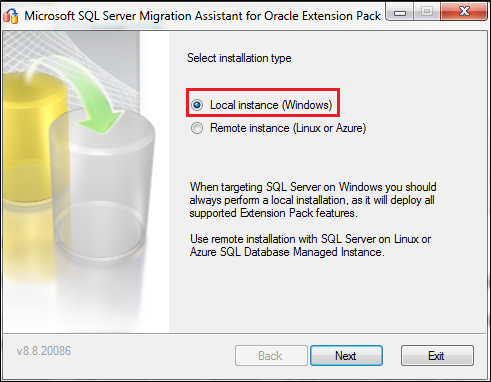
Step 8
after click on the Install tab you will able to see the below window.
Choose Installation type as Local Instance (Windows)
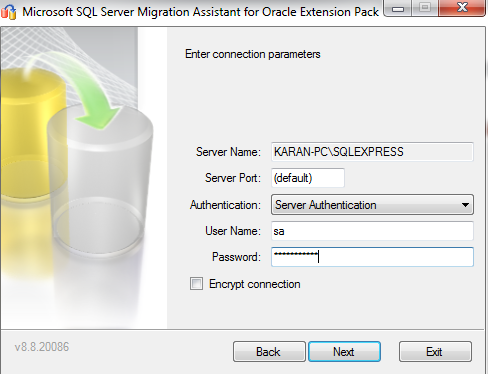
Step 9
Choose database instance, I am using my old instance (SQLEXPRESS) which I was created earlier.

Step 10
Enter Parameter Connection as per your requirement. You can choose either Window or Server Authentication.
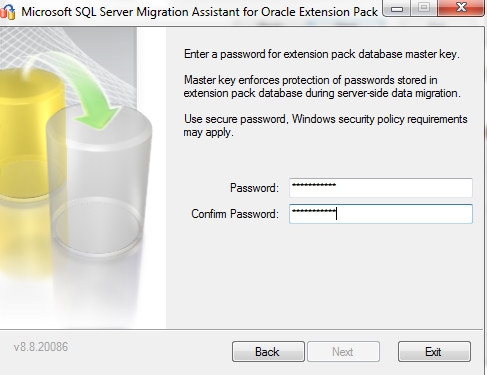
Step 11
Enter extension pack database master key password which is used at the time of server side migration.
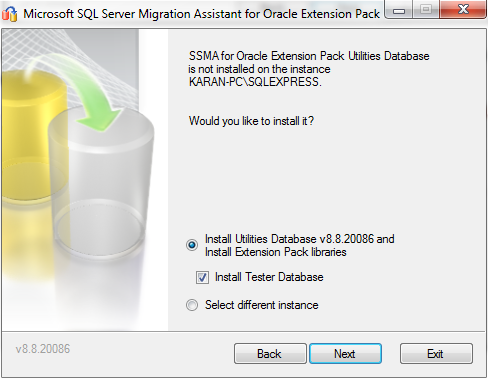
Step 12
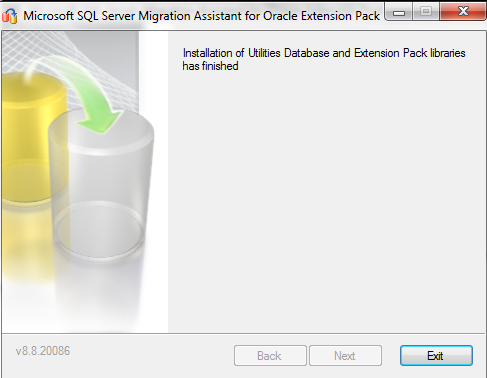
Install the utilities databases for SSMA Oracle Extension Pack.
Step 13
Now you can see the below Execution Process.
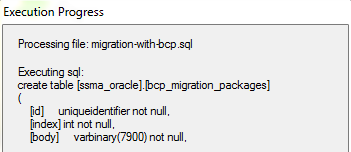
Step 14
Installation has been completed.
7. Connect to the Oracle Database
Now we need to connect Oracle database using SSMA, but before connecting make sure you have done the proper entries in tnsname.ora file.
Step 1
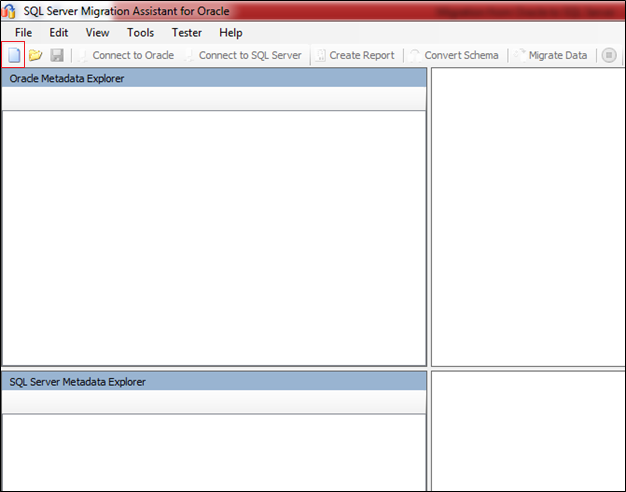
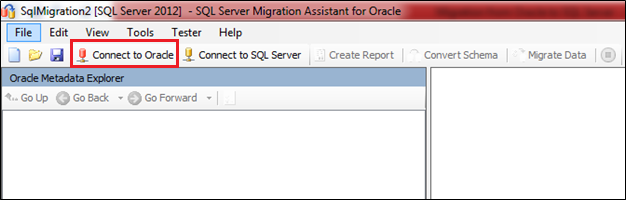
Open the SSMA tool.
Note: – For connection you first need to create the project. Click on the below left icon which has marked in red square.
Step 2
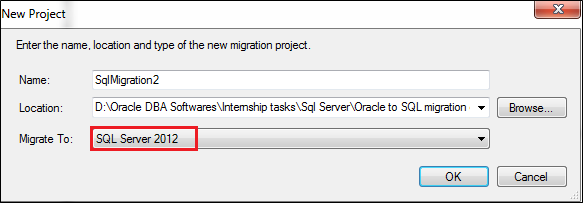
Save your project and make sure you in Migrate To tab select that version which you have installed like in my case I have installed Microsoft SQL Server 2012 so I have selected the same version.
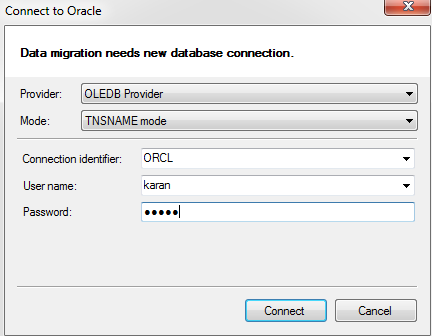
Step 3
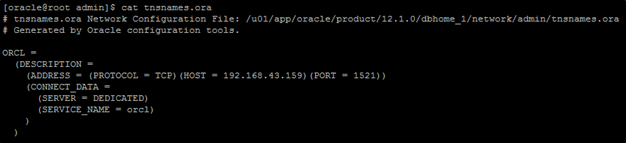
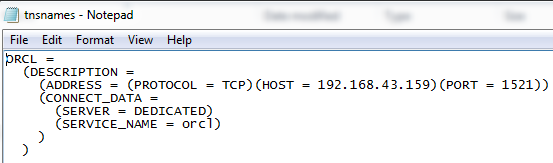
now Click on Connect to Oracle tab and please have a look below tnsnames entry of my Oracle database and Oracle Client.
tnsnames.ora file entry of Oracle Database: –
tnsnames.ora file entry of Oracle Client: –
Step 4
Specify the parameter for connect to Oracle database.
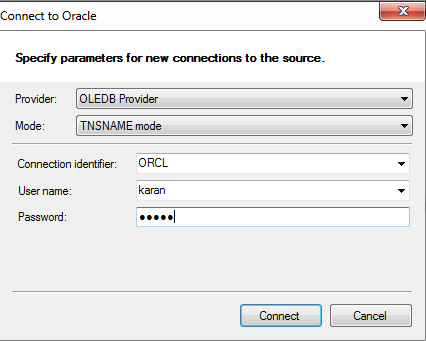
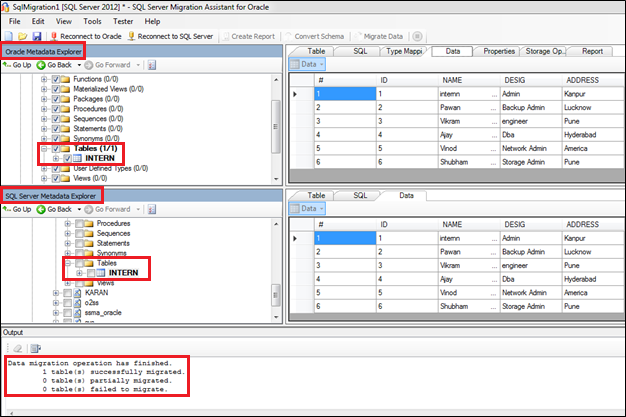
Connection has been established successfully and objects are loading, you can see the status at below right corner.
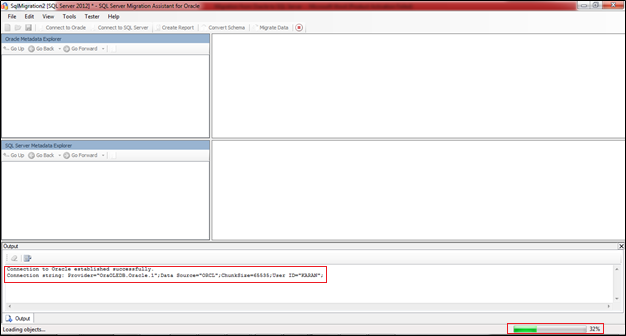
Step 5
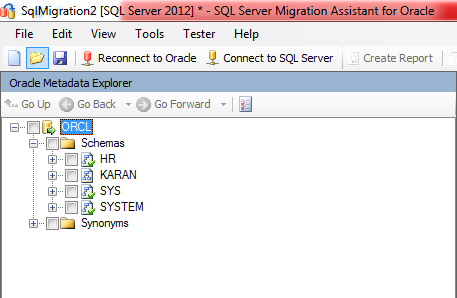
As we can see in below output we are able to see the schemas in Oracle under ORCL database.
8. Connect to the SQL Server Instance
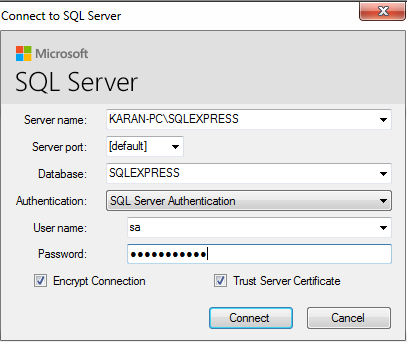
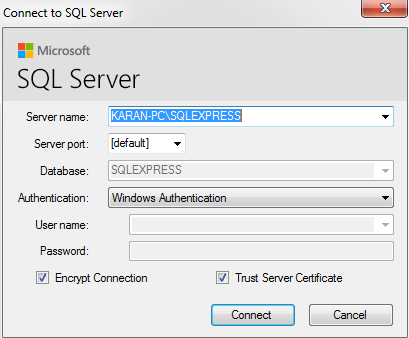
Step 1
now we will connect to the SQL server Instance, Click connect to SQL Server tab and specify the parameter for connection.
Step 2
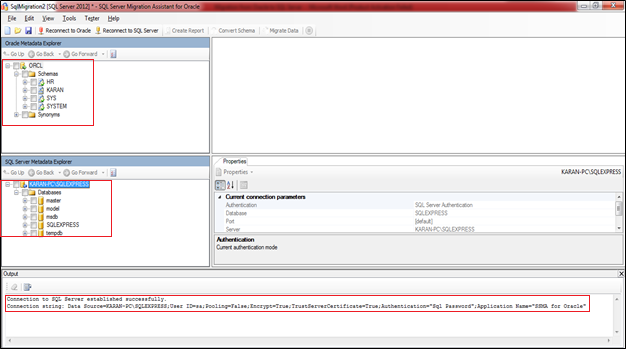
Connection has been successfully established and able to see databases inside SQLEXPRESS Instance.
9. Convert Schema from Oracle to SQL Server
Before Migrating Intern Schema first we need to create Intern user and then give below mandatory permissions.
User Creation: –
SQL> CREATE USER intern IDENTIFIED BY “intern”
DEFAULT TABLESPACE USERS
TEMPORARY TABLESPACE TEMP
ACCOUNT UNLOCK
User created.
Permissions: –
GRANT CONNECT to intern ;
GRANT CREATE ANY PROCEDURE to intern ;
GRANT EXECUTE ANY PROCEDURE to intern ;
GRANT SELECT ANY TABLE to intern ;
GRANT SELECT ANY SEQUENCE to intern ;
GRANT CREATE ANY TYPE to intern ;
GRANT CREATE ANY TRIGGER to intern ;
GRANT SELECT ANY DICTIONARY to intern ;
GRANT CREATE,CONNECT,RESOURCE,DBA to intern;
SQL> conn intern/intern@ORCL
Connected.
Now I will Migrate Intern Schema from Oracle to SQL, to perform Migration from Oracle to SQL Server first we need to Convert Schema from Oracle to SQl Server.
Right click on Intern Schema—>Convert Schema
Note: – This should be performing from Oracle Server side.
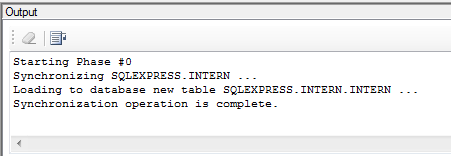
10. Synchronize with the database
Note: – This should be performing from SQL Server side.
Right click on Intern Schema—>Synchronize with database
11. Migration from Oracle to SQL Server
Step 1
Now Final step is the Migration from Oracle to SQL Server.
Note: – This should be performing from Oracle server side.
Right click on Intern Schema—->Migrate Data
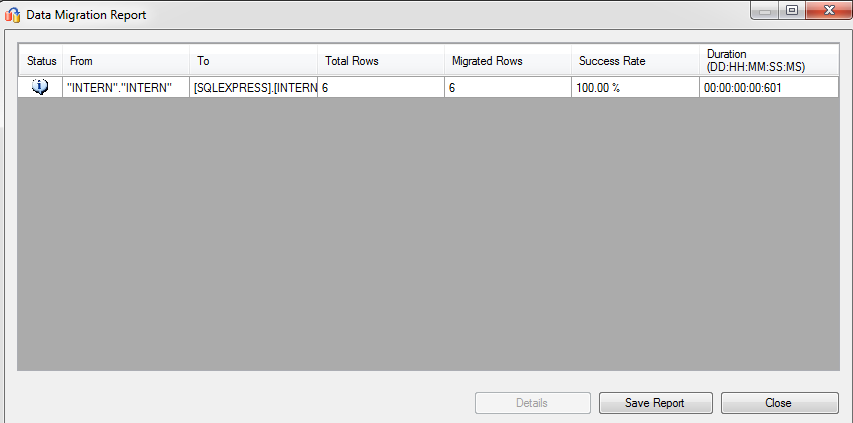
When you click on Migrate Data option then you need to put credentials of Oracle and SQL server.
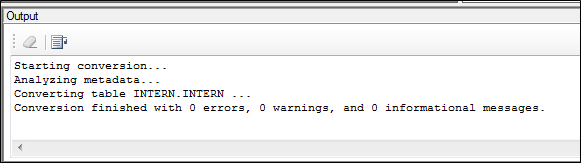
After Migration you will get success report.

Step 2
now connect to the SQL Server Management studio and check whether Intern table has been migrated successfully.
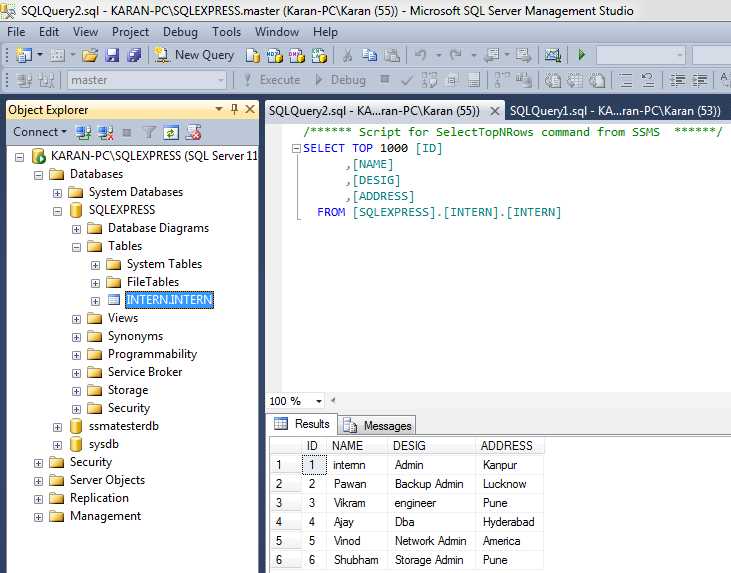
Step 3
Migration from Oracle to SQL Server has been completed successfully.
Thank you for giving your valuable time to read the above information.
Follow us on
Website : www.ktexperts.com
Facebook Page : KTexperts
Linkedin Page : KT EXPERTS