Bootstrap a Node 1 and Deploy Apache Web Server
In this article,we will see Bootstrap a Node 1 and Deploy Apache Web Server.

Attaching a node to chef server is called bootstrapping.
A Chef node is a physical or virtual machine with an operating system that is connected to the Chef server.
Once the node has made the connection to the Chef server, the installed Chef Client can execute Chef cookbooks to configure the machine.
Bootstrapping is the process to connect the node the first time to the Chef server, or to attach it again if the node lost the connectivity to the Chef server.
To be able to bootstrap a node, your workstation needs to have the Chef Development Kit installed.
The kit includes the ‘knife’ command that communicates with the Chef server.
Prepare cookbooks
- see the list of cookbook.
- Move two cookbook to cookbooks of chef-repo directory.
- Remove cookbooks directory.
- Verify the two cookbook inside cookbooks of chef-repo directory.
Bootstrap a node 1
- Check Availability Zone of your workstation.
- Create a Node “Chef-Node-1” by launching instance.
- Open your workstation Linux terminal through putty.
- Switch to root user.
- Go to chef-repo.
- Copy chef-node-1 pem key file “chef.pem” to chef-repo directory of your workstation through WinScp.
- Verify key file “chef.pem” of your node “chef-node-1”.
- Run bootstrap command to bootstrap a node 1.
- Verify bootstrap nodes.
Deploy an Apache Web Server
- open existing recipe “ktexperts-apache-recipe.rb” and write script to create apache web server.
- Upload cookbook to chef server.
- Verify cookbooks in chef server.
- Verify cookbooks in chef server graphically.
- Attatch recipe “ktexperts-apache-recipe’rb” to node “ktexperts-node1”.
- Verify recipe in run list.
- Verify recipe in run list graphically.
- Connect to node 1 “Chef-Node-1” Linux Terminal through putty and run chef-client command.
- Verify the content of node 1 “Chef-Node-1”.
- Modify recipe “ktexperts-apache-recipe.rb”.
- Upload cookbook to chef server.
- Go inside the node 1″Chef-Node-1″ and Run chef-client command.
- Verify the content of node 1 “Chef-Node-1”.
Prepare cookbooks
To see the list of cookbook
we can see two cookbook are being presented in custom cookbooks directory.
|
1 2 |
[root@ip-172-31-42-243 cookbooks]# ls ktexperts-apache-cookbook ktexperts-cookbook |
Move two cookbook to cookbooks of chef-repo directory
|
1 2 |
[root@ip-172-31-42-243 ec2-user]# mv cookbooks/ktexperts-apache-cookbook/ chef-repo/cookbooks/ [root@ip-172-31-42-243 ec2-user]# mv cookbooks/ktexperts-cookbook/ chef-repo/cookbooks/ |
Remove cookbooks directory
|
1 2 3 4 5 6 |
[root@ip-172-31-42-243 ec2-user]# cd cookbooks/ [root@ip-172-31-42-243 cookbooks]# ls [root@ip-172-31-42-243 cookbooks]# cd .. [root@ip-172-31-42-243 ec2-user]# rm -rf cookbooks/ [root@ip-172-31-42-243 ec2-user]# ls chef-repo nodes |
Verify the two cookbook inside cookbooks of chef-repo directory
|
1 2 3 4 5 6 |
[root@ip-172-31-42-243 ec2-user]# cd chef-repo/ [root@ip-172-31-42-243 chef-repo]# ls chef.pem cookbooks README.md roles [root@ip-172-31-42-243 chef-repo]# cd cookbooks/ [root@ip-172-31-42-243 cookbooks]# ls chefignore ktexperts-apache-cookbook ktexperts-cookbook starter |
Bootstrap a node 1
Make sure workstation and node should be same Availability Zone (optional).
Now onwards,Run any commands be inside the chef-rep directory.
Two actions will be done while bootstrapping
Adding node to chef server.
Installing chef package.
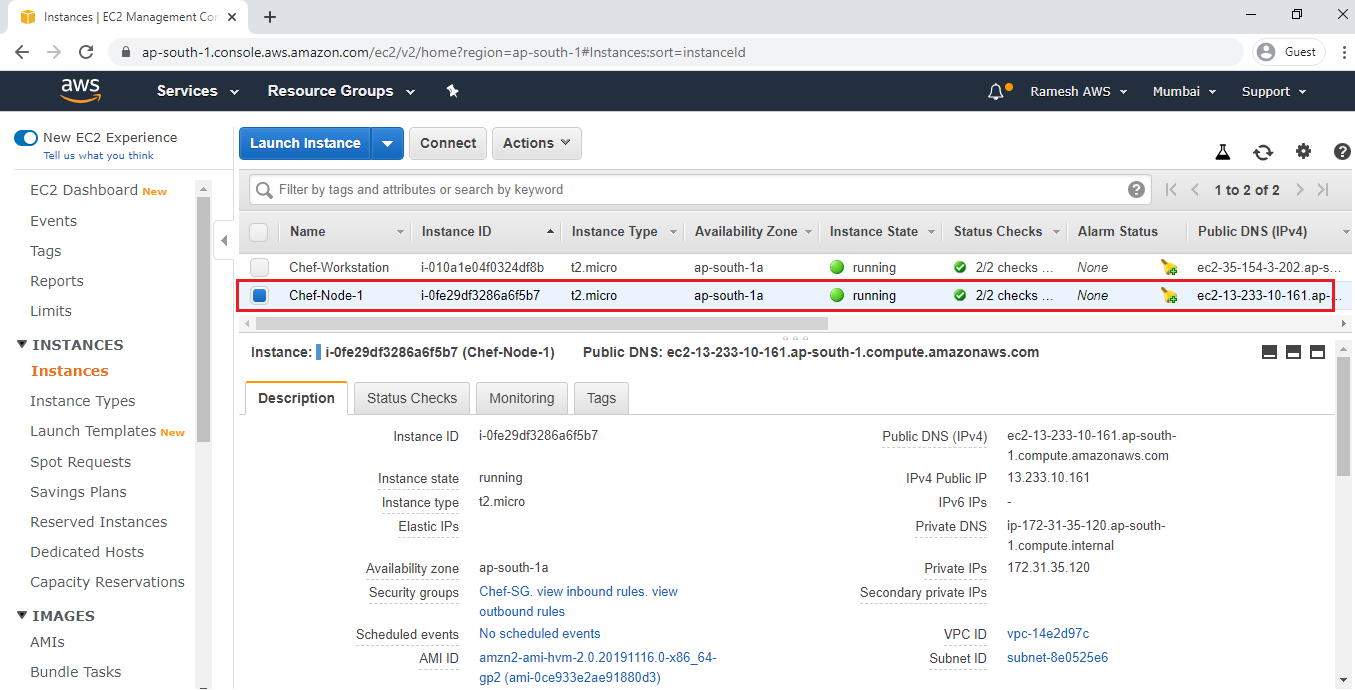
Check Availability Zone of your workstation
we can see the Availability Zone “ap-south-1a” of your workstation.

Note
Workstation is in ap-south-1a AZ.
we create a node in the same Availability Zone “ap-south-1a”.
we need to open SSH and HTTP ports.
Create a Node “Chef-Node-1”
Launch Linux EC2 Instance
Check below link to Launch Linux EC2 Instance.
We can see the node “Chef-Node-1” which was created earlier.
Open your workstation Linux terminal through putty
|
1 2 3 4 5 6 7 8 9 |
Using username "ec2-user". Authenticating with public key "imported-openssh-key" Last login: Fri Dec 27 09:02:29 2019 from 124.123.103.5 __| __|_ ) _| ( / Amazon Linux 2 AMI ___|\___|___| https://aws.amazon.com/amazon-linux-2/ |
Switch to root user
|
1 2 3 |
[ec2-user@ip-172-31-42-243 ~]$ sudo su [root@ip-172-31-42-243 ec2-user]# |
To see the list of files/directories
we can see the chef-repo directory which was copied from local machine(windows) through WinScp Tool.
|
1 2 |
[root@ip-172-31-42-243 ec2-user]# ls chef-repo cookbooks nodes |
Go to chef-repo
|
1 2 |
[root@ip-172-31-42-243 ec2-user]# cd chef-repo/ [root@ip-172-31-42-243 chef-repo]# |
Copy chef-node-1 pem key file “chef.pem” to chef-repo directory of your workstation through WinScp
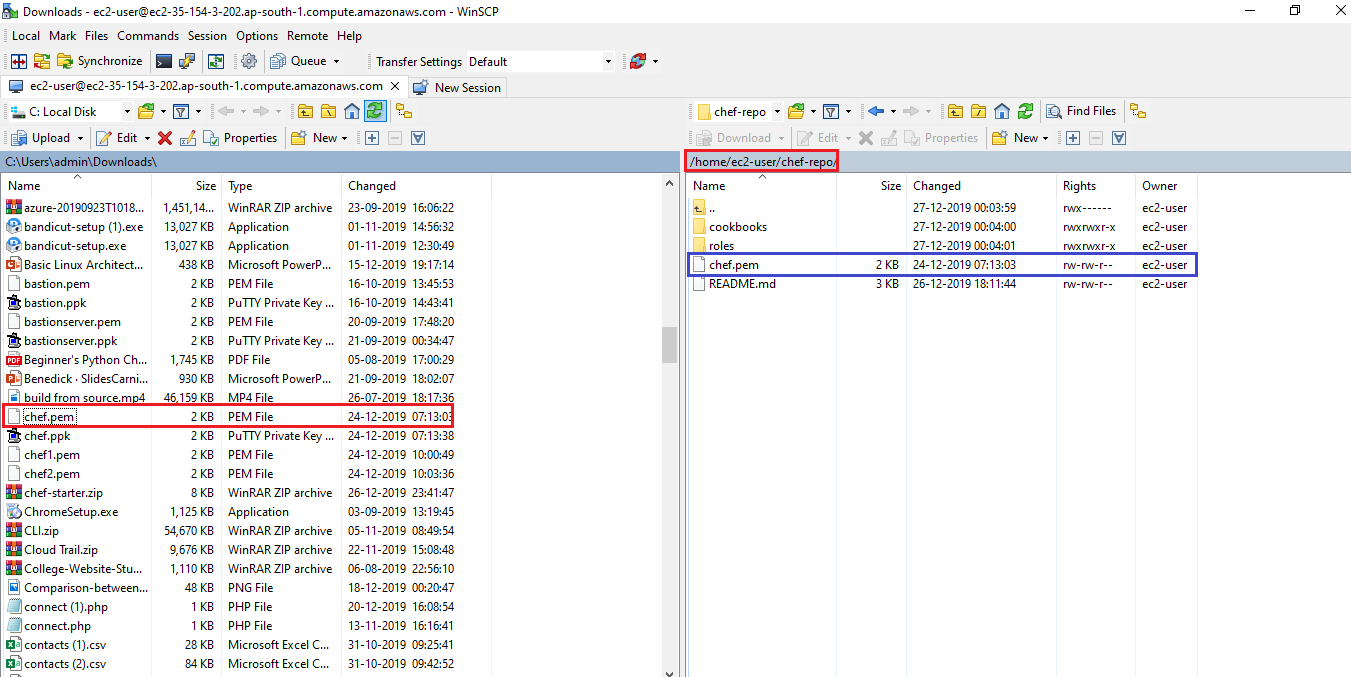
Verify key file “chef.pem” of your node “chef-node-1”
The key file “chef.pem” has been copied to chef-repo directory.
|
1 2 |
[root@ip-172-31-42-243 chef-repo]# ls chef.pem cookbooks README.md roles |
Run bootstrap command to bootstrap a node 1
knife bootstrap 172.31.35.120 –ssh-user ec2-user –sudo -i chef.pem -N ktexperts-node1
Private IP — SSH communication happens internally.
we need mention private IP key file of chef-node-1 .
Copy private IP of chef-node-1
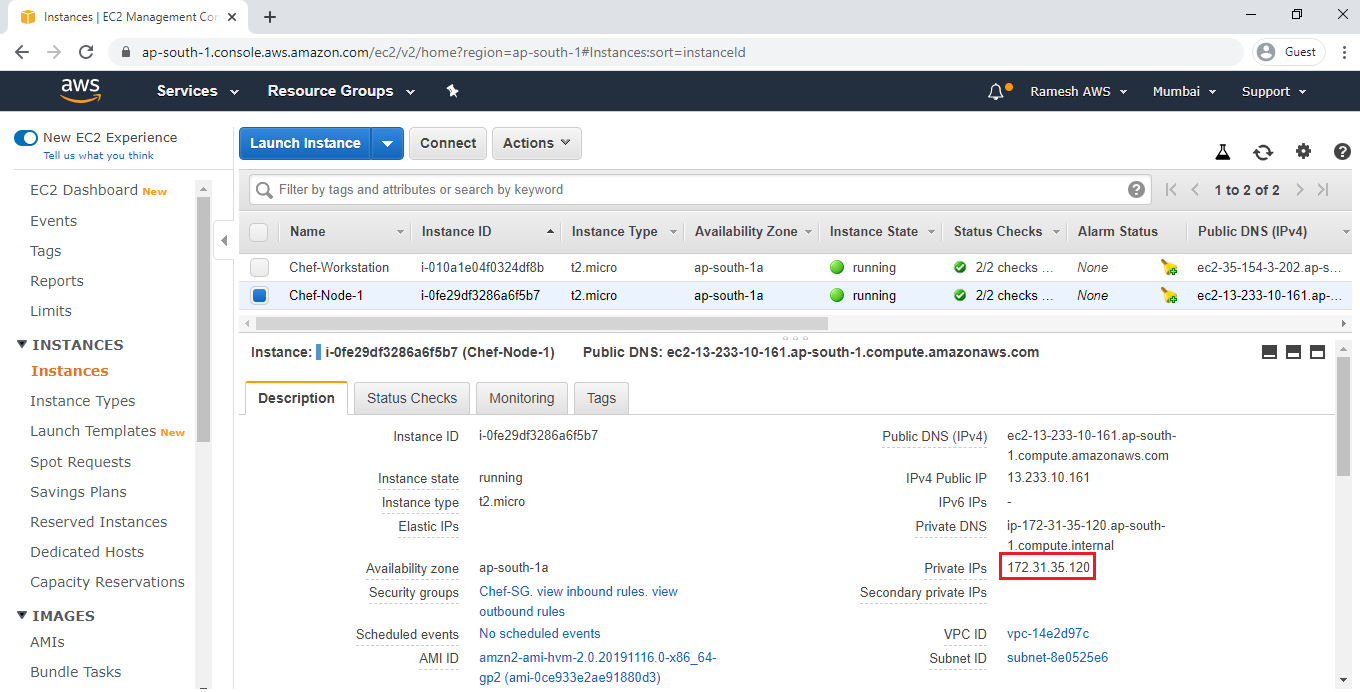
Specify username,private IP(chef-node-1) and pem key “chef.pem” (chef-node-1) in the bootstrap command.
Note
Two actions will be done while bootstrapping.
- Adding node to chef server.
- Installing chef package.
|
1 2 3 4 5 6 7 8 9 10 11 12 13 14 15 16 17 18 19 20 21 22 23 24 25 26 27 28 29 30 31 32 33 34 35 36 37 38 39 40 41 42 43 44 45 46 47 48 49 50 51 52 53 54 55 56 57 58 59 60 61 62 63 64 65 66 67 68 |
[root@ip-172-31-42-243 chef-repo]# knife bootstrap 172.31.35.120 --ssh-user ec2-user --sudo -i chef.pem -N ktexperts-node1 --ssh-user: This flag is deprecated. Use -U/--connection-user instead. Connecting to 172.31.35.120 The authenticity of host '172.31.35.120 ()' can't be established. fingerprint is SHA256:hj3Yl6N2KLclIobNAMYAtSN9rX9VBxUeQ4jQDWJUa1M. Are you sure you want to continue connecting ? (Y/N) Y <strong>Connecting to 172.31.35.120</strong> Creating new client for ktexperts-node1 Creating new node for ktexperts-node1 Bootstrapping 172.31.35.120 [172.31.35.120] -----> <strong>Installing Chef Omnibus (stable/15)</strong> downloading https://omnitruck.chef.io/chef/install.sh to file /tmp/install.sh.3711/install.sh trying wget... [172.31.35.120] el 7 x86_64 Getting information for chef stable 15 for el... downloading https://omnitruck.chef.io/stable/chef/metadata?v=15&p=el&pv=7&m=x86_64 to file /tmp/install.sh.3716/metadata.txt [172.31.35.120] trying wget... [172.31.35.120] sha1 27c8caeb7fcbab3642d3a2c320d2f880a6cf8541 sha256 9cb48fed74779b261a03c34178e375bbbf27860db3641ef5b392f7b1e439414e url https://packages.chef.io/files/stable/chef/15.6.10/el/7/chef-15.6.10-1.el7.x86_64.rpm version 15.6.10 [172.31.35.120] [172.31.35.120] downloaded metadata file looks valid... [172.31.35.120] downloading https://packages.chef.io/files/stable/chef/15.6.10/el/7/chef-15.6.10-1.el7.x86_64.rpm to file /tmp/install.sh.3716/chef-15.6.10-1.el7.x86_64.rpm [172.31.35.120] trying wget... [172.31.35.120] Comparing checksum with sha256sum... [172.31.35.120] Installing chef 15 installing with rpm... [172.31.35.120] warning: [172.31.35.120] /tmp/install.sh.3716/chef-15.6.10-1.el7.x86_64.rpm: Header V4 DSA/SHA1 Signature, key ID 83ef826a: NOKEY [172.31.35.120] Preparing... [172.31.35.120] ######################################## [172.31.35.120] [172.31.35.120] Updating / installing... chef-15.6.10-1.el7 [172.31.35.120] # [172.31.35.120] # [172.31.35.120] # [172.31.35.120] # [172.31.35.120] [172.31.35.120] Thank you for installing Chef Infra Client! For help getting started visit https://learn.chef.io [172.31.35.120] Starting the first Chef Infra Client Client run... [172.31.35.120] +---------------------------------------------+ ✔ 2 product licenses accepted. +---------------------------------------------+ [172.31.35.120] Starting Chef Infra Client, version 15.6.10 [172.31.35.120] [172.31.35.120] resolving cookbooks for run list: [] [172.31.35.120] [172.31.35.120] Synchronizing Cookbooks: [172.31.35.120] [172.31.35.120] Installing Cookbook Gems: Compiling Cookbooks... [2019-12-27T18:39:05+00:00] WARN: Node ktexperts-node1 has an empty run list. [172.31.35.120] Converging 0 resources [172.31.35.120] [172.31.35.120] [172.31.35.120] [172.31.35.120] Running handlers: [172.31.35.120] [172.31.35.120] Running handlers complete [172.31.35.120] Chef Infra Client finished, 0/0 resources updated in 06 seconds [172.31.35.120] |
Verify bootstrap nodes
To the bootstrap nodes
The ktexperts-node1 has added to chef server successfully.
|
1 2 |
[root@ip-172-31-42-243 chef-repo]# knife node list ktexperts-node1 |
Deploy an Apache Web Server
open existing recipe “ktexperts-apache-recipe.rb” and write script to create apache web server
|
1 2 3 4 5 6 7 8 9 10 11 12 13 |
[root@ip-172-31-42-243 chef-repo]# vi cookbooks/ktexperts-apache-cookbook/recipes/ktexperts-apache-recipe.rb package 'httpd' do action :install end file '/var/www/html/index.html' do content "Ktexperts is a knowledge sharing platform" action :create end service 'httpd' do action [ :enable, :start ] |
Note
:wq! — to quit.
Upload cookbook to chef server
|
1 2 3 |
[root@ip-172-31-42-243 chef-repo]# knife cookbook upload ktexperts-apache-cookbook Uploading ktexperts-apache-cookbook [0.1.0] Uploaded 1 cookbook. |
Verify cookbooks in chef server
|
1 2 |
[root@ip-172-31-42-243 chef-repo]# knife cookbook list ktexperts-apache-cookbook 0.1.0 |
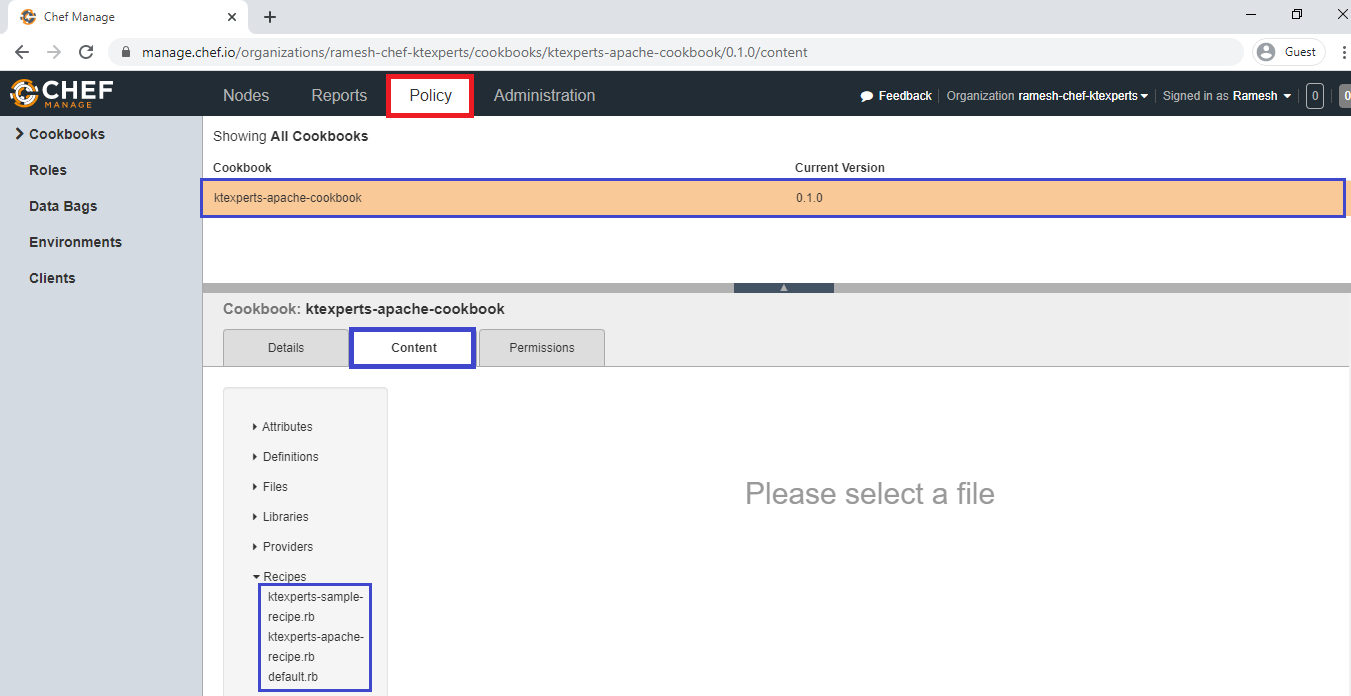
Verify cookbooks in chef server graphically
Attatch recipe “ktexperts-apache-recipe’rb” to node “ktexperts-node1”
|
1 2 3 4 |
[root@ip-172-31-42-243 chef-repo]# knife node run_list set ktexperts-node1 "recipe[ktexperts-apache-cookbook::ktexperts-apache-recipe]" ktexperts-node1: run_list: recipe[ktexperts-apache-cookbook::ktexperts-apache-recipe] |
Verify recipe in run list
|
1 2 3 4 5 6 7 8 9 10 |
[root@ip-172-31-42-243 chef-repo]# knife node show ktexperts-node1 Node Name: ktexperts-node1 Environment: _default FQDN: ip-172-31-35-120.ap-south-1.compute.internal IP: 13.235.135.222 Run List: recipe[ktexperts-apache-cookbook::ktexperts-apache-recipe] Roles: Recipes: Platform: amazon 2 Tags: |
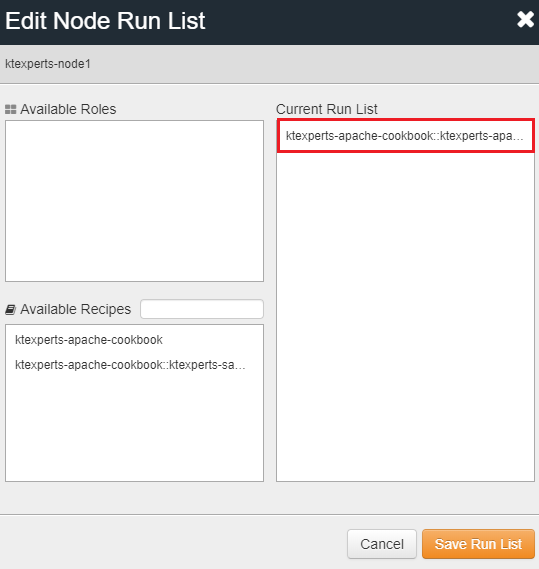
Verify recipe in run list graphically
Go to chef server,
In the Nodes click on Edit Run List.
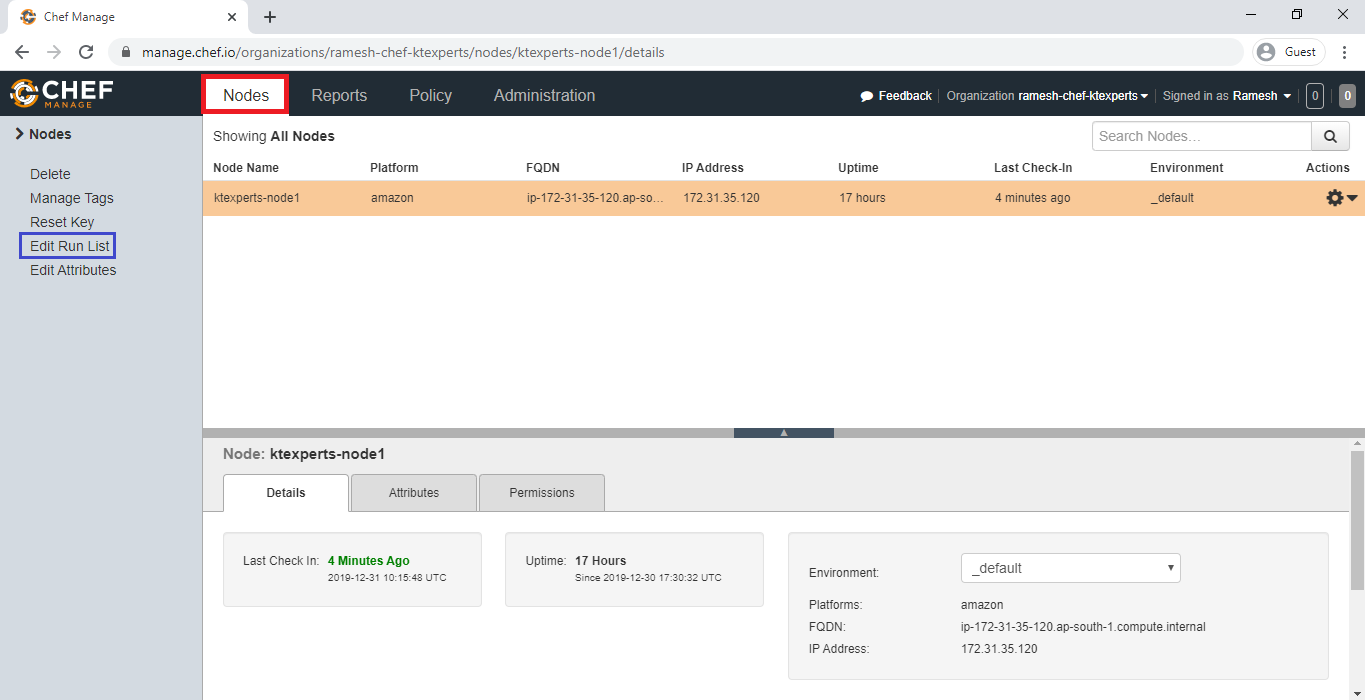
In the Edit Run List, we can see the recipe and their belonging cookbook.
Connect to node 1 “Chef-Node-1” Linux Terminal through putty and run chef-client command
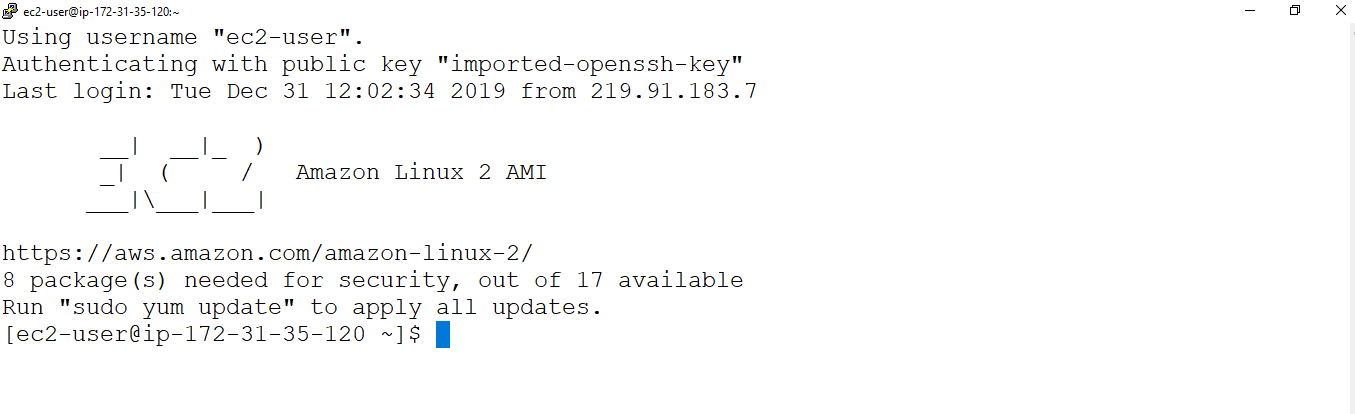
Switch to root user
|
1 2 |
[ec2-user@ip-172-31-35-120 ~]$ sudo su [root@ip-172-31-35-120 ec2-user]# |
Run chef-client
|
1 2 3 4 5 6 7 8 9 10 11 12 13 14 15 16 17 18 19 20 21 22 23 24 25 26 |
[root@ip-172-31-35-120 ec2-user]# chef-client Starting Chef Infra Client, version 15.6.10 resolving cookbooks for run list: ["ktexperts-apache-cookbook::ktexperts-apache-recipe"] Synchronizing Cookbooks: - ktexperts-apache-cookbook (0.1.0) Installing Cookbook Gems: Compiling Cookbooks... Converging 3 resources Recipe: ktexperts-apache-cookbook::ktexperts-apache-recipe * yum_package[httpd] action install - install version 0:2.4.41-1.amzn2.0.1.x86_64 of package httpd * file[/var/www/html/index.html] action create - create new file /var/www/html/index.html - update content in file /var/www/html/index.html from none to d1137a --- /var/www/html/index.html 2019-12-31 11:17:14.523768225 +0000 +++ /var/www/html/.chef-index20191231-7418-1fc2jqs.html 2019-12-31 11:17:14.523768225 +0000 @@ -1 +1,2 @@ +wwww.ktexperts.com * service[httpd] action enable - enable service service[httpd] * service[httpd] action start - start service service[httpd] Running handlers: Running handlers complete Chef Infra Client finished, 4/4 resources updated in 12 seconds |
Note
Once run the chef-client in the node 1 then the node became a Apache Web Server.
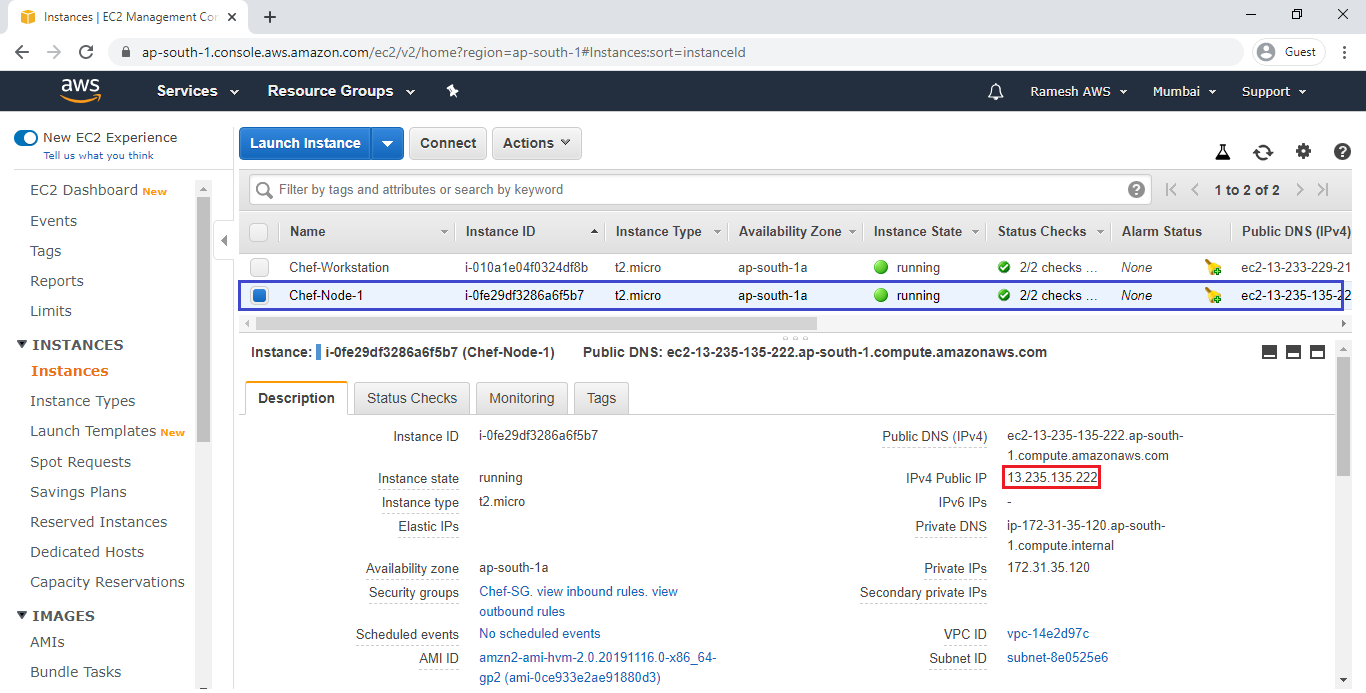
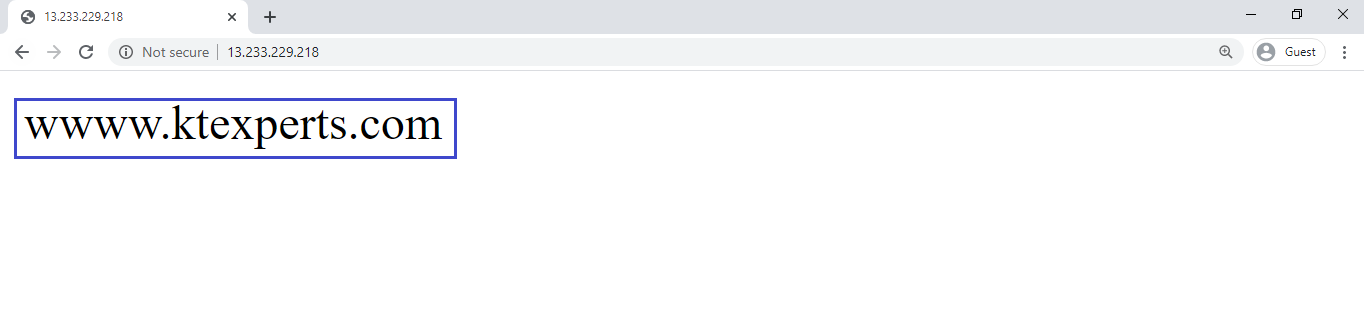
Verify the content of node 1 “Chef-Node-1”
Copy the IPV4 Public IP of node 1″Chef-Node-1″
Search IPV4 Public IP in browser
We can able to see the content of node 1 “Chef-Node-1”
Modify recipe “ktexperts-apache-recipe.rb”
|
1 2 3 4 5 6 7 8 9 10 11 12 13 14 15 16 |
[root@ip-172-31-42-243 chef-repo]# vi cookbooks/ktexperts-apache-cookbook/recipes/ktexperts-apache-recipe.rb package 'httpd' do action :install end file '/var/www/html/index.html' do content "wwww.ktexperts.com && Knowledge sharing platform" action :create end service 'httpd' do action [ :enable, :start ] end |
Note
:wq! — to quit.
Upload cookbook to chef server
we can’t upload individual recipes so,we can upload cookbook that the recipe present inside the cookbook itself.
|
1 2 3 |
[root@ip-172-31-42-243 chef-repo]# knife cookbook upload ktexperts-apache-cookbook Uploading ktexperts-apache-cookbook [0.1.0] Uploaded 1 cookbook. |
Go inside the node 1″Chef-Node-1″ and Run chef-client command
|
1 2 3 4 5 6 7 8 9 10 11 12 13 14 15 16 17 18 19 20 21 22 23 |
[root@ip-172-31-35-120 ec2-user]# chef-client Starting Chef Infra Client, version 15.6.10 resolving cookbooks for run list: ["ktexperts-apache-cookbook::ktexperts-apache-recipe"] Synchronizing Cookbooks: - ktexperts-apache-cookbook (0.1.0) Installing Cookbook Gems: Compiling Cookbooks... Converging 3 resources Recipe: ktexperts-apache-cookbook::ktexperts-apache-recipe * yum_package[httpd] action install (up to date) * file[/var/www/html/index.html] action create - update content in file /var/www/html/index.html from d1137a to 5e527b --- /var/www/html/index.html 2019-12-31 11:17:14.523768225 +0000 +++ /var/www/html/.chef-index20191231-7726-owry0v.html 2019-12-31 11:45:33.736637979 +0000 @@ -1,2 +1,2 @@ -wwww.ktexperts.com +wwww.ktexperts.com && Knowledge sharing platform * service[httpd] action enable (up to date) * service[httpd] action start (up to date) Running handlers: Running handlers complete Chef Infra Client finished, 1/4 resources updated in 09 seconds |
Verify the content of node 1 “Chef-Node-1”
Refresh IPV4 Public IP the browser
we can see the content has been modified successfully.

Key Points
Attaching node to chef server is called bootstrapping.
we should be inside the chef-rep directory and run commands.
Two actions will be done while bootstrapping.
- Adding node to chef server.
- Installing chef package automatically by chef server.
All cookbooks must be inside the cookbooks directory comes by default with chef-repo repo directory to upload to chef server.
Never ever delete the default cookbooks folder comes by default with chef-repo directory.
Note
In this article ,we have seen bootstrap a node.
Open existing recipe and write script to create web server.
By running the chef-client in the node 1 “Chef-Node-1” the node 1 became a web server.
For every time we need to go inside the node 1 “Chef-Node-1” and run the chef-client manually.
Thank you for giving your valuable time to read the above information. Please click here to subscribe for further updates
KTEXPERTS is always active on below social media platforms.
Facebook : https://www.facebook.com/ktexperts/
LinkedIn : https://www.linkedin.com/company/ktexperts/
Twitter : https://twitter.com/ktexpertsadmin
YouTube : https://www.youtube.com/c/ktexperts
Instagram : https://www.instagram.com/knowledgesharingplatform