MySQL to Oracle Heterogeneous Unidirectional Replication using Slave Server Bin log
In this article we will see MySQL to Oracle Heterogeneous Unidirectional Replication using Slave Server Bin log

First setup Master -slave replication between two mysql servers.
Use below link to setup Master-slave Replication
Once data was replicating between two master and slave now do some changes at slave side to replicate data into oracle database.
Before doing changes please check following figure :
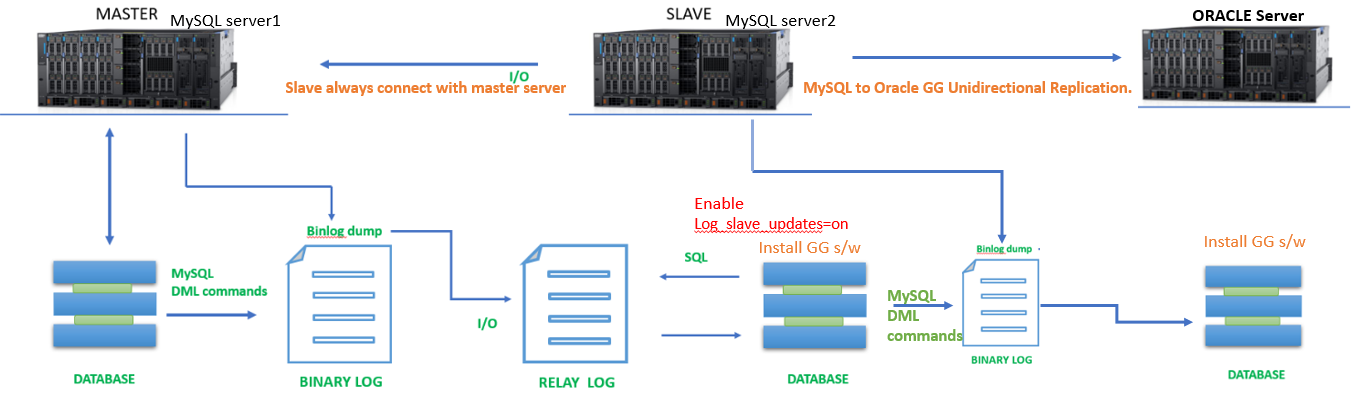
In Above diagram Data will be replicated from Master to Slave server then on slave server we will enable log_slave_updates parameter to push master DML tx’s into binnary log of slave.
Insatll mysql on two machines and keep below line on /etc/my.cnf
|
1 2 3 4 5 |
server-id=1 log-bin=/var/lib/mysql/mgg-bin max_binlog_size=4096 binlog_format=row #socket=/tmp/mysql.sock |
Important lines in MySQL Replication :
–>The slave server always connects with Master server.
–>MySQL Replication works based on Three types threads
Prerequisite for MySQL replication :
Both master and slave should be running with different server id.
Master server should be enabled with binary logs.
Step : 1
Make sure the id of both the servers should be different.
Master Server :
Check server id need to connect mysql and issue following command.
|
1 2 3 4 5 6 7 8 9 10 11 12 |
mysql> show variables like '%server%'; +---------------------------------+--------------------------------------+ | Variable_name | Value | +---------------------------------+--------------------------------------+ | character_set_server | latin1 | | collation_server | latin1_swedish_ci | | innodb_ft_server_stopword_table | | | server_id | 1 | | server_id_bits | 32 | | server_uuid | 5e9e8395-f703-11e8-95f0-0e50a4fa291a | +---------------------------------+--------------------------------------+ 6 rows in set (0.00 sec) |
For master server the id is 1.
Slave Server :
|
1 2 3 4 5 6 7 8 9 10 11 12 |
mysql> show variables like '%server%'; +---------------------------------+--------------------------------------+ | Variable_name | Value | +---------------------------------+--------------------------------------+ | character_set_server | latin1 | | collation_server | latin1_swedish_ci | | innodb_ft_server_stopword_table | | | server_id | 1 | | server_id_bits | 32 | | server_uuid | 64dc54ef-f703-11e8-9440-0e74861bbd76 | +---------------------------------+--------------------------------------+ 6 rows in set (0.00 sec) |
For slave process also the id is same.
If server id is same replication is not possible, so we need change the server id.
How to change sever id :
Open my.cnf file and write
server-id=2
Restart the service and check server id.
|
1 2 3 4 5 6 7 8 9 10 11 12 |
mysql> show variables like '%server%'; +---------------------------------+--------------------------------------+ | Variable_name | Value | +---------------------------------+--------------------------------------+ | character_set_server | latin1 | | collation_server | latin1_swedish_ci | | innodb_ft_server_stopword_table | | | server_id | 2 | | server_id_bits | 32 | | server_uuid | 64dc54ef-f703-11e8-9440-0e74861bbd76 | +---------------------------------+--------------------------------------+ 6 rows in set (0.00 sec) |
There serverid & server uuid will be written for every sql statement in binary logs :
Step 2 :
Check binary log is enabled or not on both side .
Master Server :
|
1 2 3 4 5 6 7 |
mysql> show binary logs; +----------------------------+-----------+ | Log_name | File_size | +----------------------------+-----------+ | ip-172-31-47-50-bin.000002 | 158 | +----------------------------+-----------+ 1 row in set (0.00 sec) |
Slave Server :
|
1 2 3 4 5 6 7 |
mysql> show binary logs; +----------------------------+-----------+ | Log_name | File_size | +----------------------------+-----------+ | ip-172-31-47-50-bin.000002 | 158 | +----------------------------+-----------+ 1 row in set (0.00 sec) |
Step 3 :
In Master side we need to create a user with required privileges.
|
1 2 |
mysql> grant replication slave ,replication client on *.* to replica@'172.31.35.216' identified by 'Replica@123'; Query OK, 0 rows affected, 1 warning (0.01 sec) |
Here i have created a user called replica with privileges called replication slave , replication client.
When we are performing changes to server , content will be added to binary logs.
check binary logs on master.
|
1 2 3 4 5 6 7 |
mysql> show binary logs; +----------------------------+-----------+ | Log_name | File_size | +----------------------------+-----------+ | ip-172-31-47-50-bin.000002 | 472 | +----------------------------+-----------+ 1 row in set (0.00 sec) |
Step 4:
Check ip address of master .
|
1 2 3 |
mysql> \! ip r default via 172.31.32.1 dev eth0 proto dhcp metric 100 172.31.32.0/20 dev eth0 proto kernel scope link src 172.31.47.50 metric 100 |
The Master ip address will be given to server to get binary to slave side.
Slave Server :
execute below line
|
1 2 |
mysql> change master to master_host='172.31.47.50',master_port=3306,master_user='replica',master_password='Replica@123',master_log_file='ip-172-31-47-50-bin.000002',master_log_pos=472; Query OK, 0 rows affected, 2 warnings (0.01 sec) |
What is the use of each variable ?
Master_host –> Need to give master host address
master_port –> Need to write Master mysql db running port number
master_user –> The user which is created for replication and privs
master_password –> Password of that user
master_log_file –> Binary logfile which currently running at master side
master_log_pos –> Binary logfile master log postion
Step 5 :
Check status of slave process at slave side :
The \G rearranges the text to make it more readable.
|
1 2 3 4 5 6 7 8 9 10 11 12 13 14 15 16 17 18 19 20 21 22 23 24 25 26 27 28 29 30 31 32 33 34 35 36 37 38 39 40 41 42 43 44 45 46 47 48 49 50 51 52 53 54 55 56 57 58 59 60 61 62 63 64 |
mysql> show slave status \G *************************** 1. row *************************** Slave_IO_State: Master_Host: 172.31.47.50 Master_User: replica Master_Port: 3306 Connect_Retry: 60 Master_Log_File: ip-172-31-47-50-bin.000002 Read_Master_Log_Pos: 472 Relay_Log_File: ip-172-31-35-216-relay-bin.000001 Relay_Log_Pos: 4 Relay_Master_Log_File: ip-172-31-47-50-bin.000002 Slave_IO_Running: No Slave_SQL_Running: No Replicate_Do_DB: Replicate_Ignore_DB: Replicate_Do_Table: Replicate_Ignore_Table: Replicate_Wild_Do_Table: Replicate_Wild_Ignore_Table: Last_Errno: 0 Last_Error: Skip_Counter: 0 Exec_Master_Log_Pos: 472 Relay_Log_Space: 154 Until_Condition: None Until_Log_File: Until_Log_Pos: 0 Master_SSL_Allowed: No Master_SSL_CA_File: Master_SSL_CA_Path: Master_SSL_Cert: Master_SSL_Cipher: Master_SSL_Key: Seconds_Behind_Master: NULL Master_SSL_Verify_Server_Cert: No Last_IO_Errno: 0 Last_IO_Error: Last_SQL_Errno: 0 Last_SQL_Error: Replicate_Ignore_Server_Ids: Master_Server_Id: 0 Master_UUID: Master_Info_File: /var/lib/mysql/master.info SQL_Delay: 0 SQL_Remaining_Delay: NULL Slave_SQL_Running_State: Master_Retry_Count: 86400 Master_Bind: Last_IO_Error_Timestamp: Last_SQL_Error_Timestamp: Master_SSL_Crl: Master_SSL_Crlpath: Retrieved_Gtid_Set: Executed_Gtid_Set: Auto_Position: 0 Replicate_Rewrite_DB: Channel_Name: Master_TLS_Version: 1 row in set (0.00 sec) In above example, the below two variables are showing NO. Slave_IO_Running: No Slave_SQL_Running: No |
Once we start the slave process, the above two variable will show as yes.
Activate the slave server:
|
1 2 |
mysql> start slave ; Query OK, 0 rows affected (0.00 sec) |
Now check the status again.
|
1 2 3 4 5 6 7 8 9 10 11 12 13 14 15 16 17 18 19 20 21 22 23 24 25 26 27 28 29 30 31 32 33 34 35 36 37 38 39 40 41 42 43 44 45 46 47 48 49 50 51 52 53 54 55 56 57 58 59 60 61 62 63 64 |
mysql> show slave status \G *************************** 1. row *************************** Slave_IO_State: Waiting for master to send event Master_Host: 172.31.47.50 Master_User: replica Master_Port: 3306 Connect_Retry: 60 Master_Log_File: ip-172-31-47-50-bin.000002 Read_Master_Log_Pos: 472 Relay_Log_File: ip-172-31-35-216-relay-bin.000002 Relay_Log_Pos: 330 Relay_Master_Log_File: ip-172-31-47-50-bin.000002 Slave_IO_Running: Yes Slave_SQL_Running: Yes Replicate_Do_DB: Replicate_Ignore_DB: Replicate_Do_Table: Replicate_Ignore_Table: Replicate_Wild_Do_Table: Replicate_Wild_Ignore_Table: Last_Errno: 0 Last_Error: Skip_Counter: 0 Exec_Master_Log_Pos: 472 Relay_Log_Space: 548 Until_Condition: None Until_Log_File: Until_Log_Pos: 0 Master_SSL_Allowed: No Master_SSL_CA_File: Master_SSL_CA_Path: Master_SSL_Cert: Master_SSL_Cipher: Master_SSL_Key: Seconds_Behind_Master: 0 Master_SSL_Verify_Server_Cert: No Last_IO_Errno: 0 Last_IO_Error: Last_SQL_Errno: 0 Last_SQL_Error: Replicate_Ignore_Server_Ids: Master_Server_Id: 1 Master_UUID: 5e9e8395-f703-11e8-95f0-0e50a4fa291a Master_Info_File: /var/lib/mysql/master.info SQL_Delay: 0 SQL_Remaining_Delay: NULL Slave_SQL_Running_State: Slave has read all relay log; waiting for more updates Master_Retry_Count: 86400 Master_Bind: Last_IO_Error_Timestamp: Last_SQL_Error_Timestamp: Master_SSL_Crl: Master_SSL_Crlpath: Retrieved_Gtid_Set: Executed_Gtid_Set: Auto_Position: 0 Replicate_Rewrite_DB: Channel_Name: Master_TLS_Version: 1 row in set (0.00 sec) In above example, the below two variables are changes to yes. Slave_IO_Running: Yes Slave_SQL_Running: Yes |
Step 6 :
Now check Replication is happening master to slave or not.
Master server :
Check database list and create new database.
|
1 2 3 4 5 6 7 8 9 10 |
mysql> show databases; +--------------------+ | Database | +--------------------+ | information_schema | | mysql | | performance_schema | | sys | +--------------------+ 4 rows in set (0.00 sec) |
|
1 2 |
mysql> create database crm ; Query OK, 1 row affected (0.00 sec) |
|
1 2 3 4 5 6 7 8 9 10 11 |
mysql> show databases; +--------------------+ | Database | +--------------------+ | information_schema | | crm | | mysql | | performance_schema | | sys | +--------------------+ 5 rows in set (0.00 sec) |
Use the database crm and create a table.
|
1 2 |
mysql> use crm ; Database changed |
Create table which you want to replicat
|
1 2 |
mysql> create table tab_crm_data(id int); Query OK, 0 rows affected (0.02 sec) |
Now insert the records and check at slave side.
|
1 2 3 4 5 6 7 8 |
mysql> insert into tab_crm_data values(10); Query OK, 1 row affected (0.01 sec) mysql> insert into tab_crm_data values(11); Query OK, 1 row affected (0.01 sec) mysql> insert into tab_crm_data values(12); Query OK, 1 row affected (0.01 sec) |
Step 6:
Slave Server :
IN Slave Sever and check records.
|
1 2 3 4 5 6 7 8 9 10 11 |
mysql> show databases; +--------------------+ | Database | +--------------------+ | information_schema | | crm | | mysql | | performance_schema | | sys | +--------------------+ 5 rows in set (0.00 sec) |
|
1 |
mysql> use crm; |
Reading table information for completion of table and column names
You can turn off this feature to get a quicker startup with -A
|
1 2 3 4 5 6 7 8 9 |
mysql> select * from tab_crm_data; +------+ | id | +------+ | 10 | | 11 | | 12 | +------+ 3 rows in set (0.00 sec) |
Check Relay logs at slave side :
|
1 2 3 4 5 6 7 8 9 10 11 12 13 14 15 16 17 18 19 20 21 |
mysql> show variables like '%data%' -> ; +---------------------------------------+------------------------+ | Variable_name | Value | +---------------------------------------+------------------------+ | character_set_database | latin1 | | collation_database | latin1_swedish_ci | | datadir | /var/lib/mysql/ | | innodb_data_file_path | ibdata1:12M:autoextend | | innodb_data_home_dir | | | innodb_stats_on_metadata | OFF | | innodb_temp_data_file_path | ibtmp1:12M:autoextend | | max_length_for_sort_data | 1024 | | metadata_locks_cache_size | 1024 | | metadata_locks_hash_instances | 8 | | myisam_data_pointer_size | 6 | | performance_schema_max_metadata_locks | -1 | | skip_show_database | OFF | | updatable_views_with_limit | YES | +---------------------------------------+------------------------+ 14 rows in set (0.00 sec) |
mysql> exit
Bye
|
1 2 3 4 5 6 7 8 9 10 11 12 13 14 15 16 17 18 19 20 21 22 23 24 25 26 27 28 29 30 |
[root@ip-172-31-35-216 ~]$ cd /var/lib/mysql [root@ip-172-31-35-216 mysql]# ls -ltr total 122980 -rw-r-----. 1 mysql mysql 50331648 Dec 3 13:57 ib_logfile1 -rw-r-----. 1 mysql mysql 56 Dec 3 13:57 auto.cnf drwxr-x---. 2 mysql mysql 8192 Dec 3 13:57 performance_schema drwxr-x---. 2 mysql mysql 4096 Dec 3 13:57 mysql drwxr-x---. 2 mysql mysql 8192 Dec 3 13:57 sys -rw-------. 1 mysql mysql 1675 Dec 3 13:57 ca-key.pem -rw-r--r--. 1 mysql mysql 1107 Dec 3 13:57 ca.pem -rw-------. 1 mysql mysql 1675 Dec 3 13:57 server-key.pem -rw-r--r--. 1 mysql mysql 1107 Dec 3 13:57 server-cert.pem -rw-------. 1 mysql mysql 1679 Dec 3 13:57 client-key.pem -rw-r--r--. 1 mysql mysql 1107 Dec 3 13:57 client-cert.pem -rw-------. 1 mysql mysql 1675 Dec 3 13:57 private_key.pem -rw-r--r--. 1 mysql mysql 451 Dec 3 13:57 public_key.pem -rw-r-----. 1 mysql mysql 350 Dec 3 14:12 ib_buffer_pool -rw-r-----. 1 mysql mysql 30 Dec 3 14:12 ip-172-31-35-216-bin.index -rw-r-----. 1 mysql mysql 154 Dec 3 14:12 ip-172-31-35-216-bin.000001 -rw-------. 1 mysql mysql 5 Dec 3 14:12 mysql.sock.lock srwxrwxrwx. 1 mysql mysql 0 Dec 3 14:12 mysql.sock -rw-r-----. 1 mysql mysql 12582912 Dec 3 14:12 ibtmp1 -rw-r-----. 1 mysql mysql 218 Dec 3 15:07 ip-172-31-35-216-relay-bin.000001 -rw-r-----. 1 mysql mysql 72 Dec 3 15:07 ip-172-31-35-216-relay-bin.index drwxr-x---. 2 mysql mysql 68 Dec 3 15:09 crm -rw-r-----. 1 mysql mysql 1439 Dec 3 15:09 ip-172-31-35-216-relay-bin.000002 -rw-r-----. 1 mysql mysql 82 Dec 3 15:09 relay-log.info -rw-r-----. 1 mysql mysql 12582912 Dec 3 15:09 ibdata1 -rw-r-----. 1 mysql mysql 50331648 Dec 3 15:09 ib_logfile0 -rw-r-----. 1 mysql mysql 144 Dec 11 15:09 master.info |
In above example we are able to see relay logs with contents and also relay-log.info and master.info files. As of now master to slave replication done
Now we need to do some changes on slave machine before doing installation
Stop the servcie
|
1 |
# service mysqld stop |
Add new parameter on slave server /etc/my.cnf
|
1 |
log_slave_updates=on |
Note : The above parameter to push master tx’s into binnary log of slave.
then start mysql server
|
1 |
# Service mysqld start |
MySQL Slave Server to Oracle Heterogeneous GoldenGate Unidirectional Replication
Node Details :
MySQL Slaver Server (SOURCE)
The MySQL database name is ggadmin, and uses the innodb engine.
The MySQL server name is mysql1.
GG2(TARGET)
192.168.0.40 gg2.orcl.com gg2
Database Name :ORCl
Instance Name : orcl
Download Goldengate Binaries
Download GoldenGate binaries from Oracle.com using below link(Oracle)
https://www.oracle.com/technetwork/middleware/goldengate/downloads/index.html
Make sure that you are using the correct OS version of binaries.
MySQL Slaver Server :
Starting on the MySQL database server, mysql1, install the GoldenGate software.
|
1 2 3 4 5 6 7 8 9 10 11 12 13 14 15 16 17 18 19 20 21 |
[root@mysql ~]# mysql -u root -pWElcome@@1 mysql: [Warning] Using a password on the command line interface can be insecure. Welcome to the MySQL monitor. Commands end with ; or \g. Your MySQL connection id is 6 Server version: 5.7.26 MySQL Community Server (GPL) Copyright (c) 2000, 2019, Oracle and/or its affiliates. All rights reserved. Oracle is a registered trademark of Oracle Corporation and/or its affiliates. Other names may be trademarks of their respective owners. Type 'help;' or '\h' for help. Type '\c' to clear the current input statement. mysql> show databases; +--------------------+ | Database | +--------------------+ | information_schema | | mysql | | performance_schema | | sys | crm | +--------------------+ 5 rows in set (0.00 sec) |
set the Bash_profile
|
1 2 3 |
[root@mysql ~]# vi .bash_profile export MYSQL_HOME=/usr/bin export LD_LIBRARY_PATH=/opt |
Run the bash_profile
unzip the GG s/w
|
1 2 3 4 5 6 7 8 9 10 11 12 13 14 |
[root@mysql opt]# unzip 191000_ggs_Linux_x64_MySQL_64bit.zip Archive: 191000_ggs_Linux_x64_MySQL_64bit.zip inflating: ggs_Linux_x64_MySQL_64bit.tar inflating: OGG-19.1.0.0-README.txt inflating: OGG_WinUnix_Rel_Notes_19.1.0.0.0.pdf [root@mysql opt]# ls -latr total 346208 drwxr-xr-x. 2 root root 6 Oct 30 2018 rh -rw-rw-r--. 1 root root 284221440 May 8 23:54 ggs_Linux_x64_MySQL_64bit.tar -rwxrwxrwx. 1 root root 189027 May 10 16:55 OGG_WinUnix_Rel_Notes_19.1.0.0.0.pdf -rwxrwxrwx. 1 root root 1412 May 10 17:49 OGG-19.1.0.0-README.txt -rw-r--r--. 1 root root 70098487 Jun 1 21:10 191000_ggs_Linux_x64_MySQL_64bit.zip dr-xr-xr-x. 17 root root 224 Jun 6 00:11 .. drwxr-xr-x. 3 root root 172 Jun 6 03:30 . |
untar the file
|
1 2 |
[root@mysql opt]# tar -xvf ggs_Linux_x64_MySQL_64bit.tar Run the ./ggsci command and create sub directories |
|
1 2 3 4 5 6 7 8 9 10 11 12 13 14 15 16 17 18 19 20 |
[root@mysql opt]# ./ggsci Oracle GoldenGate Command Interpreter for MySQL Version 19.1.0.0.0 OGGCORE_19.1.0.0.0_PLATFORMS_190508.1447 Linux, x64, 64bit (optimized), MySQL Enterprise on May 8 2019 20:42:57 Operating system character set identified as UTF-8. Copyright (C) 1995, 2019, Oracle and/or its affiliates. All rights reserved. GGSCI (mysql.orcl.com) 1> create subdirs Creating subdirectories under current directory /opt Parameter file /opt/dirprm: created. Report file /opt/dirrpt: created. Checkpoint file /opt/dirchk: created. Process status files /opt/dirpcs: created. SQL script files /opt/dirsql: created. Database definitions files /opt/dirdef: created. Extract data files /opt/dirdat: created. Temporary files /opt/dirtmp: created. Credential store files /opt/dircrd: created. Masterkey wallet files /opt/dirwlt: created. Dump files /opt/dirdmp: created. |
Check manager sunning or not , If not start the Mgr after specifying the port
|
1 2 3 4 |
GGSCI (mysql.orcl.com) 2> info all Program Status Group Lag at Chkpt Time Since Chkpt MANAGER STOPPED |
|
1 2 3 4 |
GGSCI (mysql.orcl.com) 3> edit param mgr PORT 7811 GGSCI (mysql.orcl.com) 4> start mgr |
|
1 2 3 4 |
GGSCI (mysql.orcl.com) 5> info all Program Status Group Lag at Chkpt Time Since Chkpt MANAGER RUNNING |
Connect as Root user and create users
|
1 2 |
mysql>CREATE USER 'oggadm1'@'localhost' IDENTIFIED BY 'WElcome@@1'; mysql>GRANT ALL PRIVILEGES ON *.* TO 'oggadm1'@'localhost'; |
Create database
Verify that the MySQL ODBC connector is installed. As the root Linux user, run the following package manager query command:
login as root on OS:
rpm -qa odbc
If it doesn’t exist, as root, create the /usr/local/etc/odbc.ini file. Add (or verify) the following in the file:
vi /usr/local/etc/odbc.ini
|
1 2 3 4 5 6 7 8 9 10 11 12 13 |
gedit /usr/local/etc/odbc.ini [ODBC Data Sources] crm = MyODBC 3.51 Driver DSN crm Driver = /usr/lib/libmyodbc3.so Description = Connector/ODBC 3.51 Driver DSN Server = localhost Port = 3306 User = oggadm1 Password = WElcome@@1 Database = crm Option = 3 Socket = /tmp/mysql.sock |
Connect to GGSCI on the Oracle server and create the initial load extract. Since these are small tables, we will use GoldenGate to do the initial load. If these were large tables, we would need to use a different, faster loading method such as load data infile. Also, note that the parameters point to the target (MySQL) database.
Login as oggadm1
|
1 2 |
/opt]# ./ggsci GGSCI>dblogin SourceDB crm, UserID oggadm1, Password WElcome@@1 |
Edit extmysql file
|
1 2 3 4 5 6 7 8 9 10 |
GGSCI (mysql.orcl.com DBLOGIN as oggadm1) 6>edit param extmysql extract extmysql SETENV(MYSQL_HOME='/usr/bin') SETENV(MYSQL_UNIX_PORT='/var/lib/mysql/mysql.sock') dboptions host mysql.orcl.com, connectionport 3306 sourcedb crm, userid oggadm1@mysql, password WElcome@@1 exttrail /opt/dirdat/lt TRANLOGOPTIONS ALTLOGDEST /var/lib/mysql/mgg-bin.index table crm.tab_crm_data; |
Add extract process
|
1 2 |
GGSCI (mysql.orcl.com DBLOGIN as oggadm1) 7> add extract extmysql,tranlog,begin now EXTRACT added. |
Add extrail file to extract process
|
1 2 |
GGSCI (mysql.orcl.com DBLOGIN as oggadm1) 8> add exttrail /opt/dirdat/lt,extract extmysql EXTTRAIL added. |
Start Extract process
|
1 2 3 4 |
GGSCI (mysql.orcl.com DBLOGIN as oggadm1) 9> start extmysql Sending START request to MANAGER ... EXTRACT EXTMYSQL starting |
|
1 2 3 4 |
GGSCI (mysql.orcl.com DBLOGIN as oggadm1) 10> info all Program Status Group Lag at Chkpt Time Since Chkpt MANAGER RUNNING EXTRACT RUNNING EXTMYSQL 00:00:17 00:00:07 |
Add extract process for datapump(dpmysql)
|
1 2 |
GGSCI (mysql.orcl.com DBLOGIN as oggadm1) 11> add extract dpmysql,exttrailsource /opt/dirdat/lt EXTRACT added. |
Add remote trail file
|
1 2 |
GGSCI (mysql.orcl.com DBLOGIN as oggadm1) 12> add rmttrail /oraeng/app/oracle/product/ogg_src/dirdat/my,extract dpmysql RMTTRAIL added. |
Edit Datapump param file
|
1 2 3 4 5 6 |
GGSCI (mysql.orcl.com DBLOGIN as oggadm1) 13> edit param dpmysql EXTRACT DPMYSQL RMTHOST 192.168.0.40,MGRPORT 7809 RMTTRAIL /oraeng/app/oracle/product/ogg_src/dirdat/my PASSTHRU table crm.tab_crm_data; |
Start dpmysql
|
1 2 3 |
GGSCI (mysql.orcl.com DBLOGIN as oggadm1) 14> start dpmysql Sending START request to MANAGER ... EXTRACT DPMYSQL starting |
Check process
|
1 2 3 4 5 |
GGSCI (mysql.orcl.com DBLOGIN as oggadm1) 15> info all Program Status Group Lag at Chkpt Time Since Chkpt MANAGER RUNNING EXTRACT RUNNING DPMYSQL 00:00:00 00:07:21 EXTRACT RUNNING EXTMYSQL 00:00:00 00:00:05 |
Check records
|
1 2 3 4 5 6 7 8 |
mysql> select * from crm.tab_crm_data; +------+ | id | +------+ | 10 | | 11 | | 12 | +------+ |
Master Server :
Insert records from master and check stats on slave ggsci
|
1 |
mysql> insert into crm.tab_crm_data values(13); |
Slave server :
Connect ggsci of mysql and check stats
|
1 2 3 4 5 6 7 8 9 10 11 12 13 14 15 16 17 18 19 20 21 22 23 24 25 26 27 28 29 30 31 32 33 34 35 36 37 38 |
GGSCI (mysql.orcl.com DBLOGIN as oggadm1) 16> stats dpmysql Sending STATS request to EXTRACT DPMYSQL ... Start of Statistics at 2019-06-06 05:33:21. Output to /oraeng/app/oracle/product/ogg_src/dirdat/my: Extracting from oggdb1.DEPT to oggdb1.DEPT: *** Total statistics since 2019-06-06 05:33:00 *** Total inserts 1.00 Total updates 0.00 Total deletes 0.00 Total upserts 0.00 Total discards 0.00 Total operations 1.00 *** Daily statistics since 2019-06-06 05:33:00 *** Total inserts 1.00 Total updates 0.00 Total deletes 0.00 Total upserts 0.00 Total discards 0.00 Total operations 1.00 *** Hourly statistics since 2019-06-06 05:33:00 *** Total inserts 1.00 Total updates 0.00 Total deletes 0.00 Total upserts 0.00 Total discards 0.00 Total operations 1.00 *** Latest statistics since 2019-06-06 05:33:00 *** Total inserts 1.00 Total updates 0.00 Total deletes 0.00 Total upserts 0.00 Total discards 0.00 Total operations 1.00 End of Statistics. |
ORACLE TARGET :
Install GG software in oracle database
Check below link to install GG:
GoldenGate: Oracle to Oracle GoldenGate Unidirectional Replication
Connect to GGSCI:
|
1 2 3 4 5 6 7 8 9 10 11 |
[oracle@ogg ogg_src]$ ./ggsci Oracle GoldenGate Command Interpreter for Oracle Version 19.1.0.0.0 OGGCORE_19.1.0.0.0_PLATFORMS_190508.1447_FBO Linux, x64, 64bit (optimized), Oracle 12c on May 9 2019 06:21:59 Operating system character set identified as UTF-8. Copyright (C) 1995, 2019, Oracle and/or its affiliates. All rights reserved. GGSCI (ogg.orcl.com) 1> info all Program Status Group Lag at Chkpt Time Since Chkpt MANAGER RUNNING |
Login as ggamdin user
|
1 2 |
GGSCI (ogg.orcl.com) 2> dblogin userid ggadmin@orcl,password ggadmin Successfully logged into database |
Create wallet and add credential store to create alias name
|
1 2 3 4 5 6 7 |
GGSCI (ogg.orcl.com) 3> create wallet Created wallet. Opened wallet GGSCI (ogg.orcl.com) 4> add credentialstore Credential store created. GGSCI (ogg.orcl.com) 5> alter credentialstore add user ggadmin@orcl,password ggadmin,alias oggadmin_trg Credential store altered. |
Add Replicat process
|
1 2 |
GGSCI (ogg.orcl.com as ggadmin@orcl) 6> add replicat repmysql,integrated exttrail /oraeng/app/oracle/product/ogg_src/dirdat/my REPLICAT (Integrated) added. |
Edit repmysql param file
|
1 2 3 4 5 6 7 8 9 |
GGSCI (ogg.orcl.com as ggadmin@orcl) 7> edit param repmysql REPLICAT repmysql SETENV(ORACLE_HOME='/oraeng/app/oracle/product/12.1.0') SETENV(ORACLE_SID='orcl') SETENV(TNS_ADMIN='/home/oracle') useridalias oggadmin_trg DBOPTIONS INTEGRATEDPARAMS(parallelism 4) ASSUMETARGETDEFS MAP crm.tab_crm_data,target ktexperts.tab_crm_data; |
Start the replicate process
|
1 2 3 |
GGSCI (ogg.orcl.com as ggadmin@orcl) 8> start repmysql Sending START request to MANAGER ... REPLICAT REPMYSQL starting |
Check the process
|
1 2 3 4 |
GGSCI (ogg.orcl.com as ggadmin@orcl) 10> info all Program Stats Group Lag at Chkpt Time Since Chkpt MANAGER RUNNING REPLICAT RUNNING REPMYSQL 00:00:00 00:00:05 |
Check the stats repmysql
|
1 2 3 4 5 6 7 8 9 10 11 12 13 14 15 16 17 18 19 20 21 22 23 24 25 26 27 28 29 30 31 32 33 34 35 36 37 38 39 40 41 42 43 44 45 46 47 48 |
GGSCI (ogg.orcl.com as ggadmin@orcl) 11> stats repmysql Sending STATS request to REPLICAT REPMYSQL ... Start of Statistics at 2019-06-06 20:16:38. Integrated Replicat Statistics: Total transactions 1.00 Redirected 0.00 Replicated procedures 0.00 DDL operations 0.00 Stored procedures 0.00 Datatype functionality 0.00 Operation type functionality 0.00 Event actions 0.00 Direct transactions ratio 0.00% Replicating from oggdb1.DEPT to KTEXPERTS.DEPT: *** Total statistics since 2019-06-06 20:11:02 *** Total inserts 1.00 Total updates 0.00 Total deletes 0.00 Total upserts 0.00 Total discards 0.00 Total operations 1.00 *** Daily statistics since 2019-06-06 20:11:02 *** Total inserts 1.00 Total updates 0.00 Total deletes 0.00 Total upserts 0.00 Total discards 0.00 Total operations 1.00 *** Hourly statistics since 2019-06-06 20:11:02 *** Total inserts 1.00 Total updates 0.00 Total deletes 0.00 Total upserts 0.00 Total discards 0.00 Total operations 1.00 *** Latest statistics since 2019-06-06 20:11:02 *** Total inserts 1.00 Total updates 0.00 Total deletes 0.00 Total upserts 0.00 Total discards 0.00 Total operations 1.00 End of Statistics. |
Now check the records
|
1 2 3 4 5 6 7 |
SYS>> select * from ktexperts.tab_crm_data; ID ----- 10 11 12 13 |
Insert few more records on master and check table data in Slave and Oracle target.
Thank you for giving your valuable time to read the above information. Please click here to subscribe for further updates
KTEXPERTS is always active on below social media platforms.
Facebook : https://www.facebook.com/ktexperts/
LinkedIn : https://www.linkedin.com/company/ktexperts/
Twitter : https://twitter.com/ktexpertsadmin
YouTube : https://www.youtube.com/c/ktexperts
Instagram : https://www.instagram.com/knowledgesharingplatform