Dear Readers,
In this article, we will see the following Master Slave Configuration in Jenkins.

Steps to Follow :
Master Server:
👉Launch Master Server
👉Install Jenkins
Slave Server:
👉Launch Slave Server
👉Create SSH Password Authentication
👉Install java
👉Generate SSH Key
👉Move the Public SSH Key to Authorized keys
👉Give Permission to the Authorized keys
Master Server:
👉Scan the SSH Key from Slave server and copy to this directory “/var/lib/jenkins/.ssh/”
👉Give permission to file “known_hosts”
👉Logging to Jenkins and Create a Node
👉Create Job and Build Job
👉Verify Console Output
Master Server:
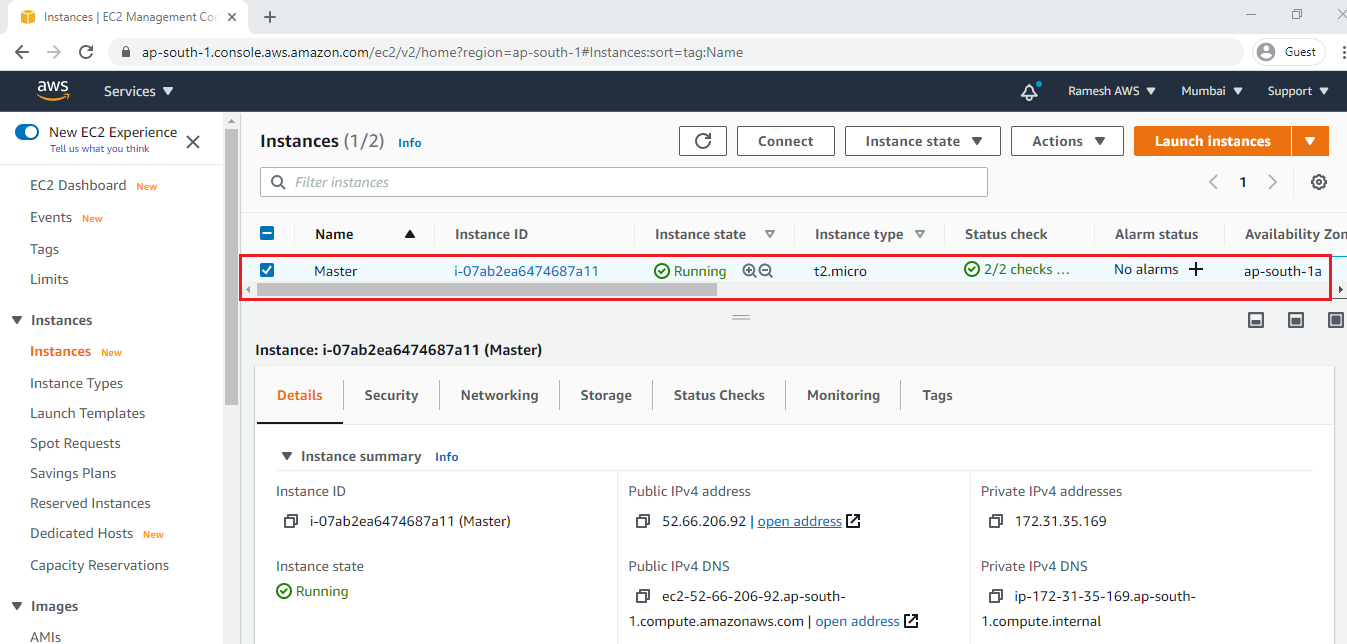
1. Launch Master Server
we need to open SSH,HTTP and 8080 ports.
Please check below link to Launch Linux EC2 Instance.
We can see “master” which was created earlier.
2. Install Jenkins
We can install Jenkins by using below link.
Slave Server:
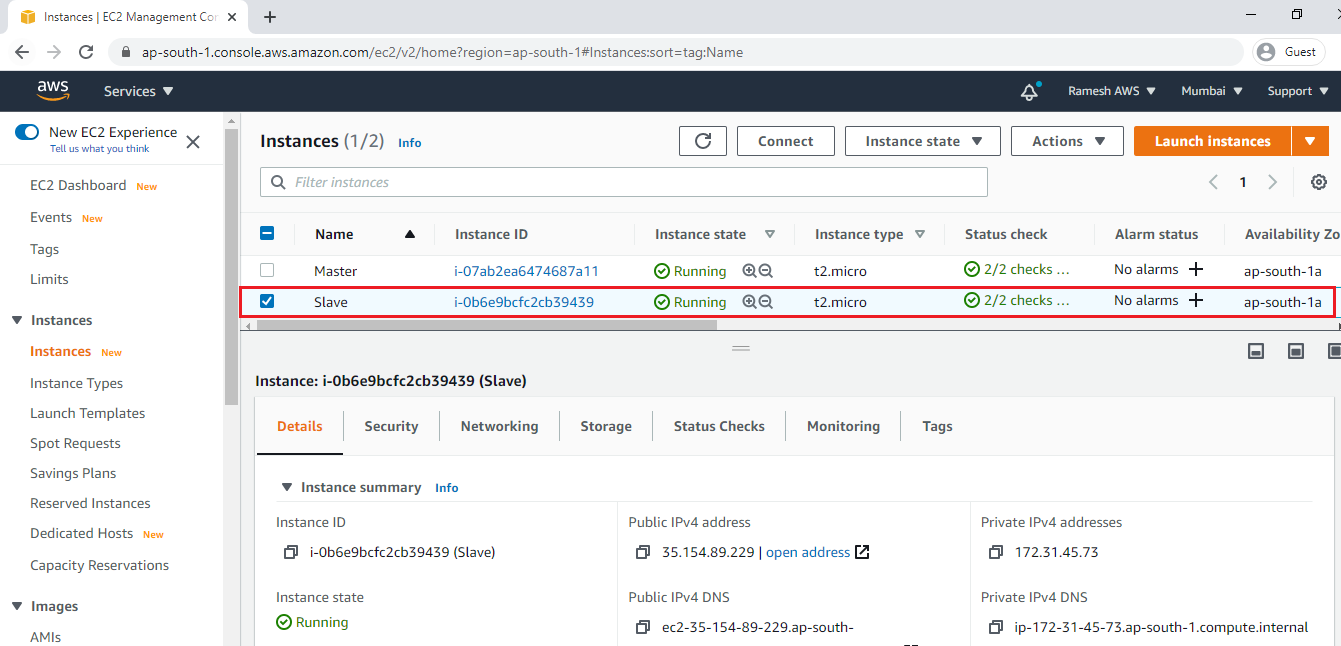
1. Launch Slave Server
we need to open SSH,HTTP and 8080 ports.
Please check below link to Launch Linux EC2 Instance.
We can see “Slave” which was created earlier.
 .
.
Connect to slave server through putty
If you mention -y it will do all the updates automatically otherwise it will wait until hit enter y(yes)
2. Create SSH Password Authentication for Slave Server
Please check below link to create SSH Password Authentication for Slave Server.SSH Password Authentication for Slave Server
3. Install the Java Package
|
1 2 3 4 5 6 7 8 9 10 11 12 13 14 15 16 17 18 19 20 21 22 23 24 25 26 27 28 29 30 31 32 33 34 35 36 37 38 39 40 41 42 43 44 45 46 47 48 49 50 51 52 53 54 55 56 57 58 59 60 61 62 63 64 65 66 67 68 69 70 71 72 73 74 75 76 77 78 79 80 81 82 83 84 85 86 87 88 89 90 91 92 93 94 95 96 97 98 99 100 101 102 103 104 105 106 107 108 109 110 |
[ec2-user@ip-172-31-37-106 ~]$sudo yum -y install java-1.8.0-openjdk Loaded plugins: extras_suggestions, langpacks, priorities, update-motd Resolving Dependencies --> Running transaction check ---> Package java-1.8.0-openjdk.x86_64 1:1.8.0.222.b10-0.amzn2.0.1 will be installed --> Processing Dependency: java-1.8.0-openjdk-headless(x86-64) = 1:1.8.0.222.b10-0.amzn2.0.1 for package: 1:java-1.8.0-openjdk-1.8.0.222.b10-0.amzn2.0.1.x86_64 --> Processing Dependency: xorg-x11-fonts-Type1 for package: 1:java-1.8.0-openjdk-1.8.0.222.b10-0.amzn2.0.1.x86_64 --> Processing Dependency: libpng15.so.15(PNG15_0)(64bit) for package: 1:java-1.8.0-openjdk-1.8.0.222.b10-0.amzn2.0.1.x86_64 --> Processing Dependency: libjvm.so(SUNWprivate_1.1)(64bit) for package: 1:java-1.8.0-openjdk-1.8.0.222.b10-0.amzn2.0.1.x86_64 --> Processing Dependency: libjava.so(SUNWprivate_1.1)(64bit) for package: 1:java-1.8.0-openjdk-1.8.0.222.b10-0.amzn2.0.1.x86_64 --> Processing Dependency: libasound.so.2(ALSA_0.9.0rc4)(64bit) for package: 1:java-1.8.0-openjdk-1.8.0.222.b10-0.amzn2.0.1.x86_64 --> Processing Dependency: libX11.so.6()(64bit) for package: 1:java-1.8.0-openjdk-1.8.0.222.b10-0.amzn2.0.1.x86_64 --> Running transaction check ---> Package alsa-lib.x86_64 0:1.1.4.1-2.amzn2 will be installed ---> Package fontconfig.x86_64 0:2.10.95-11.amzn2.0.2 will be installed --> Processing Dependency: fontpackages-filesystem for package: fontconfig-2.10.95-11.amzn2.0.2.x86_64 --> Processing Dependency: font(:lang=en) for package: fontconfig-2.10.95-11.amzn2.0.2.x86_64 ---> Package giflib.x86_64 0:4.1.6-9.amzn2.0.2 will be installed --> Processing Dependency: libSM.so.6()(64bit) for package: giflib-4.1.6-9.amzn2.0.2.x86_64 --> Processing Dependency: libICE.so.6()(64bit) for package: giflib-4.1.6-9.amzn2.0.2.x86_64 ---> Package gtk2.x86_64 0:2.24.31-1.amzn2.0.2 will be installed --> Processing Dependency: pango >= 1.20.0-1 for package: gtk2-2.24.31-1.amzn2.0.2.x86_64 --> Processing Dependency: libXrandr >= 1.2.99.4-2 for package: gtk2-2.24.31-1.amzn2.0.2.x86_64 --> Processing Dependency: atk >= 1.29.4-2 for package: gtk2-2.24.31-1.amzn2.0.2.x86_64 --> Processing Dependency: hicolor-icon-theme for package: gtk2-2.24.31-1.amzn2.0.2.x86_64 --> Processing Dependency: libXcursor.so.1()(64bit) for package: gtk2-2.24.31-1.amzn2.0.2.x86_64 ---> Package java-1.8.0-openjdk-headless.x86_64 1:1.8.0.222.b10-0.amzn2.0.1 will be installed ---> Package libXfixes.x86_64 0:5.0.3-1.amzn2.0.2 will be installed ---> Package libXinerama.x86_64 0:1.1.3-2.1.amzn2.0.2 will be installed ---> Package libglvnd.x86_64 1:1.0.0-1.amzn2.0.2 will be installed ---> Package mesa-libEGL.x86_64 0:17.2.3-8.20171019.amzn2.0.4 will be installed --> Processing Dependency: mesa-libgbm = 17.2.3-8.20171019.amzn2.0.4 for package: mesa-libEGL-17.2.3-8.20171019.amzn2.0.4.x86_64 --> Processing Dependency: libxshmfence.so.1()(64bit) for package: mesa-libEGL-17.2.3-8.20171019.amzn2.0.4.x86_64 --> Processing Dependency: libwayland-server.so.0()(64bit) for package: mesa-libEGL-17.2.3-8.20171019.amzn2.0.4.x86_64 --> Processing Dependency: libwayland-client.so.0()(64bit) for package: mesa-libEGL-17.2.3-8.20171019.amzn2.0.4.x86_64 --> Processing Dependency: libgbm.so.1()(64bit) for package: mesa-libEGL-17.2.3-8.20171019.amzn2.0.4.x86_64 ---> Package mesa-libGL.x86_64 0:17.2.3-8.20171019.amzn2.0.4 will be installed --> Processing Dependency: mesa-libglapi = 17.2.3-8.20171019.amzn2.0.4 for package: mesa-libGL-17.2.3-8.20171019.amzn2.0.4.x86_64 --> Processing Dependency: libglapi.so.0()(64bit) for package: mesa-libGL-17.2.3-8.20171019.amzn2.0.4.x86_64 --> Processing Dependency: libXxf86vm.so.1()(64bit) for package: mesa-libGL-17.2.3-8.20171019.amzn2.0.4.x86_64 ---> Package python-lxml.x86_64 0:3.2.1-4.amzn2.0.2 will be installed --> Running transaction check ---> Package libXxf86vm.x86_64 0:1.1.4-1.amzn2.0.2 will be installed ---> Package libwayland-client.x86_64 0:1.14.0-2.amzn2.0.1 will be installed ---> Package libwayland-server.x86_64 0:1.14.0-2.amzn2.0.1 will be installed ---> Package libxshmfence.x86_64 0:1.2-1.amzn2.0.2 will be installed ---> Package mesa-libgbm.x86_64 0:17.2.3-8.20171019.amzn2.0.4 will be installed ---> Package mesa-libglapi.x86_64 0:17.2.3-8.20171019.amzn2.0.4 will be installed --> Finished Dependency Resolution Dependencies Resolved ========================================================================================================================================= Package Arch Version Repository Size ========================================================================================================================================= Installing: java-1.8.0-openjdk x86_64 1:1.8.0.222.b10-0.amzn2.0.1 amzn2-core 274 k Installing for dependencies: alsa-lib x86_64 1.1.4.1-2.amzn2 amzn2-core 425 k atk x86_64 2.22.0-3.amzn2.0.2 amzn2-core 258 k avahi-libs x86_64 0.6.31-19.amzn2 amzn2-core 62 k cairo x86_64 1.14.8-2.amzn2.0.2 amzn2-core 718 k copy-jdk-configs noarch 3.3-10.amzn2 amzn2-core 21 k cups-libs x86_64 1:1.6.3-40.amzn2 amzn2-core 355 k fontconfig x86_64 2.10.95-11.amzn2.0.2 amzn2-core 231 k fontpackages-filesystem noarch 1.44-8.amzn2 amzn2-core 10 k gdk-pixbuf2 x86_64 2.36.5-1.amzn2.0.2 amzn2-core 567 k Transaction Summary ========================================================================================================================================= Install 1 Package (+62 Dependent packages) Total download size: 46 M Installed size: 145 M Downloading packages: (1/63): alsa-lib-1.1.4.1-2.amzn2.x86_64.rpm | 425 kB 00:00:00 (2/63): avahi-libs-0.6.31-19.amzn2.x86_64.rpm | 62 kB 00:00:00 (3/63): atk-2.22.0-3.amzn2.0.2.x86_64.rpm | 258 kB 00:00:00 (4/63): copy-jdk-configs-3.3-10.amzn2.noarch.rpm | 21 kB 00:00:00 (5/63): cairo-1.14.8-2.amzn2.0.2.x86_64.rpm | 718 kB 00:00:00 (6/63): cups-libs-1.6.3-40.amzn2.x86_64.rpm | 355 kB 00:00:00 (7/63): fontconfig-2.10.95-11.amzn2.0.2.x86_64.rpm | 231 kB 00:00:00 (8/63): fontpackages-filesystem-1.44-8.amzn2.noarch.rpm | 10 kB 00:00:00 (9/63): gdk-pixbuf2-2.36.5-1.amzn2.0.2.x86_64.rpm | 567 kB 00:00:00 (10/63): giflib-4.1.6-9.amzn2.0.2.x86_64.rpm | 40 kB 00:00:00 Installed: java-1.8.0-openjdk.x86_64 1:1.8.0.222.b10-0.amzn2.0.1 Dependency Installed: alsa-lib.x86_64 0:1.1.4.1-2.amzn2 atk.x86_64 0:2.22.0-3.amzn2.0.2 avahi-libs.x86_64 0:0.6.31-19.amzn2 cairo.x86_64 0:1.14.8-2.amzn2.0.2 copy-jdk-configs.noarch 0:3.3-10.amzn2 cups-libs.x86_64 1:1.6.3-40.amzn2 fontconfig.x86_64 0:2.10.95-11.amzn2.0.2 fontpackages-filesystem.noarch 0:1.44-8.amzn2 gdk-pixbuf2.x86_64 0:2.36.5-1.amzn2.0.2 giflib.x86_64 0:4.1.6-9.amzn2.0.2 graphite2.x86_64 0:1.3.10-1.amzn2.0.2 gtk-update-icon-cache.x86_64 0:3.22.26-4.amzn2 gtk2.x86_64 0:2.24.31-1.amzn2.0.2 harfbuzz.x86_64 0:1.3.2-1.amzn2.0.2 hicolor-icon-theme.noarch 0:0.12-7.amzn2 jasper-libs.x86_64 0:1.900.1-33.amzn2 java-1.8.0-openjdk-headless.x86_64 1:1.8.0.222.b10-0.amzn2.0.1 javapackages-tools.noarch 0:3.4.1-11.amzn2 libICE.x86_64 0:1.0.9-9.amzn2.0.2 libSM.x86_64 0:1.2.2-2.amzn2.0.2 libX11.x86_64 0:1.6.5-2.amzn2.0.2 libX11-common.noarch 0:1.6.5-2.amzn2.0.2 libXau.x86_64 0:1.0.8-2.1.amzn2.0.2 libXcomposite.x86_64 0:0.4.4-4.1.amzn2.0.2 libXcursor.x86_64 0:1.1.15-1.amzn2 libXdamage.x86_64 0:1.1.4-4.1.amzn2.0.2 libXext.x86_64 0:1.3.3-3.amzn2.0.2 libXfixes.x86_64 0:5.0.3-1.amzn2.0.2 libXfont.x86_64 0:1.5.2-1.amzn2.0.2 libXft.x86_64 0:2.3.2-2.amzn2.0.2 libXi.x86_64 0:1.7.9-1.amzn2.0.2 libXinerama.x86_64 0:1.1.3-2.1.amzn2.0.2 libXrandr.x86_64 0:1.5.1-2.amzn2.0.2 libXrender.x86_64 0:0.9.10-1.amzn2.0.2 Complete! |
Verify Version of Java
|
1 2 3 4 |
[ec2-user@ip-172-31-37-106 ~]$sudo java -version openjdk version "1.8.0_222" OpenJDK Runtime Environment (build 1.8.0_222-b10) OpenJDK 64-Bit Server VM (build 25.222-b10, mixed mode) |
4. Generate SSH Key
|
1 2 3 4 5 6 7 8 9 10 11 12 13 14 15 16 17 18 |
[ec2-user@ip-172-31-37-106 ~]$ sudo ssh-keygen -t rsa -N "" -f /root/.ssh/id_rsa Generating public/private rsa key pair. Your identification has been saved in /root/.ssh/id_rsa. Your public key has been saved in /root/.ssh/id_rsa.pub. The key fingerprint is: SHA256:Er+hQXoJ1bF0MC9kZs152ljE0PPnY7mGe01fFpCWstE root@ip-172-31-37-106.ap-south-1.compute.internal The key's randomart image is: +---[RSA 2048]----+ | ..X=o*o o | | . *.=+o*E | | . o o .*=o. | | + + .o.. ...| | . = S oo| | . + o +=| | . . oo*| | . +o| | .+ | +----[SHA256]-----+ |
Verify SSH Key
|
1 2 3 4 5 6 7 |
[ec2-user@ip-172-31-37-106 ~]$ sudo su [root@ip-172-31-37-106 .ssh]# [root@ip-172-31-37-106 .ssh]# ll total 12 -rw------- 1 root root 545 Nov 6 16:40 authorized_keys -rw------- 1 root root 1679 Nov 6 17:00 id_rsa -rw-r--r-- 1 root root 431 Nov 6 17:00 id_rsa.pub |
6. Move the Public SSH Key to Authorized keys
|
1 2 3 4 5 6 7 8 9 10 11 |
[root@ip-172-31-37-106 .ssh]# cat id_rsa.pub > authorized_keys [root@ip-172-31-37-106 .ssh]# cat authorized_keys ssh-rsa AAAAB3NzaC1yc2EAAAADAQABAAABAQCvcBBUJM/ q3UewCivSYSHO4hZiQoG2QKfuKwiDt/T/iwmHjM509boch5 kh3XHQlKy3BI1WqmApkN2cimfdX3HTSfR362CS258A/0tW+ TGsJ4KZhP7EFZL/UobwYWICdJugwGrVuKViMp9yfD3PZMow H4SmNsZdmBmxA0C3eRn8wRxtV6WxpdkQhlUL2wlsGUy7ZSk IyIBNtqxqKzC4xEfk3r5GHI8vzHUPuZtA+brL8ZyeMLPWlK 7ltPTZuQCPVSYCXh0dK96ZBW/QWMm3n6b1VBn+VKFYdGTee ZMpRobgMOVPRlNraNl65OcqIwwNHjAOy49apjv/bQ2pTOK1 6u7r root@ip-172-31-37-106.ap-south-1.compute.internal |
Give Permission to the Authorized keys
|
1 2 3 4 5 6 |
[root@ip-172-31-37-106 .ssh]# chmod 777 authorized_keys [root@ip-172-31-37-106 .ssh]# ll total 12 -rwxrwxrwx 1 root root 431 Nov 6 17:08 authorized_keys -rw------- 1 root root 1679 Nov 6 17:00 id_rsa -rw-r--r-- 1 root root 431 Nov 6 17:00 id_rsa.pub |
Master Server:
Go inside the master server
Create a directory /var/lib/jenkins/.ssh for storing the key
|
1 |
[ec2-user@ip-172-31-11-227 ~]$ sudo mkdir -p /var/lib/jenkins/.ssh |
1. Scan the SSH Key from Slave server and copy to this directory “/var/lib/jenkins/.ssh/”
|
1 |
[ec2-user@ip-172-31-11-227 .ssh]$ sudo su<br />[root@ip-172-31-11-227 .ssh]# ssh-keyscan -H 13.127.84.35 >>/var/lib/jenkins/.ssh/known_hosts<br /># 13.127.84.35:22 SSH-2.0-OpenSSH_7.4<br /># 13.127.84.35:22 SSH-2.0-OpenSSH_7.4<br /># 13.127.84.35:22 SSH-2.0-OpenSSH_7.4 |
2. Give permission to file “known_hosts”
|
1 2 3 4 |
[ec2-user@ip-172-31-11-227 .ssh]$<br />[ec2-user@ip-172-31-11-227 .ssh]$sudo chmod 777 known_hosts [ec2-user@ip-172-31-11-227 .ssh]$<br />$ ll total 4 -rwxrwxrwx 1 root root 806 Nov 6 17:40 known_hosts |
Make Directory in slave server
|
1 2 3 4 5 6 |
[ec2-user@ip-172-31-37-106 ~]$ sudo mkdir slave [ec2-user@ip-172-31-37-106 ~]$ pwd /home/ec2-user [ec2-user@ip-172-31-37-106 ~]$ cd slave/ [ec2-user@ip-172-31-37-106 slave]$ pwd /home/ec2-user/slave |
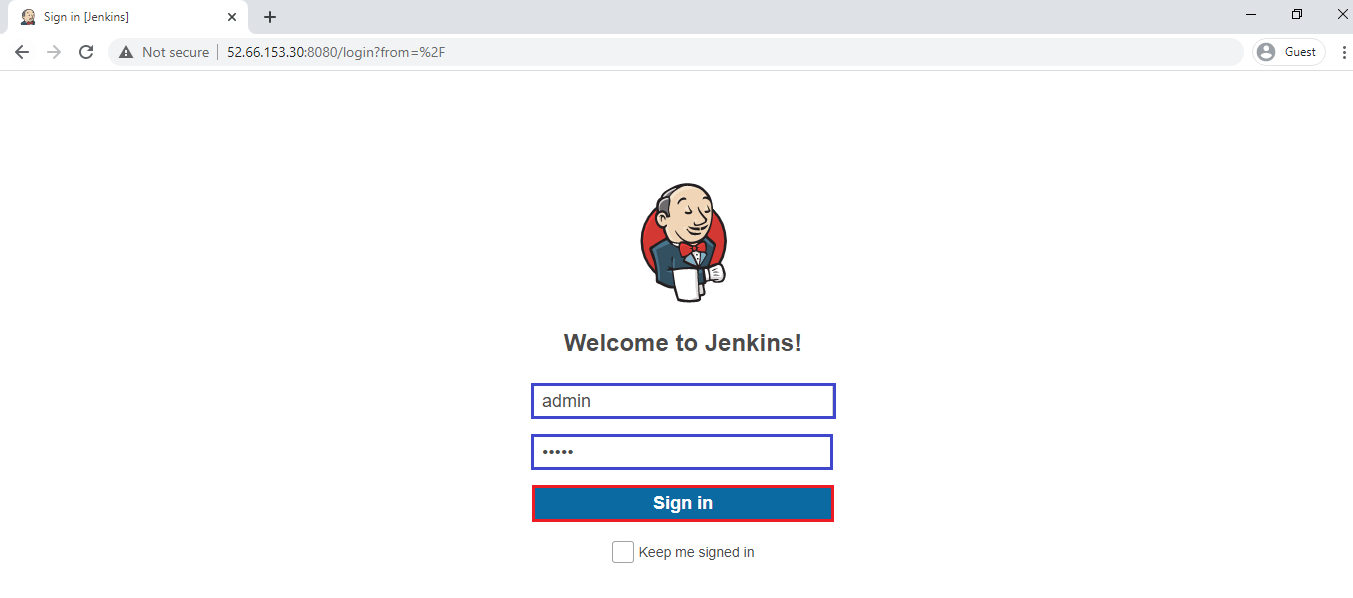
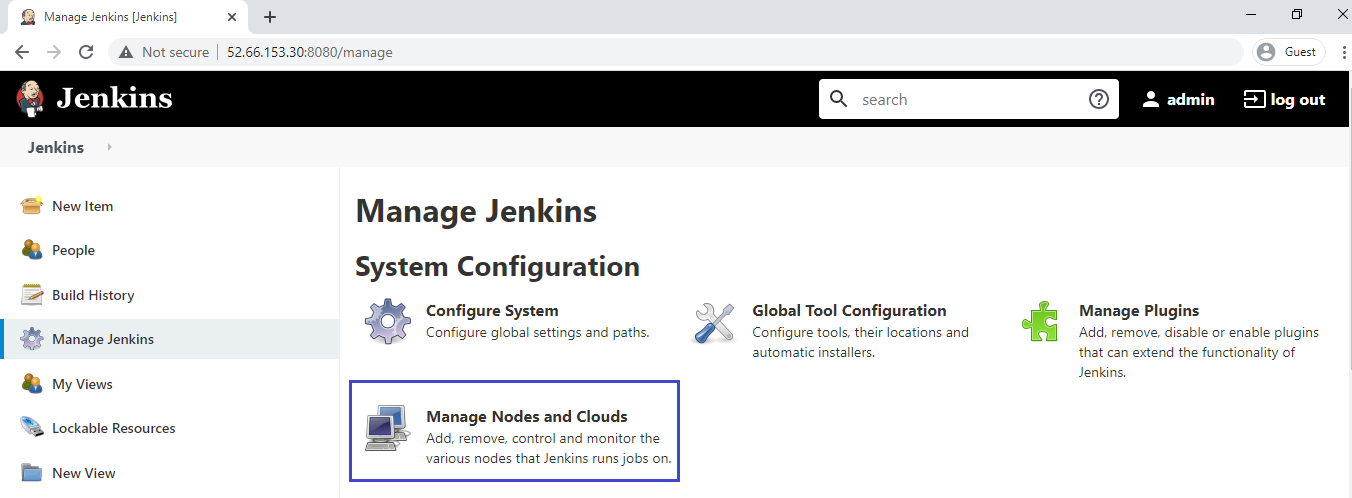
3. Logging to Jenkins
Specify username and password for logging to Jenkins.
Click on Manage Jenkins.
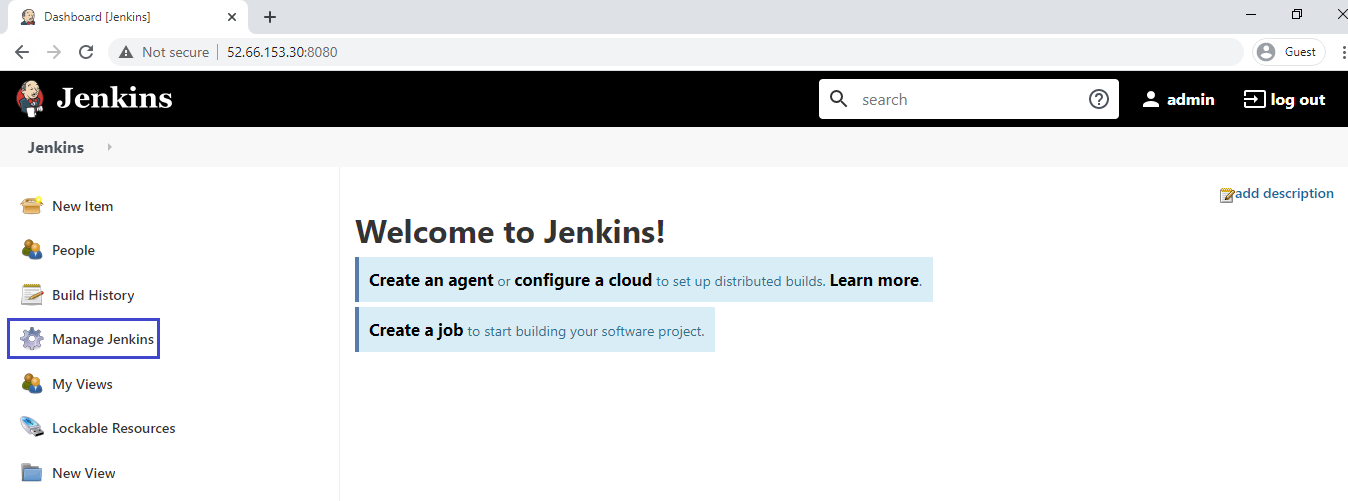
Click on Manage Nodes and Clouds.
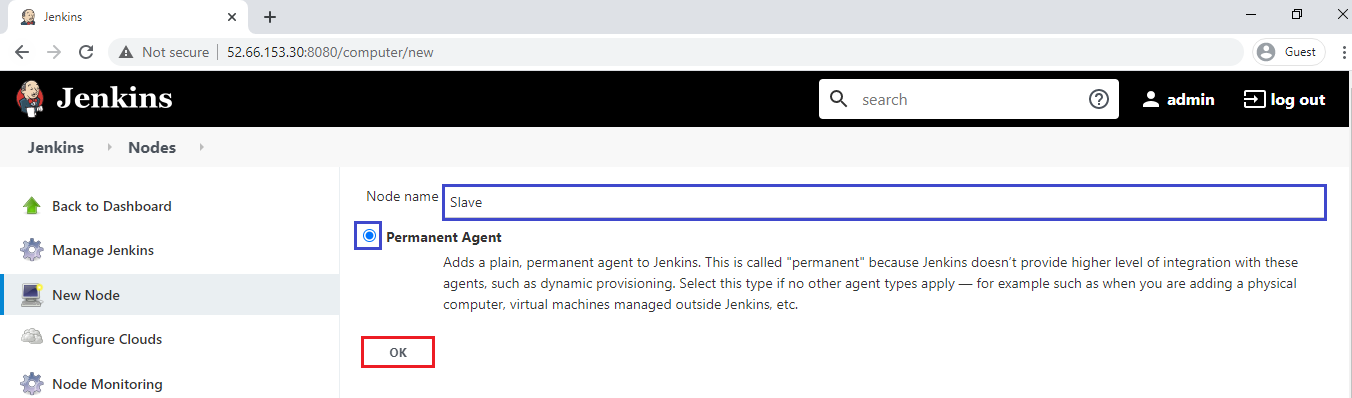
4. Create New Node
Click on Create a New Node.

Specify Node Name “Slave” and select Permanent Agent and click on ok.
Specify Remote root directory “/home/ec2-user/slave” ,Usage “Use this node as much as possible”,Launch method “Lanch agents via SSH”.
We need to provide slave server public IP in the Host and provide credentials of slave server by clicking add.

Specify slave server username and password and click on Add.
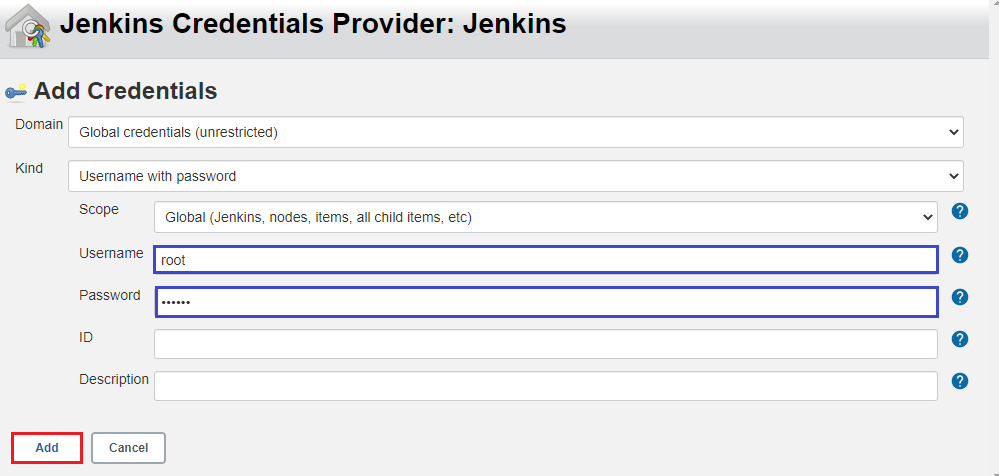
Select root in the credentials and click on Save.
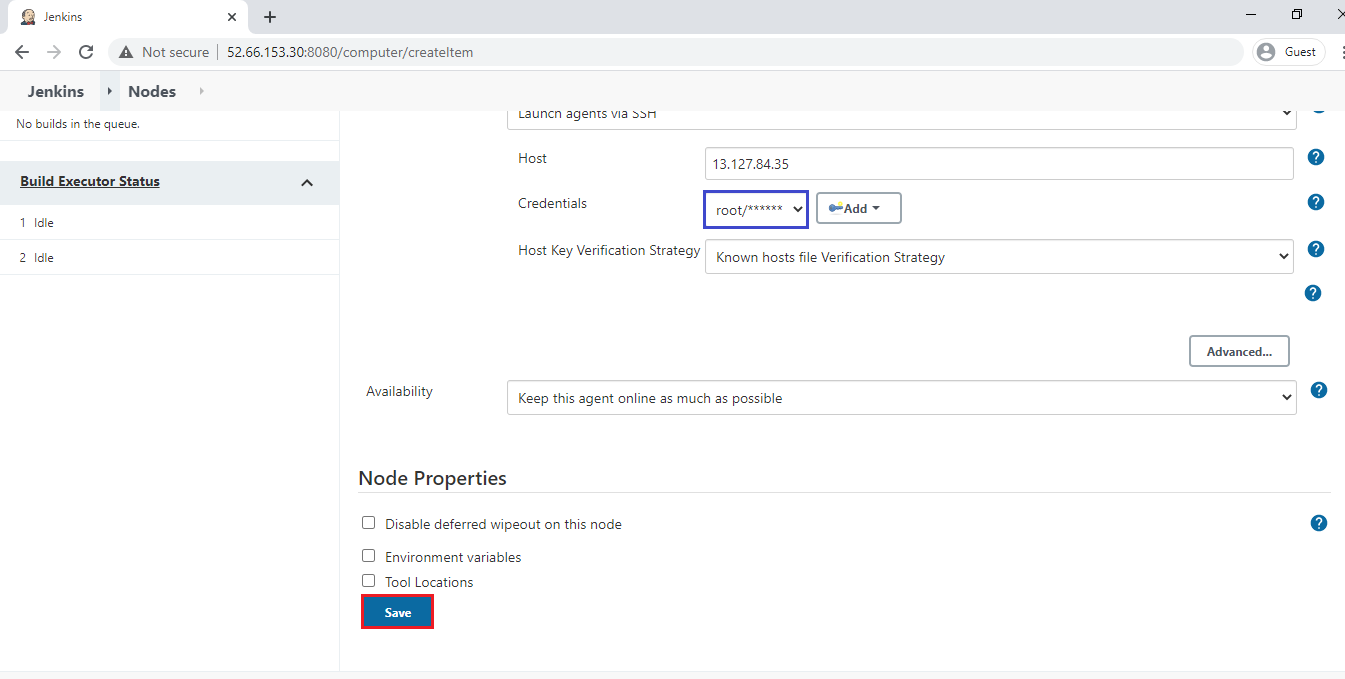
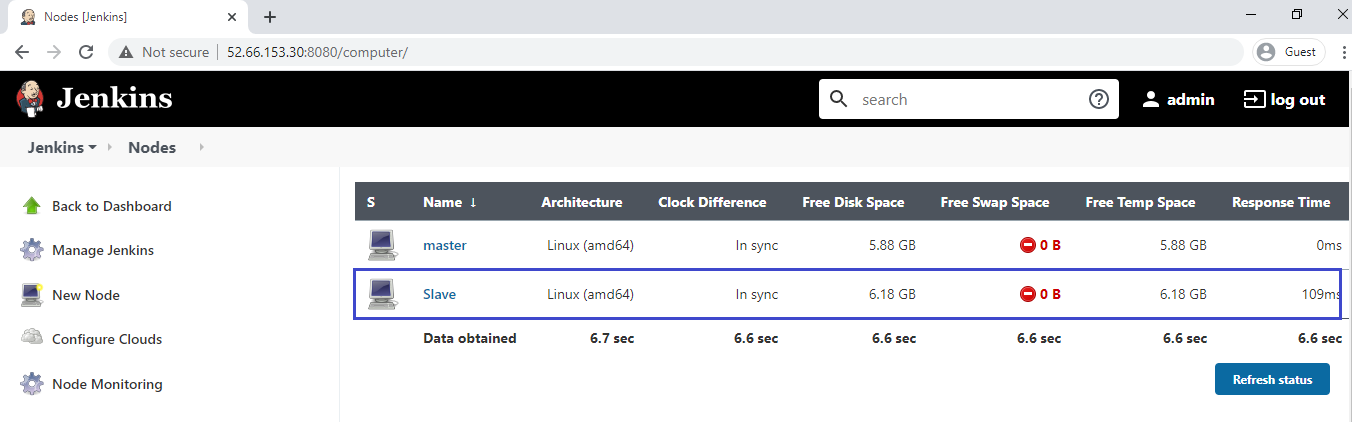
we can see the slave node has created successfully.
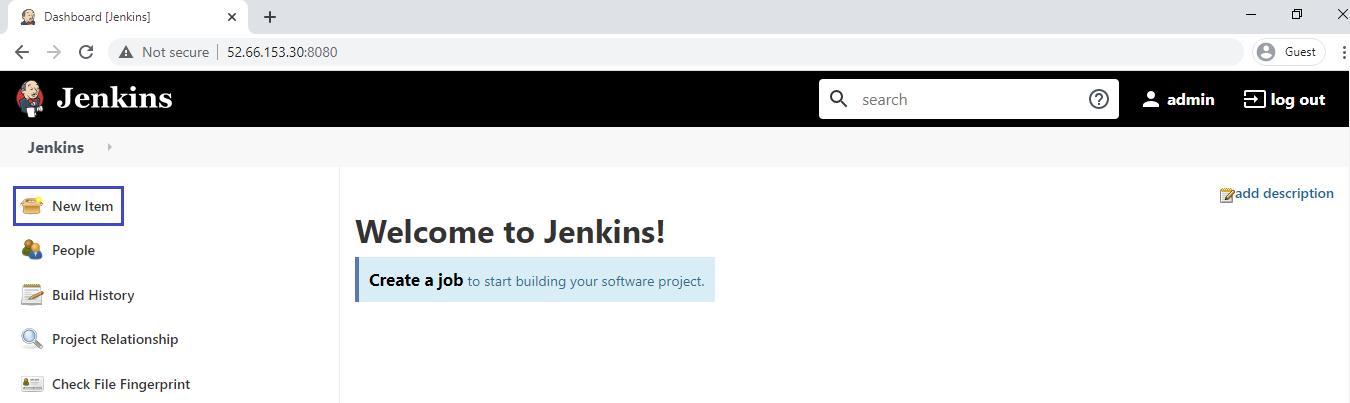
5. Create a Job
Go to Jenkins dashboard ,click on New item.
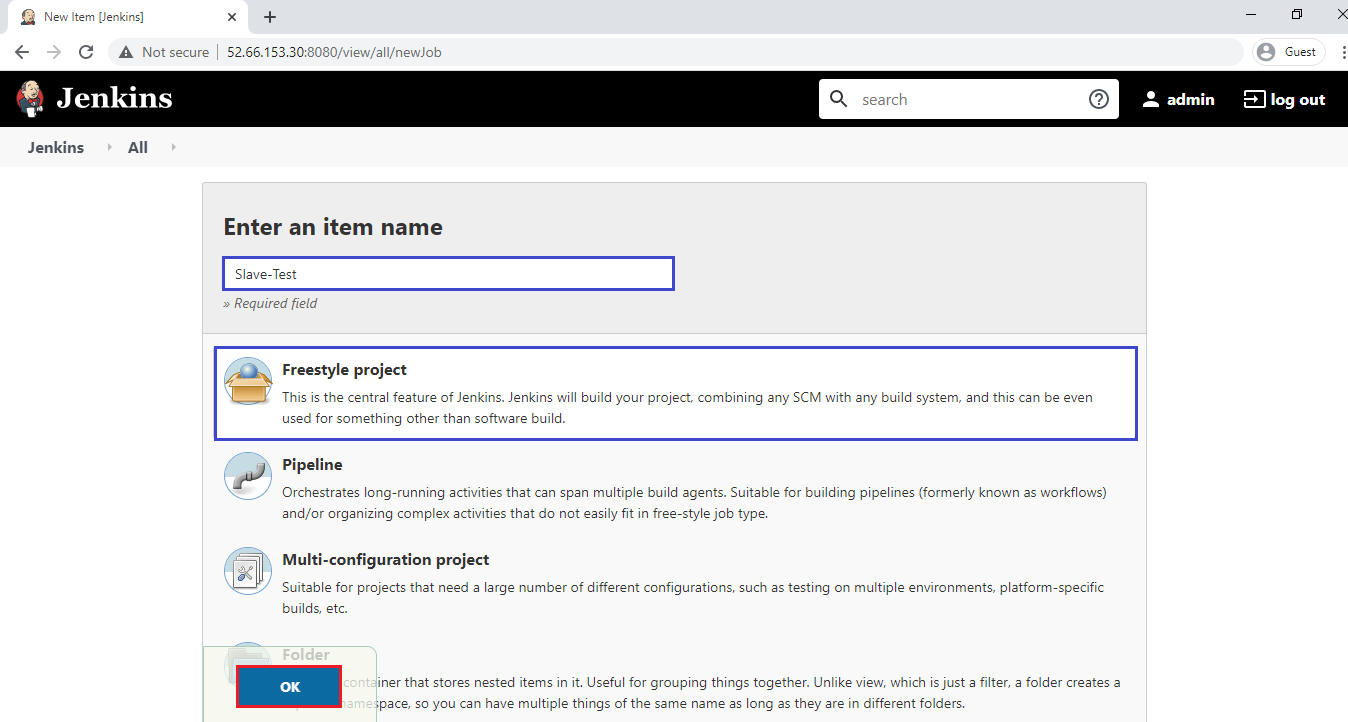
Specify item name “Slave-Test” and select Free style project and click Ok.
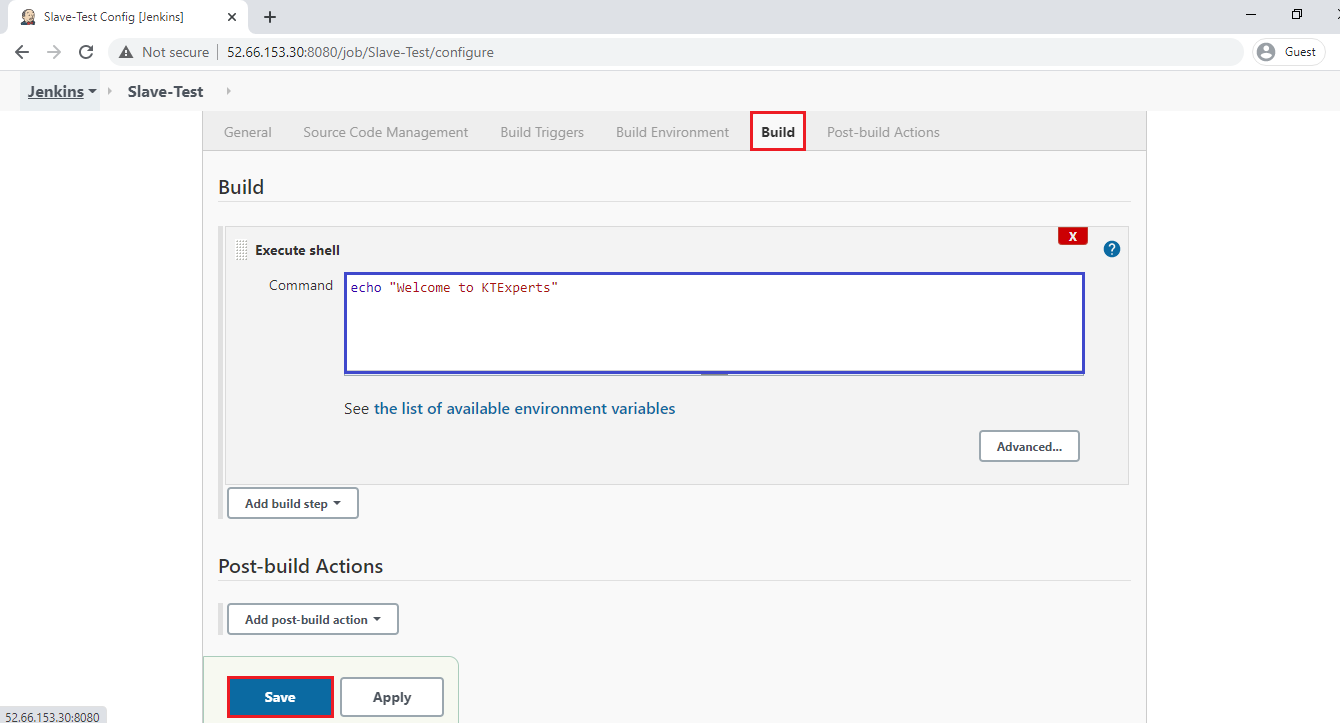
Go to Build and mention Linux command in the Execute shell and click on Save.
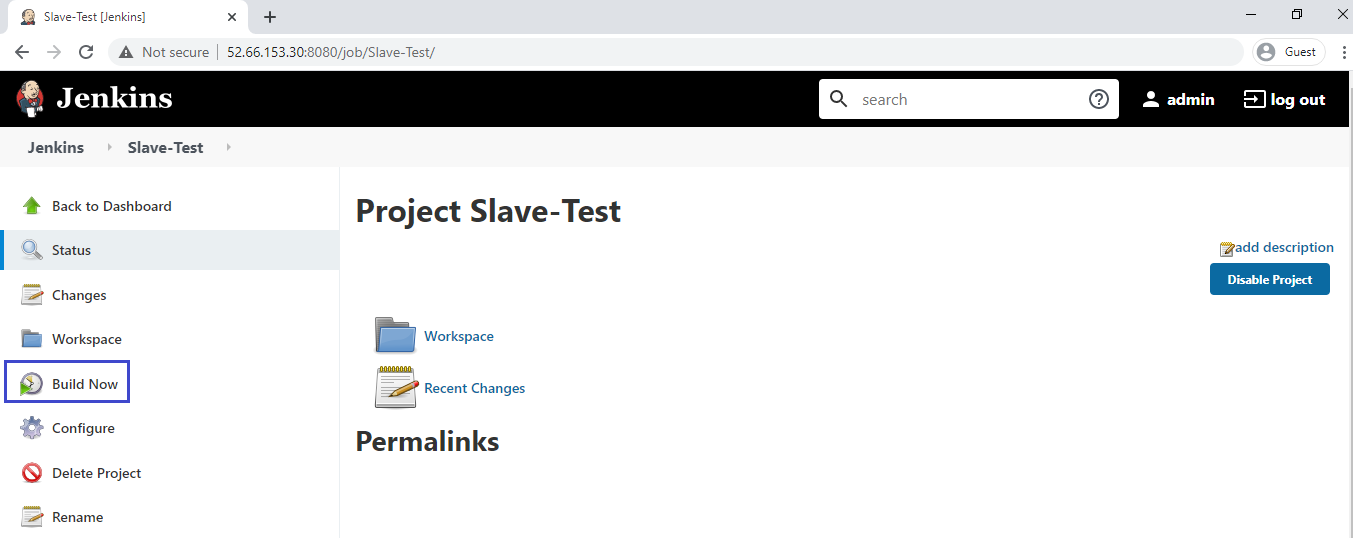
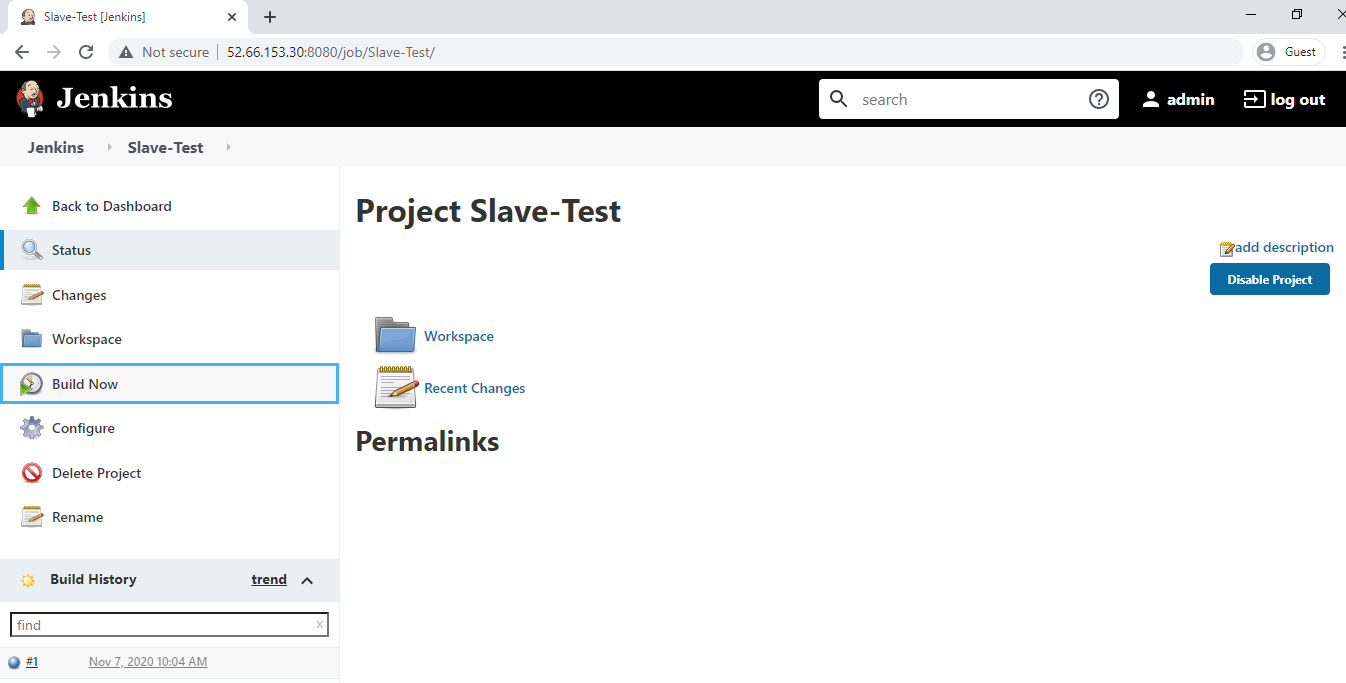
6. Build the job
Click on Build Now.
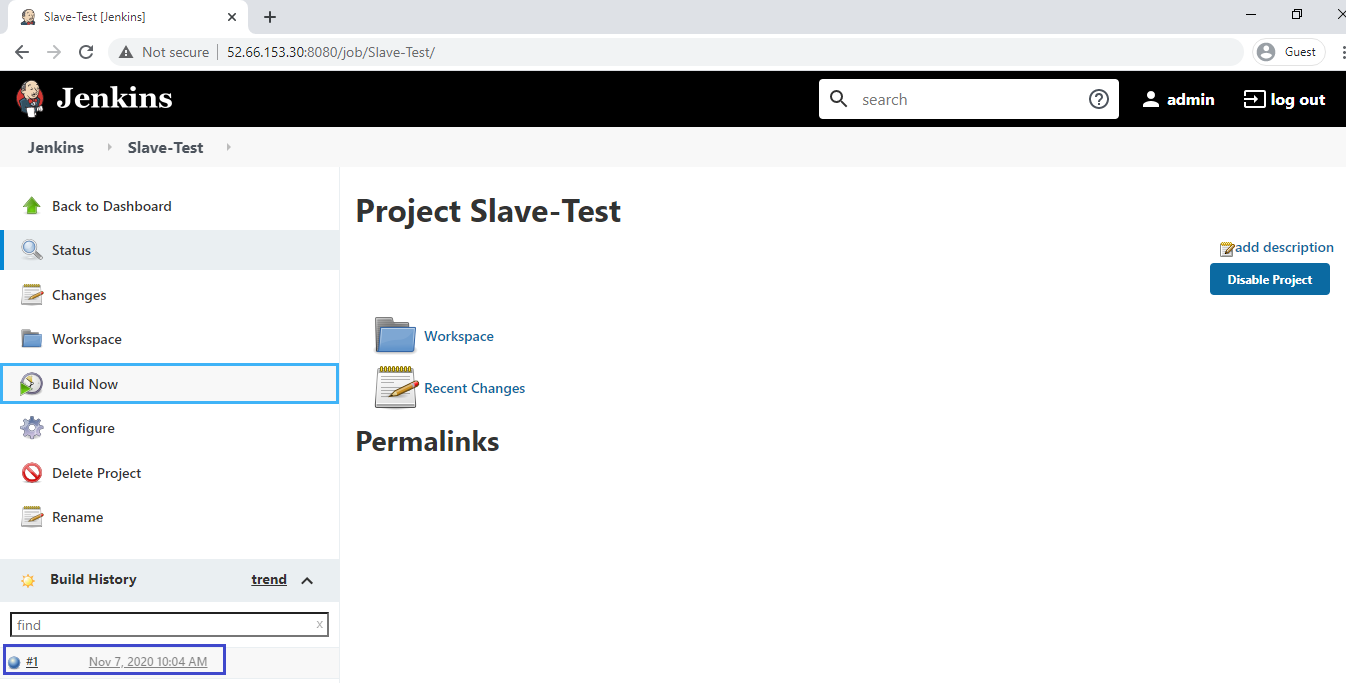
we can see the blue ball means the build has done succussfully.
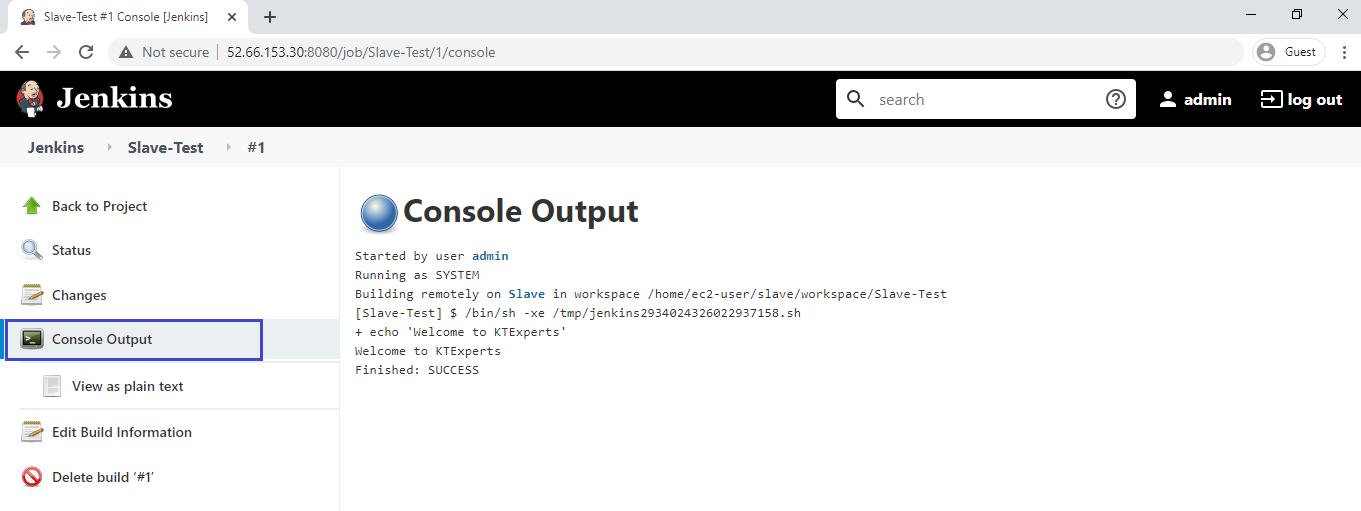
Verify Console Output
Go to build ball and click on that to see the console output.
We can see the console output.
Here we can see the build has done in the slave server and workspace has created with jobname ” /home/ec2-user/slave/workspace/Slave-Test”
Thank you for giving your valuable time to read the above information.
Follow us on
Website : www.ktexperts.com
Facebook Page : KTexperts
Linkedin Page : KT EXPERTS
Follow Me
Ramesh’s Linkedin : Ramesh Atchala