Dear Readers,
In this article, we will see the step by step Oracle 12c RAC Installation, we will create 2 RAC nodes with below configuration.
Software’s used in the activity: –
Network Configuration:
Node 1:
|
1 2 3 4 5 6 |
Node Name: - rac1 Hostname: - rac1.ktexpert.com Ipaddress: - eth0: -147.43.0.10/255.255.0.0--public eth1: -192.168.0.10/255.255.255.0—private eth2: - use DHCP network |
Node 2:
|
1 2 3 4 5 6 |
Node Name: - rac2 Node Name: - rac2.ktexpert.com Ipaddress : - eth0: -147.43.0.11/255.255.0.0--public eth1: -192.168.0.11/255.255.255.0--private eth2: - use DHCP network |
Oracle Virtual Box Installation and configuration
Note: – I know you all are very familiar with the installation of the Oracle Virtual Box, but still I want to show step by step process of Oracle 12c RAC Installation.
Now we need to open our VMware workstation to proceed with the activity.
Step 1) To download the Oracle Virtual Box software as per your requirement.
Download Oracle Virtual Box Link: – https://www.virtualbox.org/wiki/Downloads
I am using windows machine so I will download Workstation for windows.
Step 2) after download you need to install the software and open it. You will get below screen.

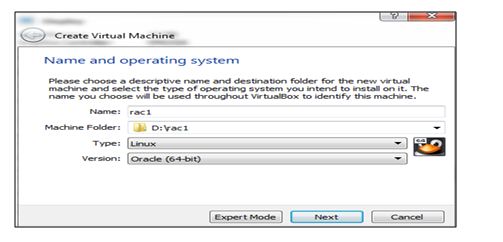
Steps 3) now click on new tab and give name and Operating systemto proceed further.
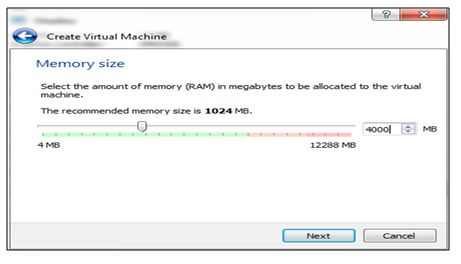
Step 4)Give Memory Size and proceed with the next step. At least give 4 GB for each node for better performance.
Step 5) Select Create a virtual hard disk now option and proceed further.

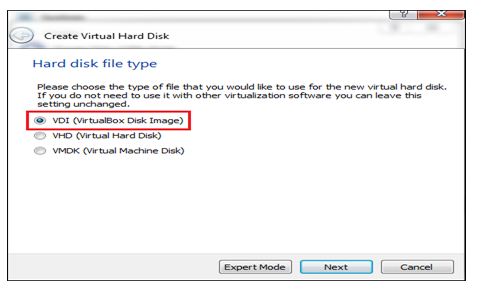
Step 6)SelectVDI (Virtual Box Disk Image) optionand proceed further.
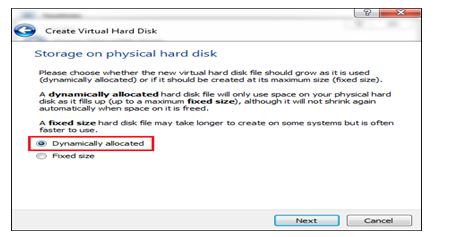
Step 7) Select Storage on physical hard disk as dynamically allocated and proceed further.
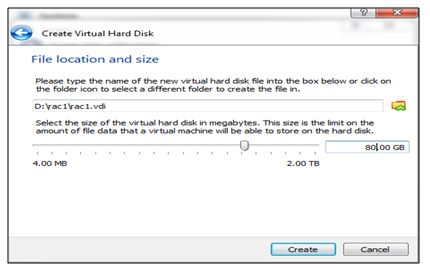
Step 8)File location and size as per your requirement.
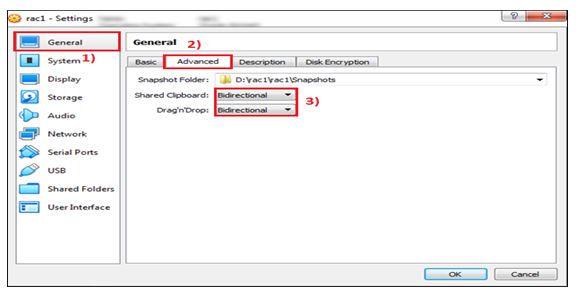
Step 9) now we need to do some setting for our rac node 1. Click on setting option for the machine, you will get below window.
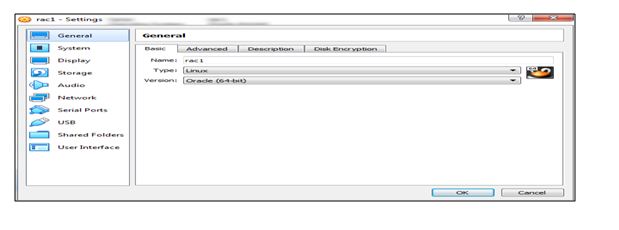
Step 10) Click on Advanced under General tab and choose Bidirectional option which help to copy anything from host machine to physical machine and vice-versa.
Step 11)Click on System tab and make below setting for Boot Order.

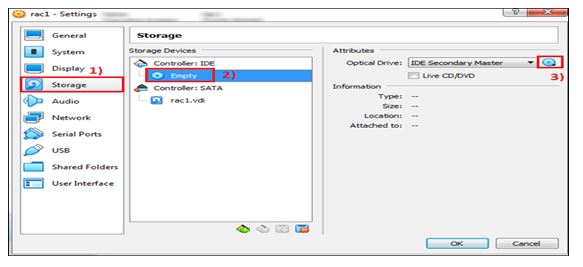
Step 12)Give the ISO image under storage tab using below path.
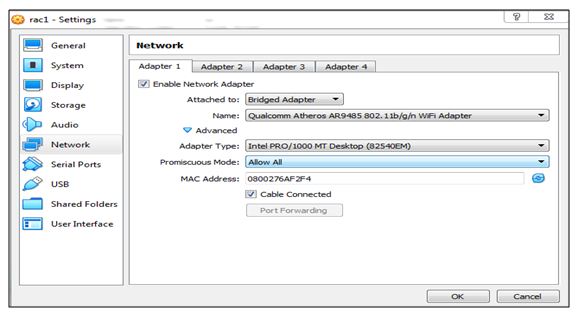
Step 13)Click on Network tab and enable 2 network adapter as per below screenshot for eth0 which we will use for public and eth1 which we will use for private communication between the nodes.
Step 14)Settings for Node 1 is completed, now click OK to save the changes.
Step 15) you have to use same steps to prepare for the RAC node 2.
Installation of RAC Node 1
Now after completed the Oracle Virtual Box setup, now will start the Installation on Oracle RAC Node 1.
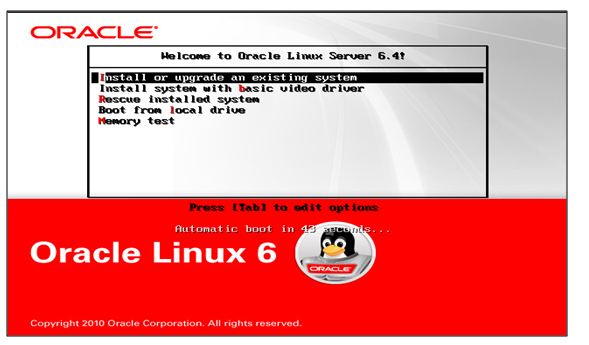
Step 1)Now Start the virtual machine for the installation.
Step 2) Choose Install or upgrade an existing system and click next to proceed further.
Step 3) Skip the media test and start the installation.
Step 4) Click the Next tab to proceed.
Step 5) Choose “ENGLISH”language or any other as per your requirement.
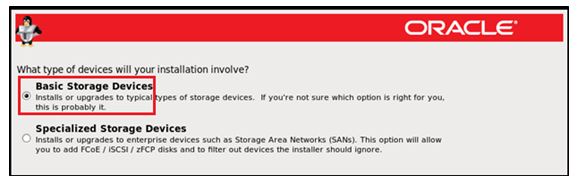
Step 6) we will go with the Basic Storage Devices option.
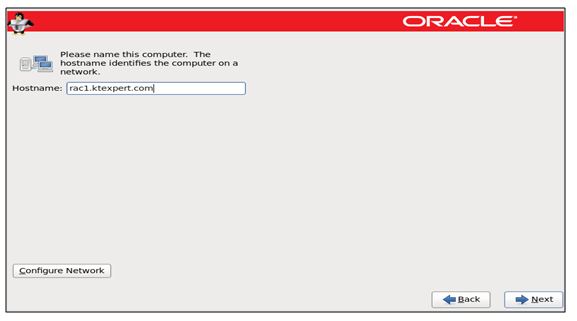
Step 7) now give the Hostname and Configure the Network as per you requirement.
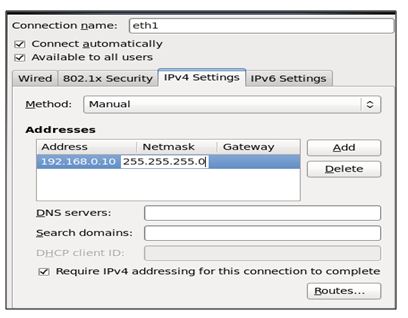
Step 8) To configure the network use below steps.
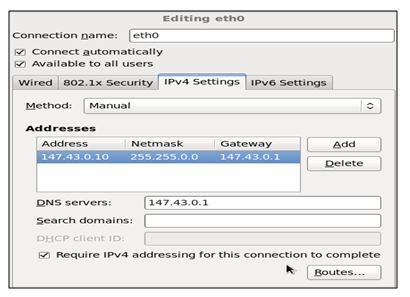
For eth0 setting: –
Click on Configure Network Double Click on eth0 Click IPv4 settings Select Manual Method Click Add to put the address and Net mask Click Apply to complete the setting
For eth1 setting: –
Click on Configure Network Double Click on eth1 Click IPv4 settings Select Manual Method Click Add to put the address and Net mask Click Apply to complete the setting
Step 9) Choose Time Zone as per your requirement, for me it is Asia/Kolkata.
Step10) Give the root password as per your requirement and click next to proceed.
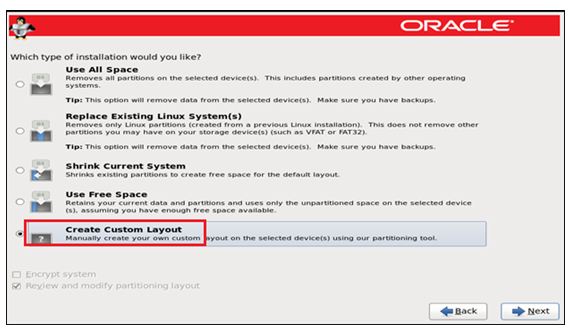
Step 11) Choose the Custom Layout option to create the mount point as per our requirements.
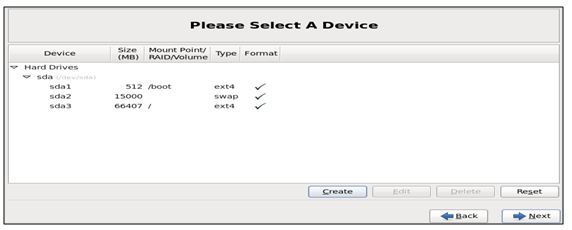
Step 11)Now create the partition as per your requirements.
Click on CreateèGive the mount point nameèSizeèClick OK
Step 12) Choose option “Customize Now” to customize the software as per our requirement.
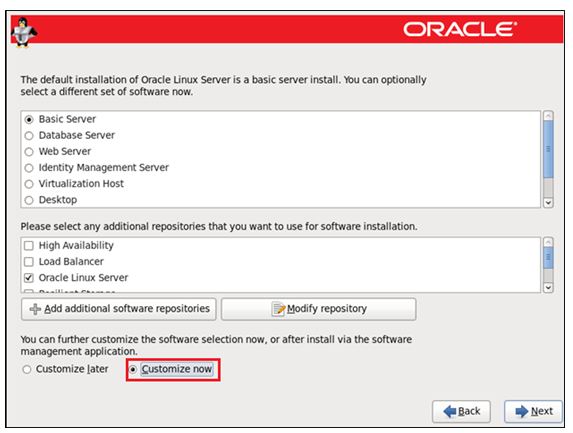
Step 13) Select all the packages so that any issue will not come in our Installation after that click Next to proceed with the installation.
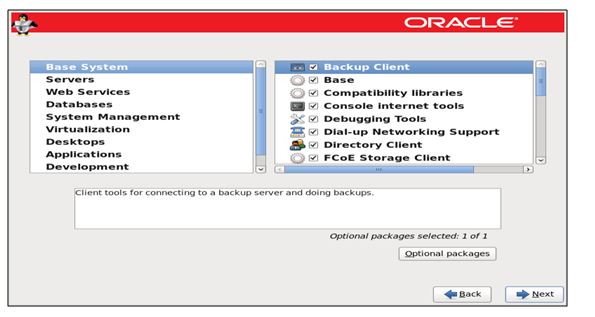
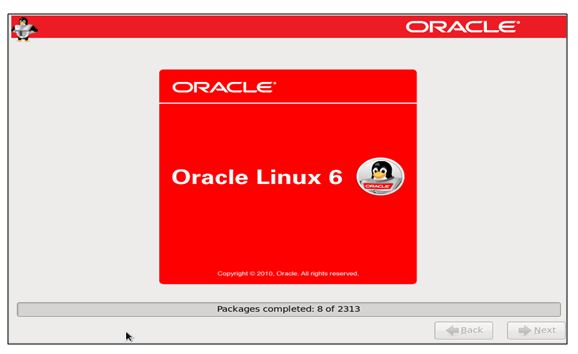
Now Installation is in Progress.
Step 14)After successful Installation of the software then you need to reboot the server.
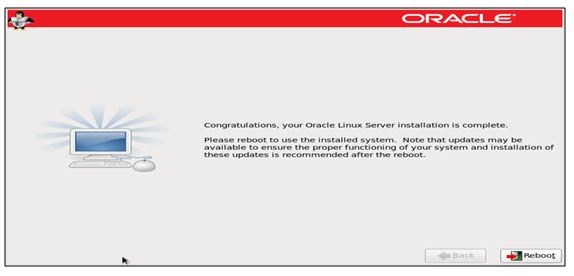
Note: – Please use above settings for the RAC Node 2 as well.
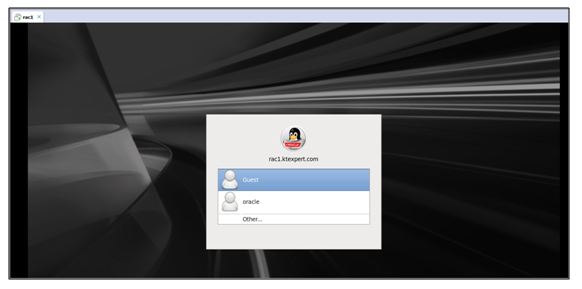
Step 15)After reboot, your machine is ready for login.
Installation of Oracle Virtual Box tool
Now before start the RAC installation we need to install Virtual machine tools because we need to share the folder in which we have zip files and if tool is not install then we cannot share the folder between host machine and Virtual machine.
Please follow the below steps to install the Virtual machine tools.
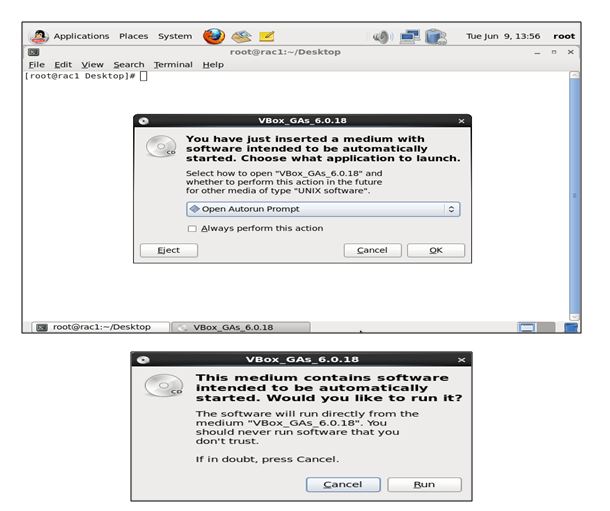
Step 1) First you need to click on Devices option and then click on Insert Guest Additions CD optionto install the tools.
Step 2)After click on Insert Guest Additions CD optionyou will get below window, click on ok andthen run to install the tool.
Step 3)you will get the below output after running the file.
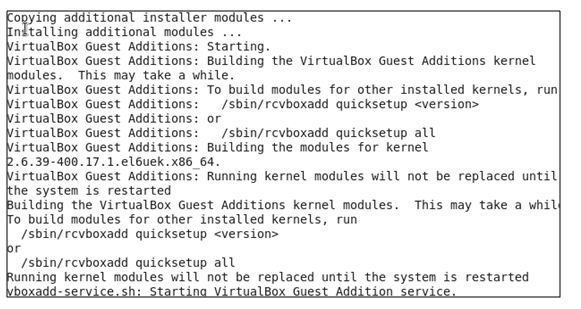
Step 4) Reboot the machine to reflect the changes.
Disk Addition
Now we need to add a single disk in the Virtual machine and will create 3 partitions from that disk for OCR, DATA and FRA disk group with External Redundancy.
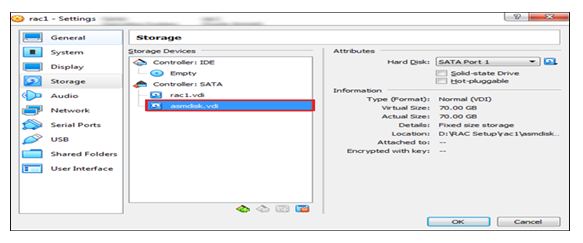
Step 1) to add the disks use below path.
Click on settingsègo to storageèClick control SATAàChoose Add Hard DiskOptionèCreate new diskèChoose VDI(Virtual Box Disk Image)èChoose Fixed Size Option èGive path and size to store diskèclick on finish to add the disk
Note: – we are using fixed size option so it will take some time to allocate the space.
Step 2) after adding the entire disk it should be look like below.
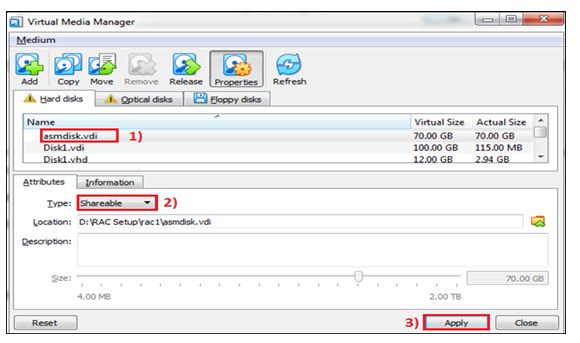
Modify disk setting for shared storage
Now we need to modify the disk setting as shareable so that second name can also use the same disk for making data consistent.
Please follow below steps to change the setting: –
Step 1) click on File then click on the Virtual Media Manager.

Step 2) Select the disk which we havecreated andmake type as shareable and click on apply.
Step 3) Follow same steps on RAC node 2, but only one difference is choose existing disk option instead of create new disk, but we want shared storage, so use same disk which we have created in RAC Node 1.
Putty Connection
Now we will check our putty connection. To check the connection you can use below steps.
Step 1) Login into the machine and check the ipaddress for putty connection, we configure eth2 for the putty.
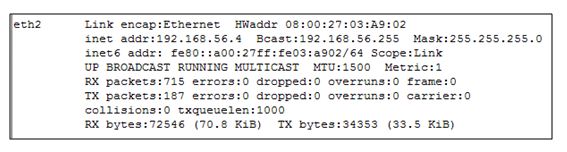
Step 2)As we can see from above output ipaddress of eth2 is 192.168.56.44
Step 3)Now we can connect with the putty and check the connection.
Open puttyègive the IP addressèSaved the session
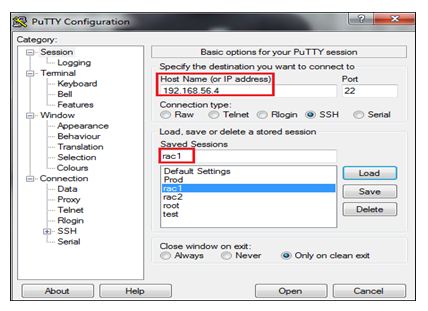
Step 4) now click on open tab and check the connection.
We are able to login from putty as well.

User and Group Creation
Group Creation: –
|
1 2 3 4 5 6 |
groupadd -g 5001 oinstall groupadd -g 5002 dba groupadd -g 5003 oper groupadd -g 5004 asmadmin groupadd -g 5005 asmdba groupadd -g 5006 asmoper |
User Creation: –
|
1 2 3 4 5 6 |
useradd -u 5007 -g oinstall -G dba,oper,asmdba oracle useradd -u 5008 -g oinstall -G asmadmin,asmdba,asmoper,dba grid usermod -g oinstall -G dba,oper,asmdba oracle usermod -g oinstall -G asmadmin,asmdba,asmoper,dba grid passwd oracle passwd grid |
Home Directories Creation
Home directories creation: –
|
1 2 3 4 5 6 7 8 9 10 |
mkdir -p /u01/app/grid mkdir -p /u01/app/12.2.0/gridhome_1 mkdir -p /u02/app/oracle mkdir -p /u02/app/oracle/product/12.2.0/dbhome_1 mkdir -p /u01/app/oraInventory chown -R grid:oinstall /u01 chown -R oracle:oinstall /u02 chown -R grid:oinstall /u01/app/oraInventory chmod755 /u01 chmod755 /u02 |
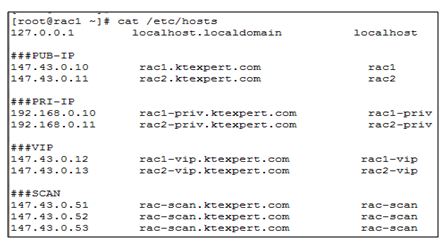
Configuration of the Host File: –
Open /etc/hosts file and put below entries.
|
1 2 3 4 5 6 7 8 9 10 11 12 13 14 15 |
127.0.0.1 localhost.localdomainlocalhost ###PUB-IP 147.43.0.10 rac1.ktexpert.com rac1 147.43.0.11 rac2.ktexpert.com rac2 ###PRI-IP 192.168.0.10 rac1-priv.ktexpert.com rac1-priv 192.168.0.11 rac2-priv.ktexpert.com rac2-priv ###VIP 147.43.0.12 rac1-vip.ktexpert.com rac1-vip 147.43.0.13 rac2-vip.ktexpert.com rac2-vip ###SCAN 147.43.0.51 rac-scan.ktexpert.com rac-scan 147.43.0.52 rac-scan.ktexpert.com rac-scan 147.43.0.53 rac-scan.ktexpert.com rac-scan |
Backup of NTP file
Now we will take the backup of NTP file because we are not going to use NTP, we will use CTSS for our configuration.
Command: – mv /etc/ntp.conf /etc/ntp.conf_bkp
Command: – service ntpd restart
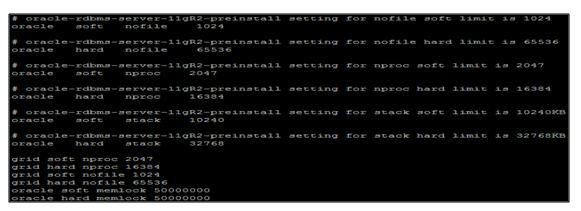
Addition of security limits
Now we will add some limits because we are using Oracle OS so most of the kernel packages are already installed we just add some limits.
File Name : – /etc/security/limit.conf
ASM Library Packages installation
We require 2 oracle ASM library packages.
- Oracle support
- Oracle lib

Disk Partitions
Now we need to create disk partitions.
To create disk partitions use below steps.
|
1 2 3 4 5 6 7 8 9 10 11 12 13 14 15 16 17 18 19 20 21 22 23 24 25 26 27 28 29 30 31 32 33 34 35 36 37 38 39 40 41 |
[root@rac1 sf_Oracle_DBA_Softwares]# fdisk /dev/sdb Device contains neither a valid DOS partition table, nor Sun, SGI or OSF disklabel Building a new DOS disklabel with disk identifier 0xb5c7988f. Changes will remain in memory only, until you decide to write them. After that, of course, the previous content won't be recoverable. Warning: invalid flag 0x0000 of partition table 4 will be corrected by w(rite) WARNING: DOS-compatible mode is deprecated. It's strongly recommended to switch off the mode (command 'c') and change display units to sectors (command 'u'). Command (m for help): n -------> for new partition Command action e extended p primary partition (1-4) p--------> Primary Partition Partition number (1-4): 1 --------> First Partition First cylinder (1-9137, default 1):--------> Press Default Using default value 1 Last cylinder, +cylinders or +size{K,M,G} (1-9137, default 9137): +40G -----> Space for CRSdiskgroup Command (m for help): n Command action e extended p primary partition (1-4) p Partition number (1-4): 2-------> Second Partition First cylinder (5224-9137, default 5224): Using default value 5224 Last cylinder, +cylinders or +size{K,M,G} (5224-9137, default 9137): +20G-----> Space for DATA diskgroup Command (m for help): n Command action e extended p primary partition (1-4) p Partition number (1-4): 3 First cylinder (7836-9137, default 7836): Using default value 7836 Last cylinder, +cylinders or +size{K,M,G} (7836-9137, default 9137):------> Left space for FRA diskgroup Using default value 9137 Command (m for help): w ------> save the setting The partition table has been altered! Calling ioctl() to re-read partition table. Syncing disks. |
|
1 2 3 4 5 6 7 8 9 10 11 12 13 14 15 16 17 18 19 20 21 22 23 |
[root@rac1 sf_Oracle_DBA_Softwares]# fdisk -l Disk /dev/sda: 85.9 GB, 85899345920 bytes 255 heads, 63 sectors/track, 10443 cylinders Units = cylinders of 16065 * 512 = 8225280 bytes Sector size (logical/physical): 512 bytes / 512 bytes I/O size (minimum/optimal): 512 bytes / 512 bytes Disk identifier: 0x00062377 Device Boot Start End Blocks Id System /dev/sda1 * 1 66 524288 83 Linux Partition 1 does not end on cylinder boundary. /dev/sda2 66 1978 15360000 82 Linux swap / Solaris /dev/sda3 1978 10444 68000768 83 Linux Disk /dev/sdb: 75.2 GB, 75161927680 bytes 255 heads, 63 sectors/track, 9137 cylinders Units = cylinders of 16065 * 512 = 8225280 bytes Sector size (logical/physical): 512 bytes / 512 bytes I/O size (minimum/optimal): 512 bytes / 512 bytes Disk identifier: 0xb5c7988f Device Boot Start End Blocks Id System /dev/sdb1 1 5223 41953716 83 Linux /dev/sdb2 5224 7835 20980890 83 Linux /dev/sdb3 7836 9137 10458315 83 Linux ASM library Configuration |
|
1 2 3 4 5 6 7 8 9 10 11 12 |
[root@rac1 OracleDBASoftwares]# oracleasm configure -i Configuring the Oracle ASM library driver. This will configure the on-boot properties of the Oracle ASM library driver. The following questions will determine whether the driver is loaded on boot and what permissions it will have. The current values will be shown in brackets ('[]'). Hitting <ENTER> without typing an answer will keep that current value. Ctrl-C will abort. Default user to own the driver interface []: grid Default group to own the driver interface []: asmadmin Start Oracle ASM library driver on boot (y/n) [n]:y Scan for Oracle ASM disks on boot (y/n) [y]: y Writing Oracle ASM library driver configuration: done |
Disk Creation
Command to create the disks: –
|
1 2 3 |
oracleasmcreatedisk CRS /dev/sdb1 oracleasmcreatedisk DATA /dev/sdb2 oracleasmcreatedisk FRA /dev/sdb3 |
Output: –
|
1 2 3 4 |
[root@rac1 sf_Oracle_DBA_Softwares]# oracleasmlistdisks CRS DATA FRA |
Bash Profile for Grid User
Bash Profile for GRID User: –
Node 1
|
1 2 3 4 5 6 |
export CVUQDISK_GRP=oinstall export ORACLE_SID=+ASM1 export ORACLE_UNQNAME=+ASM export ORACLE_BASE=/u01/app/grid export ORACLE_HOME=/u01/app/12.2.0/gridhome_1 export PATH=$PATH:.:$ORACLE_HOME/bin |
Node 2
|
1 2 3 4 5 6 |
export CVUQDISK_GRP=oinstall export ORACLE_SID=+ASM2 export ORACLE_UNQNAME=+ASM export ORACLE_BASE=/u01/app/grid export ORACLE_HOME=/u01/app/12.2.0/gridhome_1 export PATH=$PATH:.:$ORACLE_HOME/bin |
Bash Profile for Oracle User
Node 1
|
1 2 3 4 5 6 |
export CVUQDISK_GRP=oinstall export ORACLE_SID=+karan1 export ORACLE_UNQNAME=+karan export ORACLE_BASE=/u02/app/oracle export ORACLE_HOME=/u02/app/oracle/product/12.2.0/dbhome_1 #export PATH=$PATH:.:$ORACLE_HOME/bin |
Node 2
|
1 2 3 4 5 6 |
export CVUQDISK_GRP=oinstall export ORACLE_SID=+karan2 export ORACLE_UNQNAME=+karan export ORACLE_BASE=/u02/app/oracle export ORACLE_HOME=/u02/app/oracle/product/12.2.0/dbhome_1 #export PATH=$PATH:.:$ORACLE_HOME/bin |
Note: – we will uncomment PATH after Oracle Home Binaries Installation.
Unzipping Binaries for Grid and Oracle User
Step 1) I have created two separate mount points for both users, so I will unzip grid binaries in /u01 and Oracle binaries in /u02 mount points.
Command: –
|
1 |
cp linuxx64_12201_grid_home.zip /u01 |
Output: –
|
1 2 3 4 5 |
[root@rac1 Oracle12c]# cd /u01 [root@rac1 u01]# du -sh * 20K app 2.8G linuxx64_12201_grid_home.zip 16K lost+found |
Command: –
|
1 |
cp linuxx64_12201_database.zip /u02 |
Output: –
|
1 2 3 4 5 |
[root@rac1 Oracle12c]# cd /u02 [root@rac1 u02]# du -sh * 20K app 3.3G linuxx64_12201_database.zip 16K lost+found |
Step 2)Now first unzip the binaries zip files one by one from respective users.
Command: –
|
1 |
unzip linuxx64_12201_grid_home.zip |
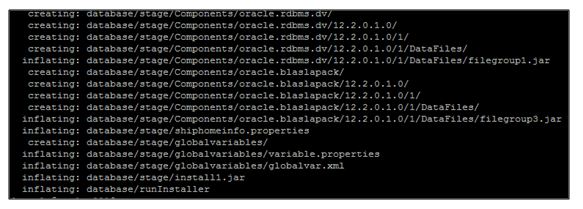
Grid Unzip Output: –
Command: – unzip linuxx64_12201_database.zip
Oracle Unzip Output: –
Cluvfy command for precheck
Command: – ./runcluvfy.sh stage -pre crsinst -n rac1,rac2 -fixup -verbose
Execution of Grid Setup file
Now execute the gridsetup.sh file to start out installation.
Command: –
|
1 |
./gridsetup.sh |
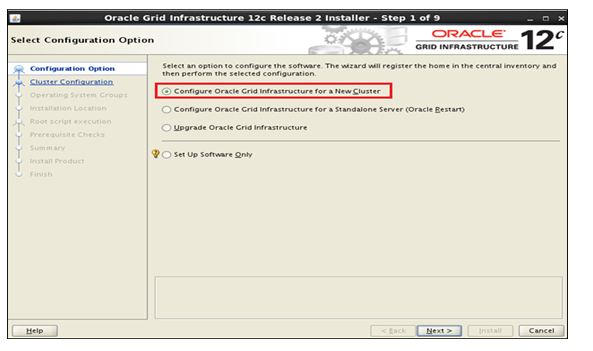
Step 1)After executing you will get below Installer window, select option Configure Oracle Grid Infrastructure for a New Cluster and click on Next.
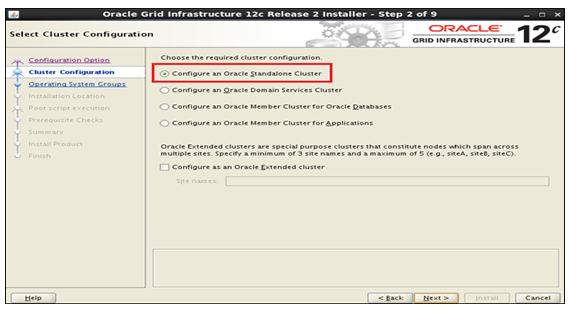
Step 2) Select Configure an Oracle Standalone Cluster and click on Next.
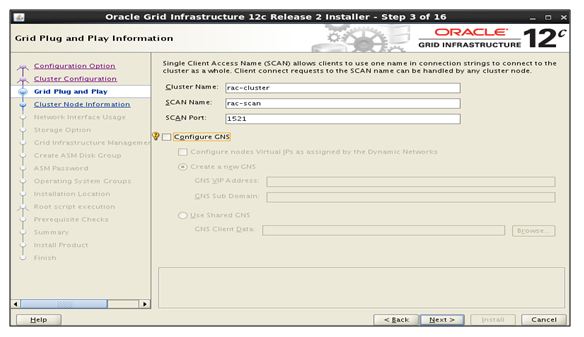
Step 3) Give Cluster Name, SCAN Name, SCAN Port as per your requirement, we are not usingGNS so uncheck it and click on Next.
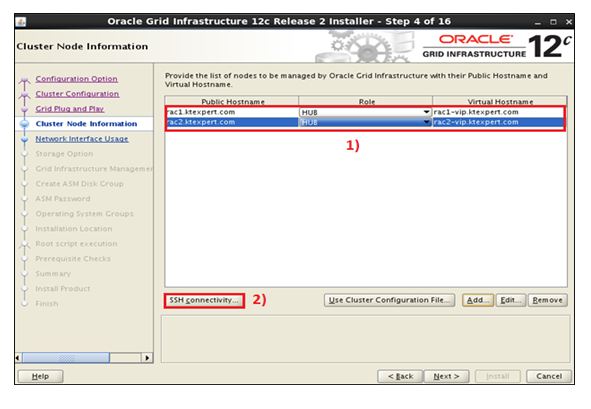
Step 4) Add all the host entries and click on ssh connectivity to exchange the keys for password less connection.
Step 5) Check the Interface name and its use as per your requirement and click on Next.
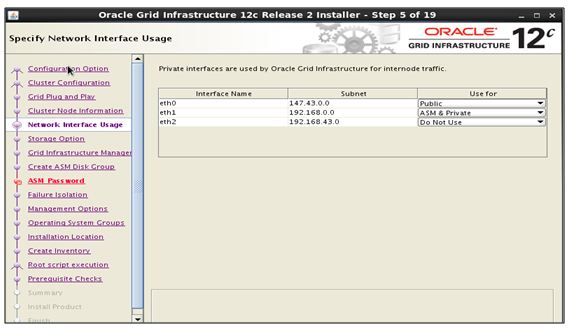
I am using eth1 for ASM&Private, eth0 is for public and I am not using eth2 because it is for putty connection.
Make sure your firewall is off before proceeding this steps otherwise you will get issue.
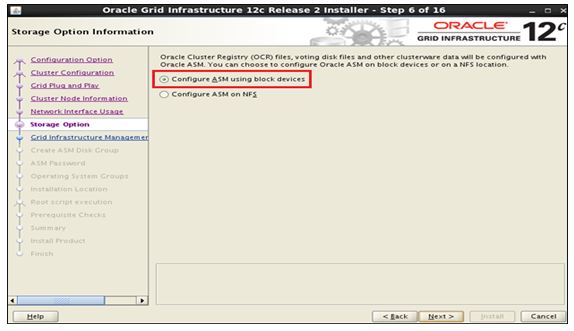
Step 6)I am Configuring ASM using block devices, but you can choose option as per your requirement.
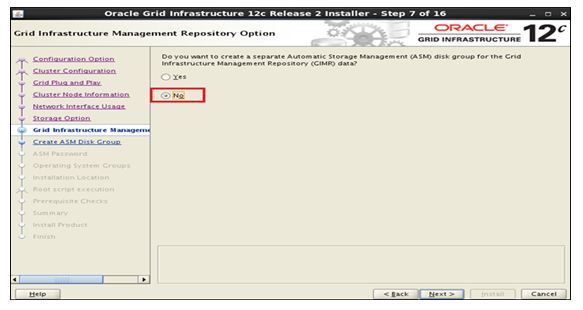
Step 7) I am not creating separate disk group for ASM, if you want you can choose “Yes” and proceed further.
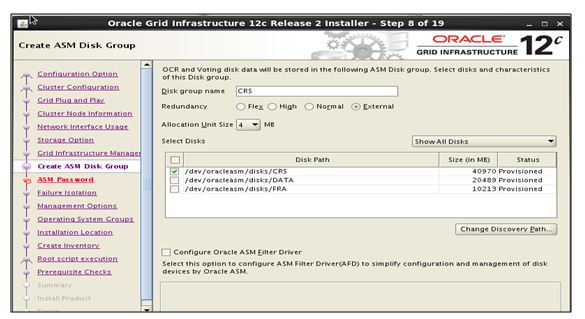
Step 8) Now give the name of the OCR and Voting data disk group name, I am selecting Externalredundancy because it required at
least 30 GB of disk space and if you will choose Normal redundancy then 70GB disk space is required so I am using External one due to space issue with 4 MB Allocation Unit size, you can choose as per your requirement.
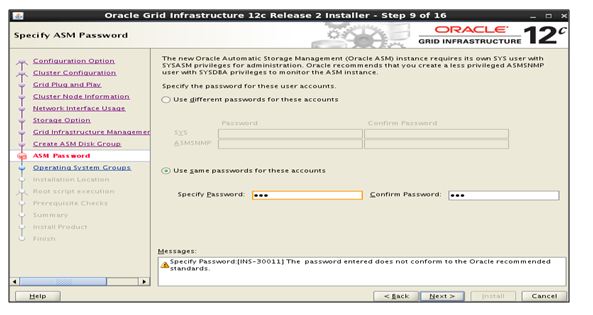
Step 9) Give SYS and ASMSNMPpassword as per you requirement.
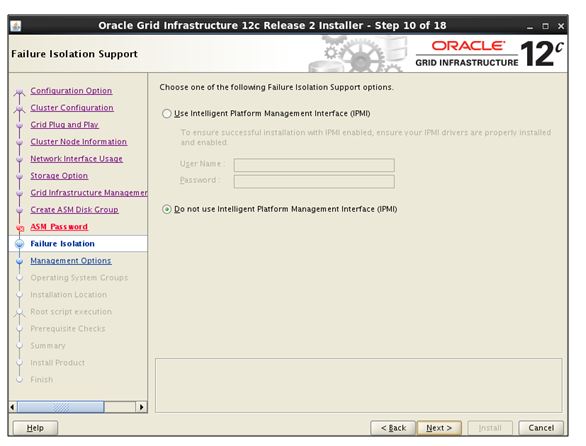
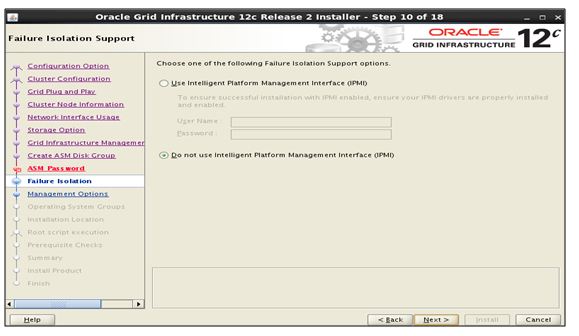
Step 10) I am not using Intelligent Platform Management Interface (IPMI), if it is required then you can check and proceed further.
Step 11) I am not using Enterprise Manager (EM) Cloud Control as well.
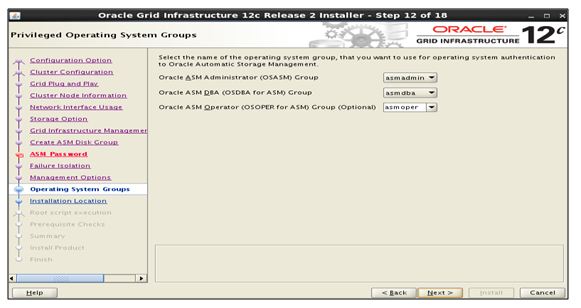
Step 12) Give the privileged for operatingsystemgroups as per your requirement.
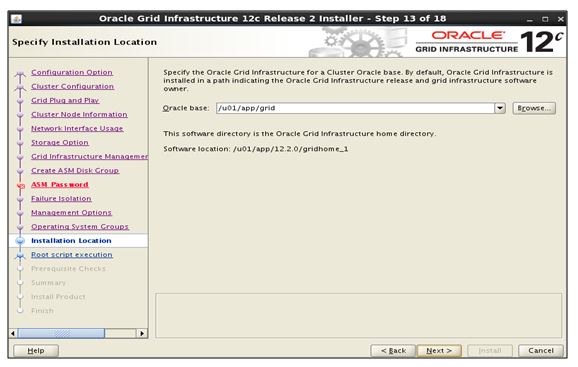
Step 13) Specify the ORACLE_ BASE Location and ORACLE_HOME are already defined where we have extracted the zip file.
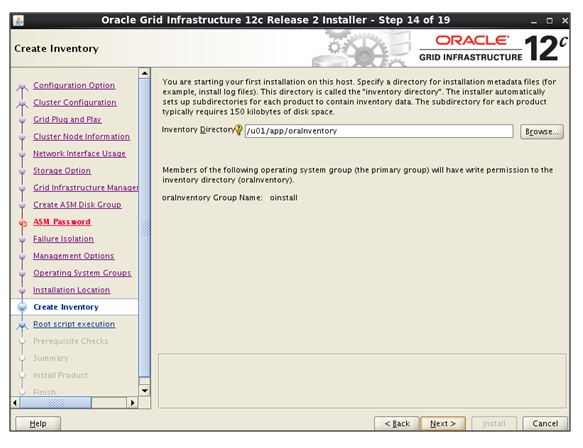
Step 14) Specify the Inventory Directory when all the meta data information will get stored.
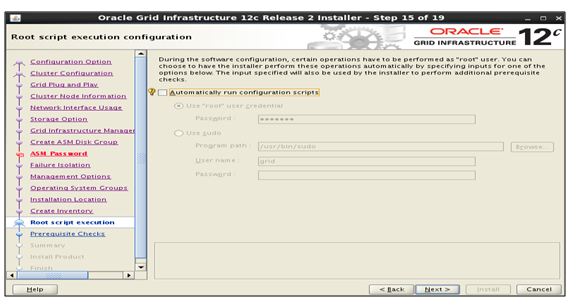
Step15)You can use root user to run scripts automatically just by giving password or you can use Sudo privileged user and password or you can run those scripts manually.
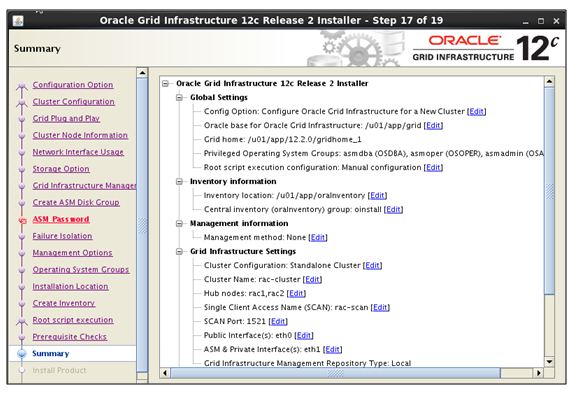
Step 16) Then it will do the prerequisite checks and show the summary screen, do check all the parameters and click on Install.
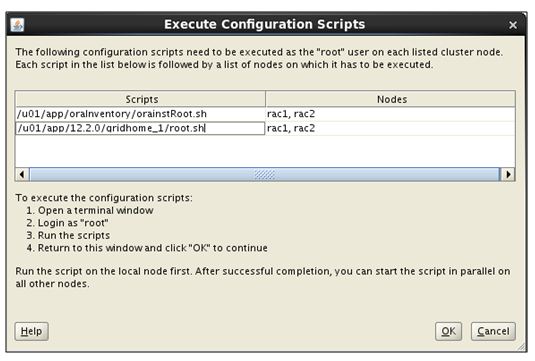
Step 17) Now we need to run below scripts from root user.
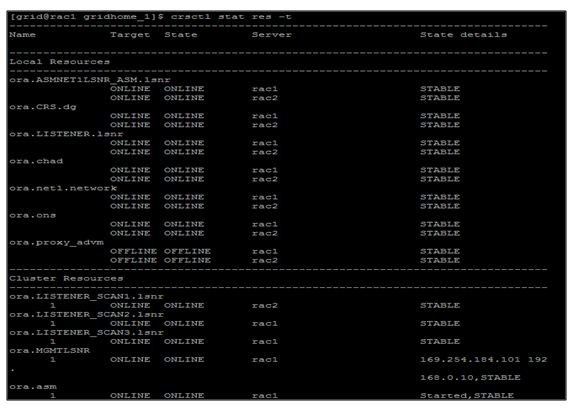
Step 18) Grid Installation has been completed successfully.


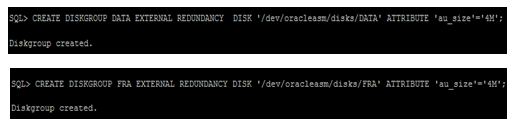
DATA and FRA Disk group Creation
Now we will create DATA and FRA disk group, We will use DATA disk group to store the database information and FRA for recovery of data.
Command to create the disk group: –
|
1 2 3 |
CREATE DISKGROUP DATA EXTERNAL REDUNDANCY DISK '/dev/oracleasm/disks/DATA' ATTRIBUTE 'au_size'='4M'; CREATE DISKGROUP FRA EXTERNAL REDUNDANCY DISK '/dev/oracleasm/disks/FRA’ ATTRIBUTE 'au_size'='4M'; |
Output: –
Note: – After creating the disk groups they are visible only on rac node 1, but to visible on rac node 2 as well you need to mount it manually through below command.
RAC Node 2 beforemount output: –

RAC node 2 after mount output: –

RDBMS Binaries Installation
To install the RDBMS binaries first you need to copy the database zip file in respective location or folder then unzip it.
Command: –
|
1 |
unzip linuxx64_12201_database.zip |

Step 1) after unzip the files, a new folder will create called database. Now go inside the database folder and execute below command for the installation.
Command: –
|
1 |
./runInstallaer |
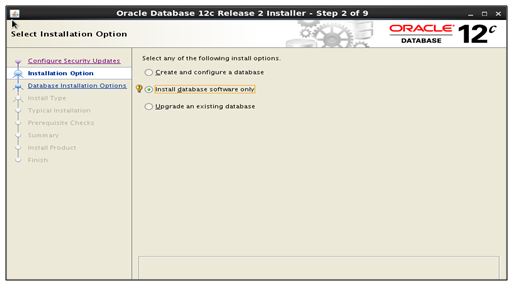
After execute the command you will get below screen, we will complete database creation in 2 parts.
- Install Software only.
- Database Creation through DBCA.
Step 2)Uncheck the Security updates from Oracle and click on Next tab.

Step 3)Choose 2nd option Install database software only option and click Next.
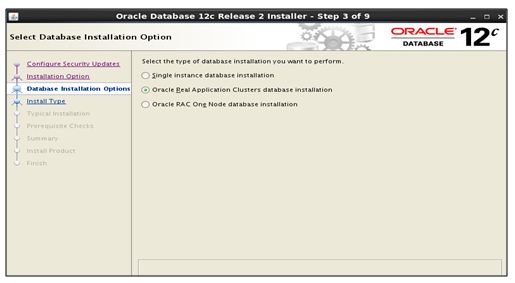
Step 4)Choose 2nd option Oracle Real Application Clusters database installation and click Next.
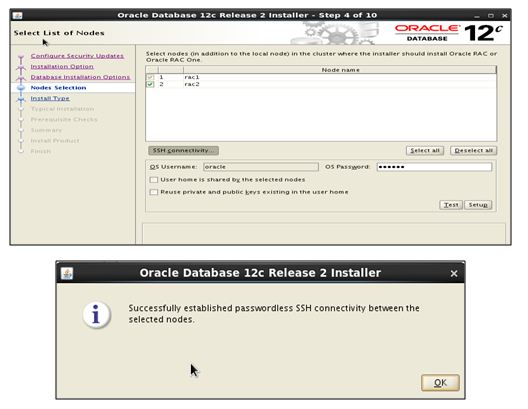
Step 5) Make sure all the nodes are selected otherwise software will only install in single nodes and click on SSH connectivity to create password less connections between the nodes.
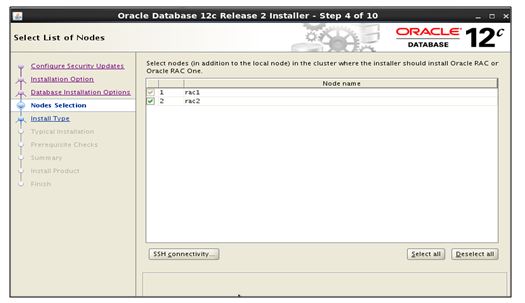
Step 6)Give the Oracle password which you have created and click on setup to create the password less connectivity.
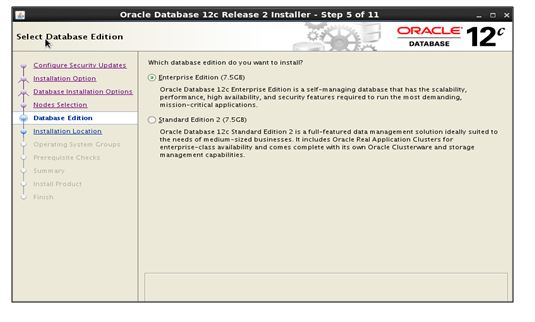
Step 7)Choose Enterprise Edition and click Next.
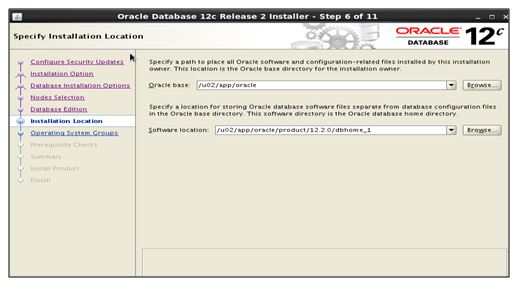
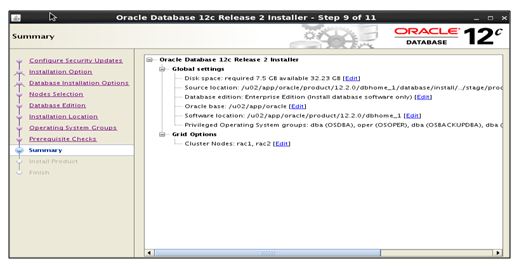
Step 8)now Choose the location for Oracle base and Software location as per the requirement.
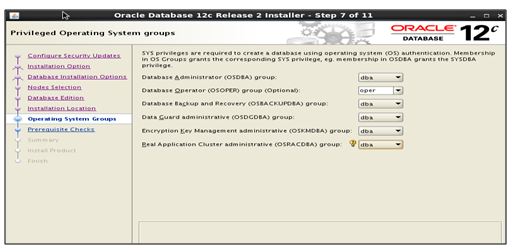
Step 9)Give the privilegedOperating system groups as per your requirement.
Step 10)Check the Summary and click on Next to proceed with the installation.
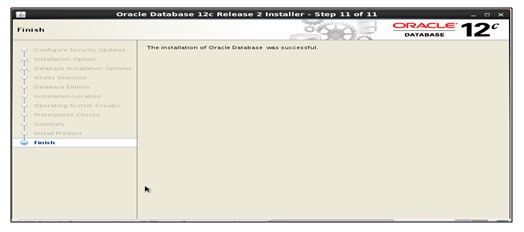
Step 11)Finally you will get the success message after completing the installation.
Database Creation
Step 1)Login as oracle User and go to ORACLE_HOME/bin direcotry and execute ./dbca command.
|
1 |
[oracle@rac1 bin]$ cd /u02/app/oracle/product/12.2.0/dbhome_1/bin |
|
1 |
[oracle@rac1 bin]$ ./dbca |
Step 2) Choose the Create a Database Option and Click on Next button.

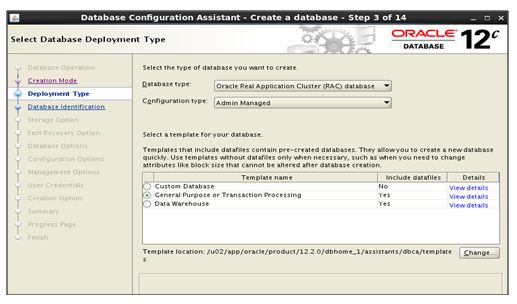
Step 3)Choose Option Advanced Configuration and Click on Next Button.
Step 4)Choose General purpose or Transaction processing Option and Click on Next button.
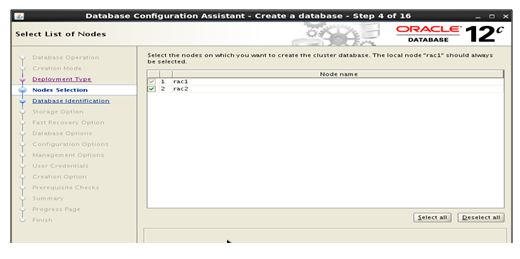
Step 5) Select all the nodes and click on Next.
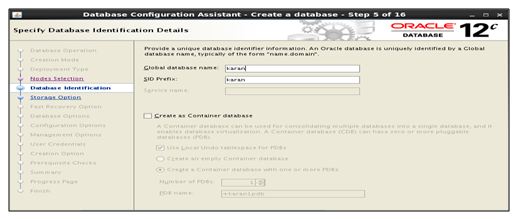
Step 6)Choose your Global Database name and select both the nodes.
Step 7)Choose ASM as a storage type and click on Next button.
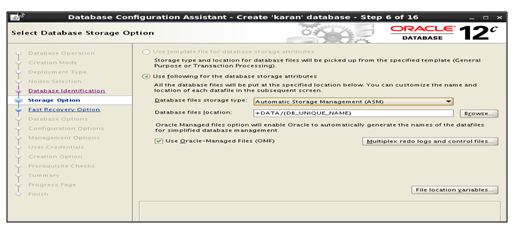
Step 8) Select the FRAas per your requirement.

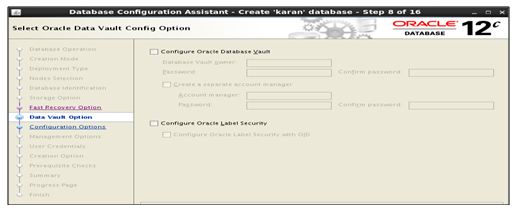
Step 9)Choose “Database Vault” and “Oracle Label Security” as per your requirement.
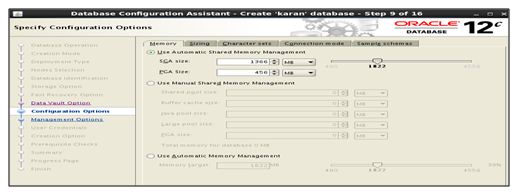
Step 10) Define Memory, Character sets, Connection mode, Sample schemas as per your requirements.
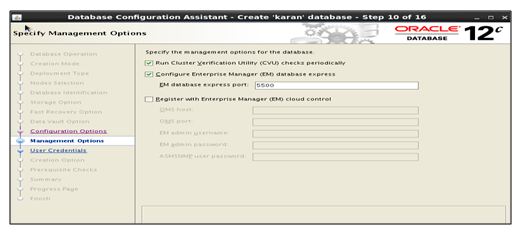
Step 11) Choose EM options as per your requirement, if you want to monitor the logs, issues then you can configure EM (Enterprise Manager). It is GUI tools.
Step 12)now set the password of SYS, SYSTSM, DBSNMP and SYSMAN and Click on Next button.

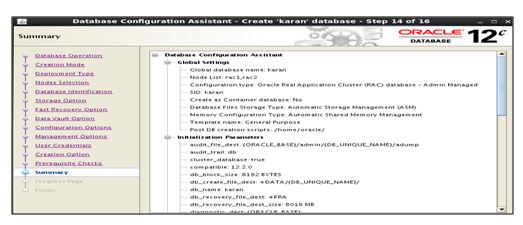
Step 13)Check the Summary report, if something went wrong you can rectify and resolve it.
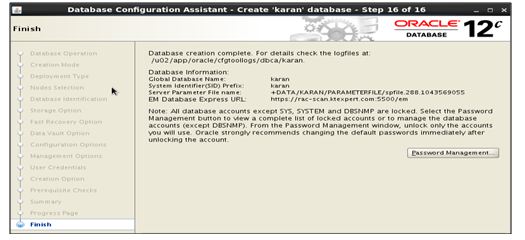
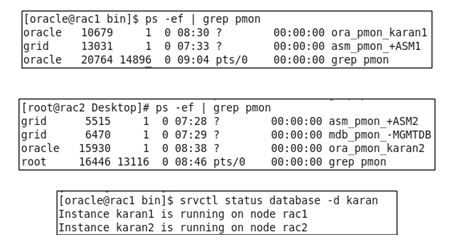
Step 14) Database has been created successfully we can see from below command database is also up and running.
Step 15) Check Database status
Thank you for giving your valuable time to read the above information. Please click here to subscribe for further updates
KTEXPERTS is always active on below social media platforms.
Facebook : https://www.facebook.com/ktexperts/
LinkedIn : https://www.linkedin.com/company/ktexperts/
Twitter : https://twitter.com/ktexpertsadmin
YouTube : https://www.youtube.com/c/ktexperts