Dear Readers,
In this article, we will see the following Install Jenkins On Ubuntu.
 Steps to Follow :
- Logging to AWS Account
- Launch Ubuntu EC2 Instance
- Connect to Linux EC2 Instance by Using Putty
- Install the Java Package
- Configure the Java Home Location
- Download and Install Jenkins
- Start the Jenkins
- Access the Jenkins
1. Logging to AWS Account
First, we need to AWS Console page by using below link.
https://aws.amazon.com/console/
Click on sign in to Console button. 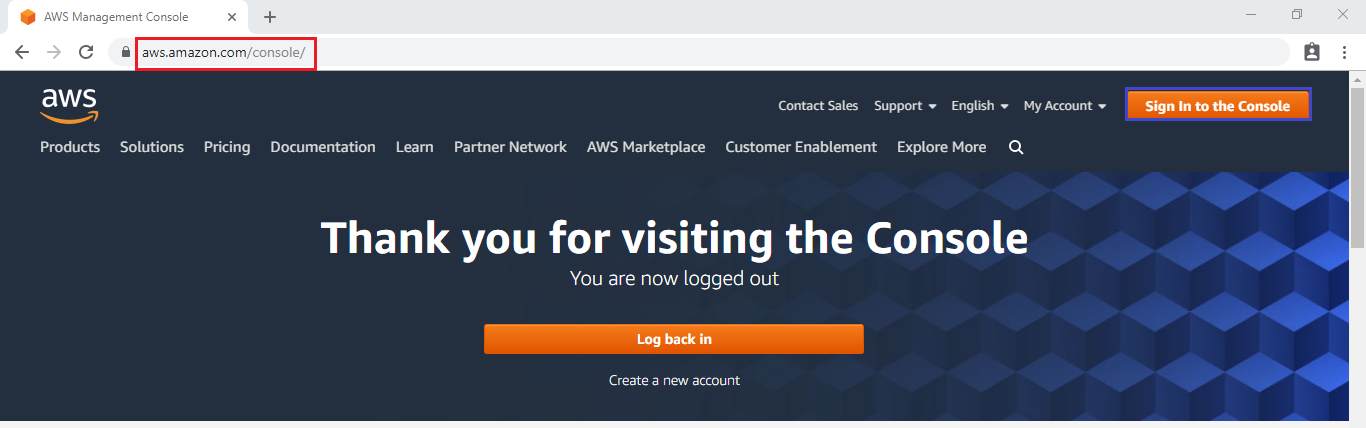 Logging to aws account
Login using username & password and click on sign in. 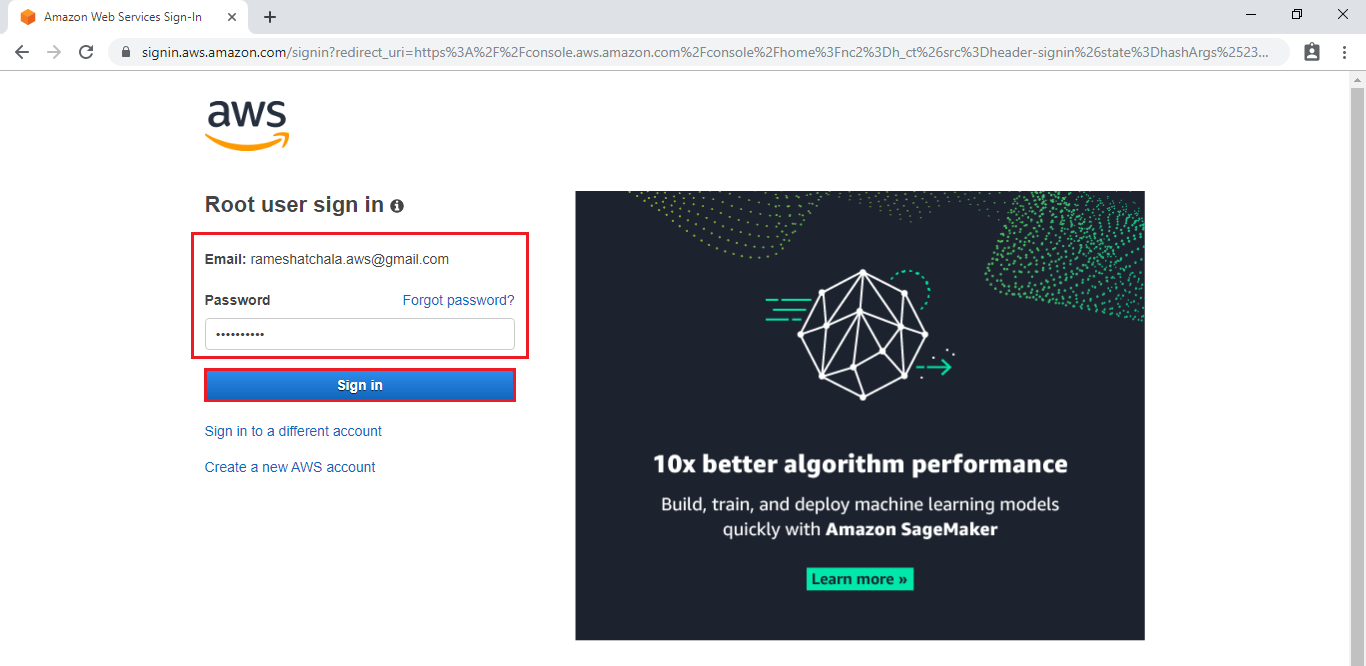 Enter to AWS Management Console
We can see the AWS Management Console Dashboard. 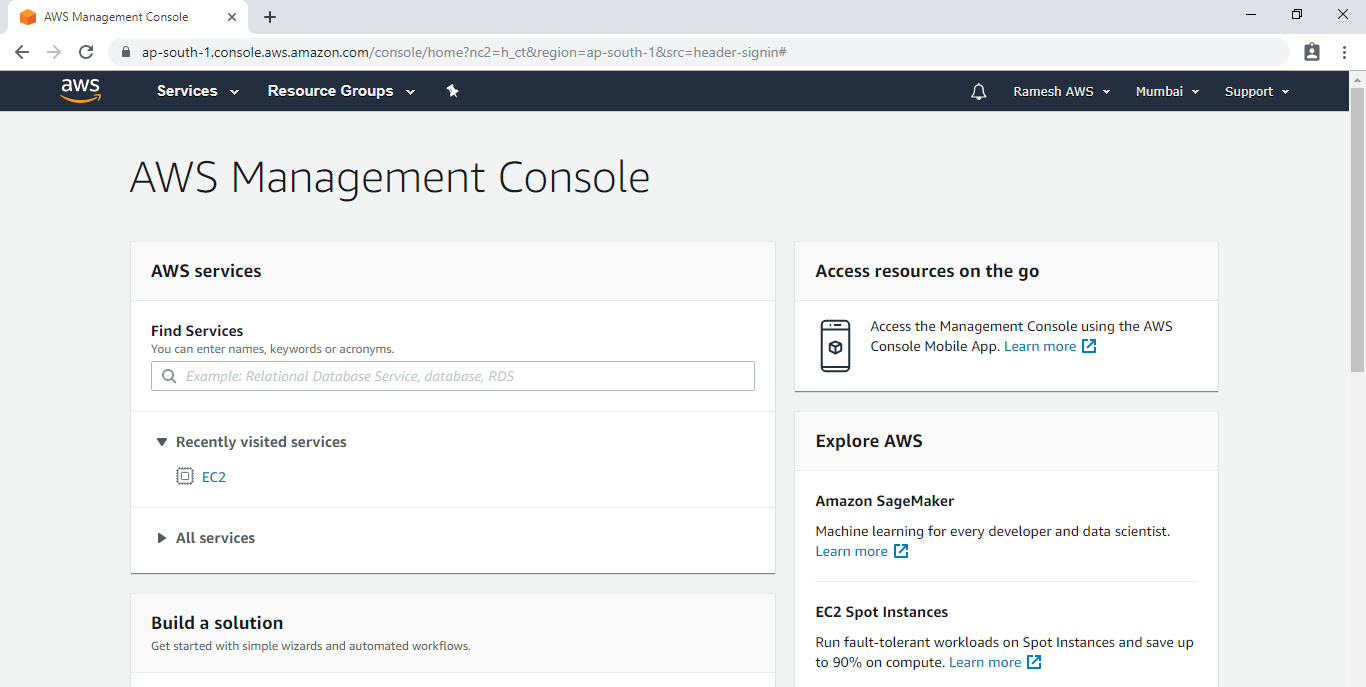 2. Launch Ubuntu EC2 Instance
Go to Services, under the compute module click EC2 service to open. 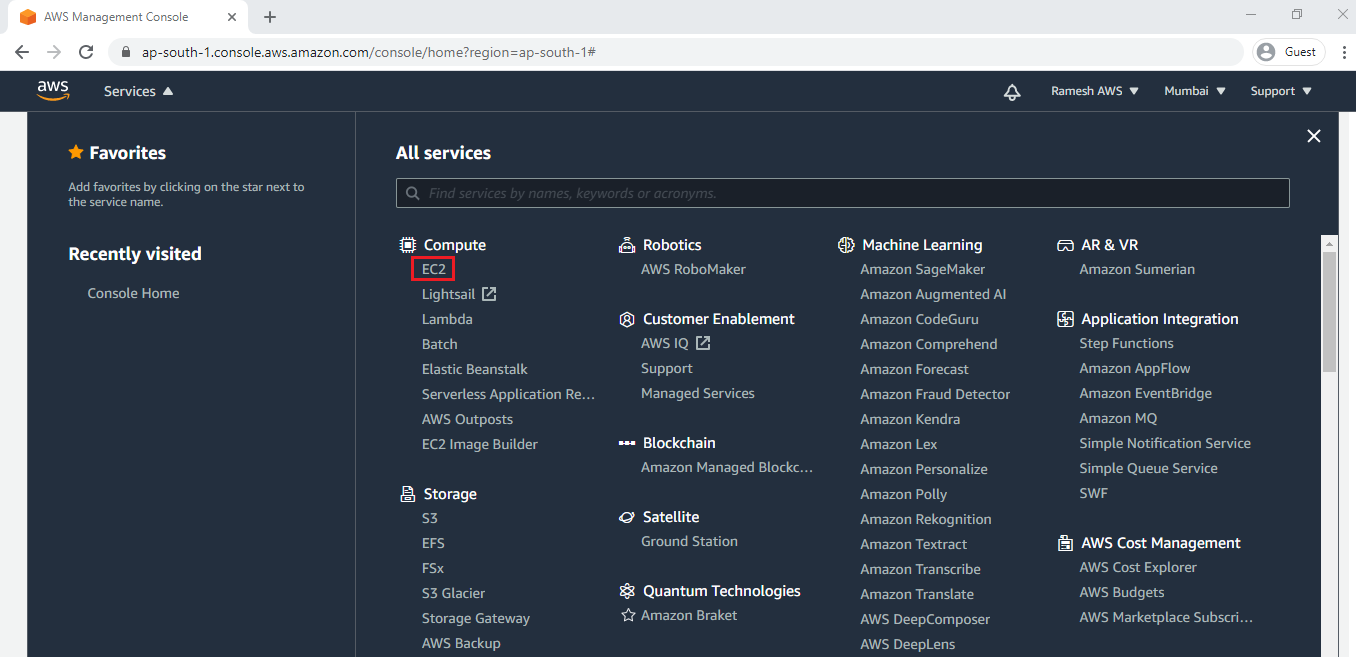 We need to select Ubuntu AMI
  we need to open SSH,HTTP and 8080 ports.
Please check below link to Launch Linux EC2 Instance. We can launch Linux EC2 Instance by using below link.
We can see the Ubuntu Server has been launched successfully. 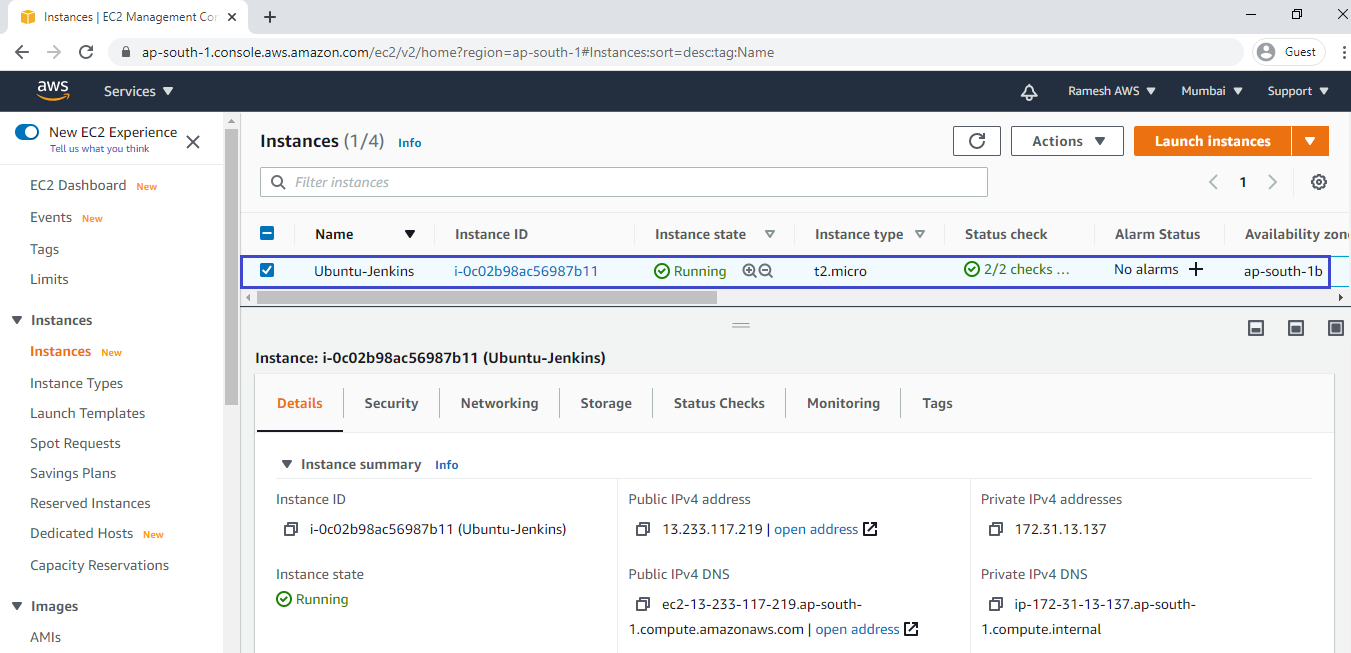
3. Connect to Linux EC2 Instance Using Putty
We can connect putty by using below link.
Connect to EC2 Instance Using Putty
Go inside the Ubuntu Server Terminal.
|
1 2 3 4 5 6 7 8 9 10 11 12 13 14 15 16 17 18 19 20 21 22 23 24 25 26 27 28 29 30 31 32 33 34 35 |
login as: ubuntu Authenticating with public key "imported-openssh-key" Welcome to Ubuntu 20.04.1 LTS (GNU/Linux 5.4.0-1024-aws x86_64) * Documentation: https://help.ubuntu.com * Management: https://landscape.canonical.com * Support: https://ubuntu.com/advantage System information as of Fri Oct 23 16:51:52 UTC 2020 System load: 0.0 Processes: 100 Usage of /: 16.7% of 7.69GB Users logged in: 0 Memory usage: 19% IPv4 address for eth0: 172.31.13.137 Swap usage: 0% 1 update can be installed immediately. 0 of these updates are security updates. To see these additional updates run: apt list --upgradable The list of available updates is more than a week old. To check for new updates run: sudo apt update The programs included with the Ubuntu system are free software; the exact distribution terms for each program are described in the individual files in /usr/share/doc/*/copyright. Ubuntu comes with ABSOLUTELY NO WARRANTY, to the extent permitted by applicable law. To run a command as administrator (user "root"), use "sudo <command>". See "man sudo_root" for details. ubuntu@ip-172-31-13-137:~$ |
Update Server Packages
|
1 2 3 4 5 6 7 8 9 10 11 12 13 14 15 16 17 18 19 20 21 22 23 |
ubuntu@ip-172-31-13-137:~$ sudo apt-get update -y Get:1 http://security.ubuntu.com/ubuntu focal-security InRelease [107 kB] Hit:2 http://ap-south-1.ec2.archive.ubuntu.com/ubuntu focal InRelease Get:3 http://ap-south-1.ec2.archive.ubuntu.com/ubuntu focal-updates InRelease [111 kB] Get:4 http://security.ubuntu.com/ubuntu focal-security/main amd64 Packages [342 kB] Get:5 http://ap-south-1.ec2.archive.ubuntu.com/ubuntu focal-backports InRelease [98.3 kB] Get:6 http://ap-south-1.ec2.archive.ubuntu.com/ubuntu focal/universe amd64 Packages [8628 kB] Get:7 http://security.ubuntu.com/ubuntu focal-security/main Translation-en [78.5 kB] Get:8 http://security.ubuntu.com/ubuntu focal-security/main amd64 c-n-f Metadata [4996 B] Get:9 http://security.ubuntu.com/ubuntu focal-security/restricted amd64 Packages [65.8 kB] Get:10 http://security.ubuntu.com/ubuntu focal-security/restricted Translation-en [10.8 kB] Get:11 http://security.ubuntu.com/ubuntu focal-security/universe amd64 Packages [509 kB] Get:12 http://ap-south-1.ec2.archive.ubuntu.com/ubuntu focal/universe Translation-en [5124 kB] Get:13 http://security.ubuntu.com/ubuntu focal-security/universe Translation-en [64.2 kB] Get:14 http://ap-south-1.ec2.archive.ubuntu.com/ubuntu focal/universe amd64 c-n-f Metadata [265 kB] Get:15 http://ap-south-1.ec2.archive.ubuntu.com/ubuntu focal/multiverse amd64 Packages [144 kB] Get:16 http://ap-south-1.ec2.archive.ubuntu.com/ubuntu focal/multiverse Translation-en [104 kB] Get:17 http://ap-south-1.ec2.archive.ubuntu.com/ubuntu focal/multiverse amd64 c-n-f Metadata [9136 B] Get:18 http://ap-south-1.ec2.archive.ubuntu.com/ubuntu focal-updates/main amd64 Packages [618 kB] Get:19 http://ap-south-1.ec2.archive.ubuntu.com/ubuntu focal-updates/main Translation-en [156 kB] Get:20 http://ap-south-1.ec2.archive.ubuntu.com/ubuntu focal-updates/main amd64 c-n-f Metadata [10.4 kB] Fetched 17.4 MB in 5s (3408 kB/s) Reading package lists... Done |
4. Install the Java Package
|
1 2 3 4 5 6 7 8 9 10 11 12 13 14 15 16 17 18 19 20 21 22 23 24 25 26 27 28 29 30 31 32 33 34 35 36 37 38 39 40 41 42 43 44 45 46 47 48 49 50 51 52 53 54 |
ubuntu@ip-172-31-13-137:~$ sudo apt-get install openjdk-8-jdk Reading package lists... Done Building dependency tree Reading state information... Done The following additional packages will be installed: adwaita-icon-theme at-spi2-core ca-certificates-java fontconfig fontconfig-config fonts-dejavu-core fonts-dejavu-extra gtk-update-icon-cache hicolor-icon-theme The following NEW packages will be installed: adwaita-icon-theme at-spi2-core ca-certificates-java fontconfig fontconfig-config fonts-dejavu-core fonts-dejavu-extra gtk-update-icon-cache hicolor-icon-theme humanity-icon-theme java-common libasyncns0 libatk-bridge2.0-0 libatk-wrapper-java libatk-wrapper-java-jni libatk1.0-0 libatk1.0-data libatspi2.0-0 libavahi-client3 Need to get 88.1 MB of archives. After this operation, 599 MB of additional disk space will be used. Get:1 http://ap-south-1.ec2.archive.ubuntu.com/ubuntu focal/main amd64 hicolor-icon-theme all 0.17-2 [9976 B] Get:2 http://ap-south-1.ec2.archive.ubuntu.com/ubuntu focal-updates/main amd64 libjpeg-turbo8 amd64 2.0.3-0ubuntu1.20.04.1 [117 kB] Get:3 http://ap-south-1.ec2.archive.ubuntu.com/ubuntu focal/main amd64 libjpeg8 amd64 8c-2ubuntu8 [2194 B] Get:4 http://ap-south-1.ec2.archive.ubuntu.com/ubuntu focal/main amd64 libjbig0 amd64 2.1-3.1build1 [26.7 kB] Get:5 http://ap-south-1.ec2.archive.ubuntu.com/ubuntu focal/main amd64 libwebp6 amd64 0.6.1-2 [185 kB] Get:6 http://ap-south-1.ec2.archive.ubuntu.com/ubuntu focal/main amd64 libtiff5 amd64 4.1.0+git191117-2build1 [161 kB] Get:7 http://ap-south-1.ec2.archive.ubuntu.com/ubuntu focal/main amd64 libgdk-pixbuf2.0-common all 2.40.0+dfsg-3 [4896 B] Preparing to unpack .../002-libjpeg8_8c-2ubuntu8_amd64.deb ... Unpacking libjpeg8:amd64 (8c-2ubuntu8) ... Selecting previously unselected package libjbig0:amd64. Preparing to unpack .../003-libjbig0_2.1-3.1build1_amd64.deb ... Unpacking libjbig0:amd64 (2.1-3.1build1) ... Selecting previously unselected package libwebp6:amd64. Preparing to unpack .../004-libwebp6_0.6.1-2_amd64.deb ... Unpacking libwebp6:amd64 (0.6.1-2) ... SelecSelecting previously unselected package libxaw7:amd64. Preparing to unpack .../084-libxaw7_2%3a1.0.13-1_amd64.deb ...Adding debian:GeoTrust_Universal_CA_2.pem done. Setting up adwaita-icon-theme (3.36.1-2ubuntu0.20.04.2) ... update-alternatives: using /usr/share/icons/Adwaita/cursor.theme to provide /usr/share/icons/default/index.theme (x-cursor-theme) in auto mode Setting up openjdk-8-jdk-headless:amd64 (8u265-b01-0ubuntu2~20.04) ... update-alternatives: using /usr/lib/jvm/java-8-openjdk-amd64/bin/jstatd to provide /usr/bin/jstatd (jstatd) in auto mode update-alternatives: using /usr/lib/jvm/java-8-openjdk-amd64/bin/jdb to provide /usr/bin/jdb (jdb) in auto mode update-alternatives: using /usr/lib/jvm/java-8-openjdk-amd64/bin/serialver to provide /usr/bin/serialver (serialver) in auto mode update-alternatives: using /usr/lib/jvm/java-8-openjdk-amd64/bin/wsgen to provide /usr/bin/wsgen (wsgen) in auto mode update-alternatives: using /usr/lib/jvm/java-8-openjdk-amd64/bin/jcmd to provide /usr/bin/jcmd (jcmd) in auto mode update-alternatives: using /usr/lib/jvm/java-8-openjdk-amd64/bin/jmap to provide /usr/bin/jmap (jmap) in auto mode Setting up libgtk2.0-0:amd64 (2.24.32-4ubuntu4) ... Setting up openjdk-8-jre:amd64 (8u265-b01-0ubuntu2~20.04) ... update-alternatives: using /usr/lib/jvm/java-8-openjdk-amd64/jre/bin/policytool to provide /usr/bin/policytool (policytool) in auto mode Setting up humanity-icon-theme (0.6.15) ... Processing triggers for systemd (245.4-4ubuntu3.2) ... Processing triggers for man-db (2.9.1-1) ... Processing triggers for ca-certificates (20190110ubuntu1.1) ... Updating certificates in /etc/ssl/certs... 0 added, 0 removed; done. Running hooks in /etc/ca-certificates/update.d... done. done. Processing triggers for mime-support (3.64ubuntu1) ... Processing triggers for libc-bin (2.31-0ubuntu9) ... Processing triggers for libgdk-pixbuf2.0-0:amd64 (2.40.0+dfsg-3) ... |
Verify Version of Java
|
1 2 3 4 |
ubuntu@ip-172-31-13-137:~$ java -version openjdk version "1.8.0_265" OpenJDK Runtime Environment (build 1.8.0_265-8u265-b01-0ubuntu2~20.04-b01) OpenJDK 64-Bit Server VM (build 25.265-b01, mixed mode) |
Configure the Java Home Location
|
1 2 3 4 5 6 7 |
ubuntu@ip-172-31-13-137:~$ readlink -f $(which java) /usr/lib/jvm/java-8-openjdk-amd64/jre/bin/java ubuntu@ip-172-31-13-137:~$ JAVA_HOME=/usr/lib/jvm/java-8-openjdk-amd64/jre/bin/java ubuntu@ip-172-31-13-137:~$ echo $JAVA_HOME /usr/lib/jvm/java-8-openjdk-amd64/jre/bin/java ubuntu@ip-172-31-13-137:~$ export JAVA_HOME ubuntu@ip-172-31-13-137:~$ PATH=$PATH:$JAVA_HOME |
5. Download and Install Jenkins
Go inside the website :
https://www.jenkins.io/doc/book/installing/linux/#debianubuntu
Install wget command to download something from Internet
Download Repository from internet and add key to your machine
|
1 2 |
ubuntu@ip-172-31-13-137:~$ wget -q -O - https://pkg.jenkins.io/debian-stable/jenkins.io.key | sudo apt-key add - OK |
Add entry “deb https://pkg.jenkins.io/debian-stable binary” to this path ” /etc/apt/sources.list.d/”
|
1 2 |
ubuntu@ip-172-31-13-137:~$ sudo sh -c 'echo deb https://pkg.jenkins.io/debian-stable binary/ > \ /etc/apt/sources.list.d/jenkins.list' |
Update your local package index
|
1 2 3 4 5 6 7 8 9 10 11 |
ubuntu@ip-172-31-13-137:~$ sudo apt-get update Ign:1 https://pkg.jenkins.io/debian-stable binary/ InRelease Get:2 https://pkg.jenkins.io/debian-stable binary/ Release [2044 B] Get:3 https://pkg.jenkins.io/debian-stable binary/ Release.gpg [833 B] Get:4 http://security.ubuntu.com/ubuntu focal-security InRelease [107 kB] Hit:5 http://ap-south-1.ec2.archive.ubuntu.com/ubuntu focal InRelease Get:6 https://pkg.jenkins.io/debian-stable binary/ Packages [18.5 kB] Hit:7 http://ap-south-1.ec2.archive.ubuntu.com/ubuntu focal-updates InRelease Hit:8 http://ap-south-1.ec2.archive.ubuntu.com/ubuntu focal-backports InRelease Fetched 128 kB in 1s (177 kB/s) Reading package lists... Done |
Install Jenkins Package
|
1 2 3 4 5 6 7 8 9 10 11 12 13 14 15 16 17 18 19 20 21 22 23 24 25 26 27 28 29 30 31 32 33 34 35 36 37 38 39 40 41 42 43 44 45 46 47 |
ubuntu@ip-172-31-13-137:~$ apt-get install jenkins E: Could not open lock file /var/lib/dpkg/lock-frontend - open (13: Permission denied) E: Unable to acquire the dpkg frontend lock (/var/lib/dpkg/lock-frontend), are you root? ubuntu@ip-172-31-13-137:~$ ubuntu@ip-172-31-13-137:~$ sudo apt-get install jenkins Reading package lists... Done Building dependency tree Reading state information... Done The following additional packages will be installed: daemon net-tools The following NEW packages will be installed: daemon jenkins net-tools 0 upgraded, 3 newly installed, 0 to remove and 68 not upgraded. Need to get 67.1 MB of archives. After this operation, 68.6 MB of additional disk space will be used. Do you want to continue? [Y/n] ^L^C ubuntu@ip-172-31-13-137:~$ ubuntu@ip-172-31-13-137:~$ sudo apt-get install jenkins -y Reading package lists... Done Building dependency tree Reading state information... Done The following additional packages will be installed: daemon net-tools The following NEW packages will be installed: daemon jenkins net-tools 0 upgraded, 3 newly installed, 0 to remove and 68 not upgraded. Need to get 67.1 MB of archives. After this operation, 68.6 MB of additional disk space will be used. Get:1 http://ap-south-1.ec2.archive.ubuntu.com/ubuntu focal/universe amd64 daemon amd64 0.6.4-1build2 [96.3 kB] Get:2 http://ap-south-1.ec2.archive.ubuntu.com/ubuntu focal/main amd64 net-tools amd64 1.60+git20180626.aebd88e-1ubuntu1 [196 kB] Get:3 https://pkg.jenkins.io/debian-stable binary/ jenkins 2.249.2 [66.8 MB] Fetched 67.1 MB in 5min 25s (206 kB/s) Selecting previously unselected package daemon. (Reading database ... 75306 files and directories currently installed.) Preparing to unpack .../daemon_0.6.4-1build2_amd64.deb ... Unpacking daemon (0.6.4-1build2) ... Selecting previously unselected package net-tools. Preparing to unpack .../net-tools_1.60+git20180626.aebd88e-1ubuntu1_amd64.deb ... Unpacking net-tools (1.60+git20180626.aebd88e-1ubuntu1) ... Selecting previously unselected package jenkins. Preparing to unpack .../jenkins_2.249.2_all.deb ... Unpacking jenkins (2.249.2) ... Setting up net-tools (1.60+git20180626.aebd88e-1ubuntu1) ... Setting up daemon (0.6.4-1build2) ... Setting up jenkins (2.249.2) ... Processing triggers for man-db (2.9.1-1) ... Processing triggers for systemd (245.4-4ubuntu3.2) ... |
6. Start the Jenkins
|
1 |
ubuntu@ip-172-31-13-137:~$ sudo service jenkins start |
Note: we can use this command : sudo systemctl jenkins start
Verify the status of Jenkins
|
1 2 3 4 5 6 7 8 9 10 11 12 13 14 15 16 17 |
ubuntu@ip-172-31-13-137:~$ sudo service jenkins status ● jenkins.service - LSB: Start Jenkins at boot time Loaded: loaded (/etc/init.d/jenkins; generated) Active: active (exited) since Fri 2020-10-23 18:08:46 UTC; 25min ago Docs: man:systemd-sysv-generator(8) Tasks: 0 (limit: 1164) Memory: 0B CGroup: /system.slice/jenkins.service Oct 23 18:08:45 ip-172-31-13-137 systemd[1]: Starting LSB: Start Jenkins at boot time... Oct 23 18:08:45 ip-172-31-13-137 jenkins[18652]: Correct java version found Oct 23 18:08:45 ip-172-31-13-137 jenkins[18652]: * Starting Jenkins Automation Server jenkins Oct 23 18:08:45 ip-172-31-13-137 su[18691]: (to jenkins) root on none Oct 23 18:08:45 ip-172-31-13-137 su[18691]: pam_unix(su-l:session): session opened for user jenkins by (uid=0) Oct 23 18:08:45 ip-172-31-13-137 su[18691]: pam_unix(su-l:session): session closed for user jenkins Oct 23 18:08:46 ip-172-31-13-137 jenkins[18652]: ...done. Oct 23 18:08:46 ip-172-31-13-137 systemd[1]: Started LSB: Start Jenkins at boot time. |
Enable the Jenkins Service
|
1 |
ubuntu@ip-172-31-13-137:~$sudo systemctl enable jenkins<br /> |
7. Access the Jenkins
we can access the Jenkins through web page.
Jenkins default port is 8080.
Open browser we need to give Public IP of Jenkins Machine:8080 for accessing Jenkins.
Copy the Public IP of Jenkins
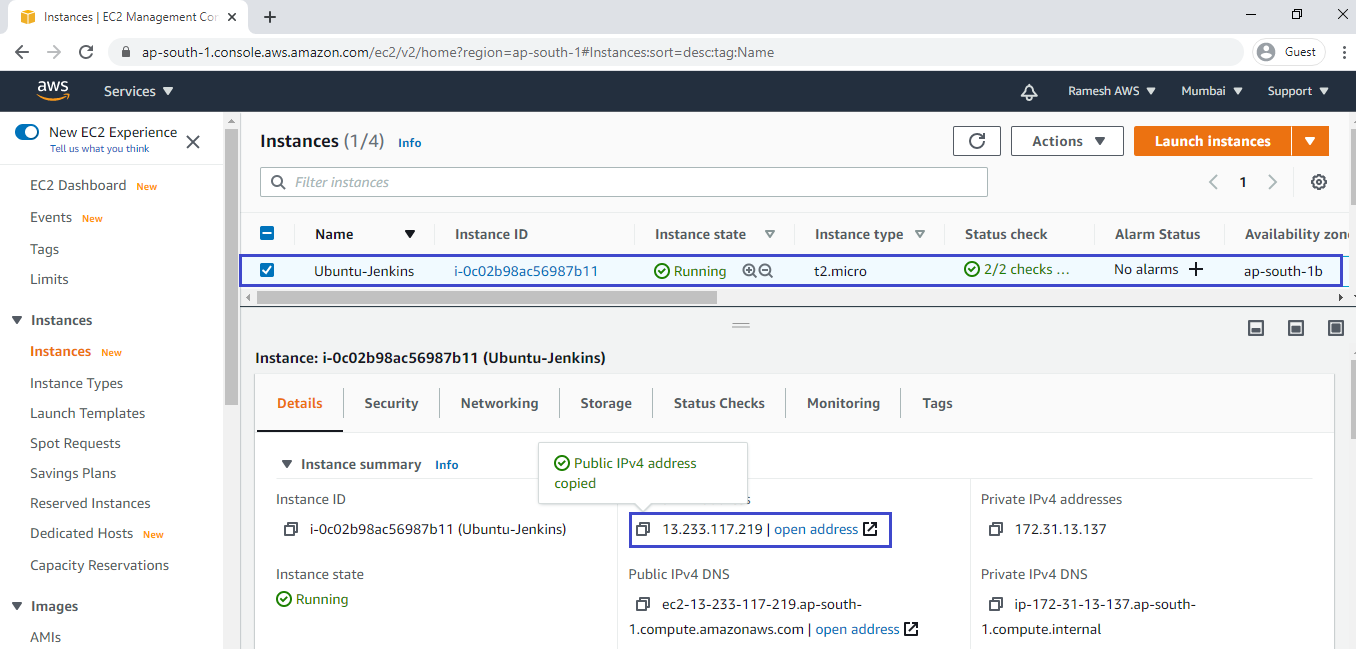
Search Public IP:8080 in browser
We can see the Jenkins page and we need to unlock Jenkins.
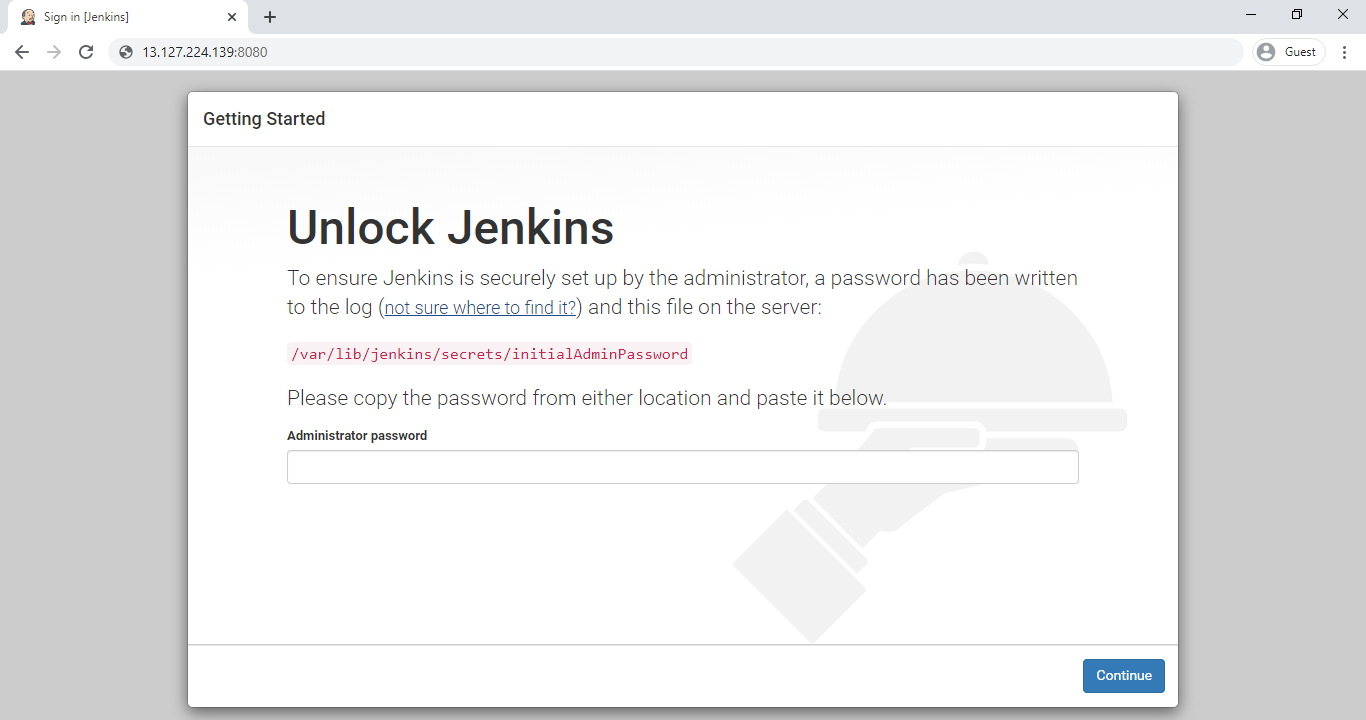
Unlock Jenkins
If you want to unlock jenkins we need to provide password.
we will get password by using path ” /var/lib/jenkins/secrets/initialAdminPassword”.
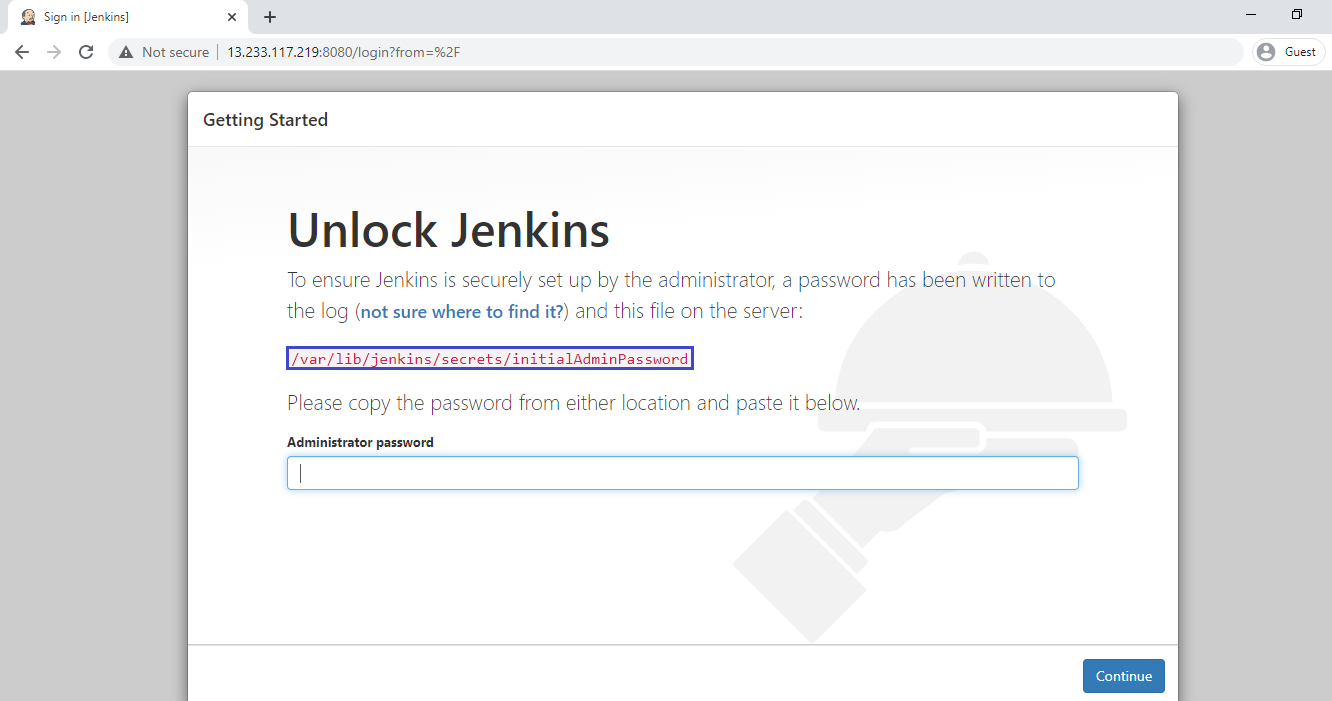
Get Password
Go the path “/var/lib/jenkins/secrets” and open the file “initialAdminPassword” and copy the password.
|
1 2 |
ubuntu@ip-172-31-13-137:~$ sudo cat /var/lib/jenkins/secrets/initialAdminPassword c00a82fdff7747bdbdf7c3a35bd8db9c |
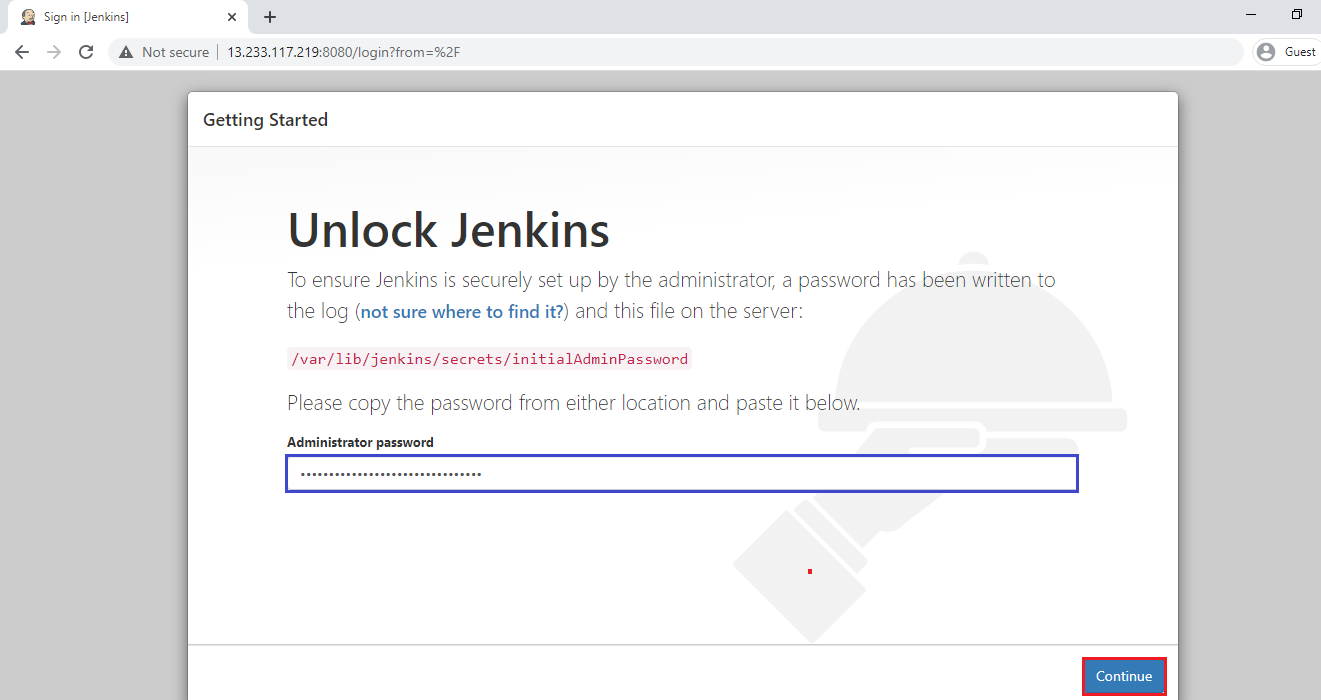
Provide password which was copied and click on continue.
Select Install suggested plugins.
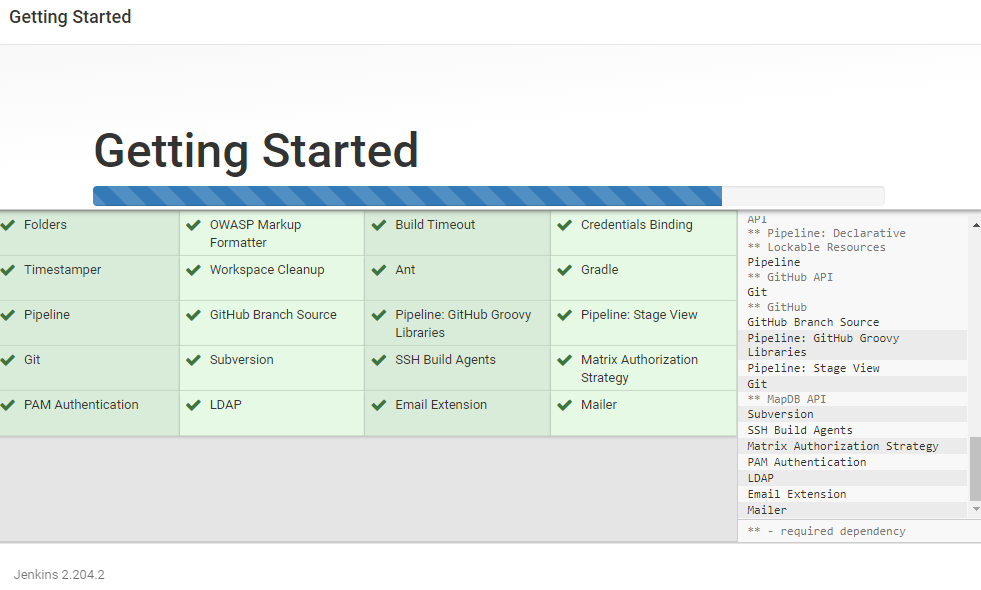
when you select install suggested plugins you will get so many default plugins.
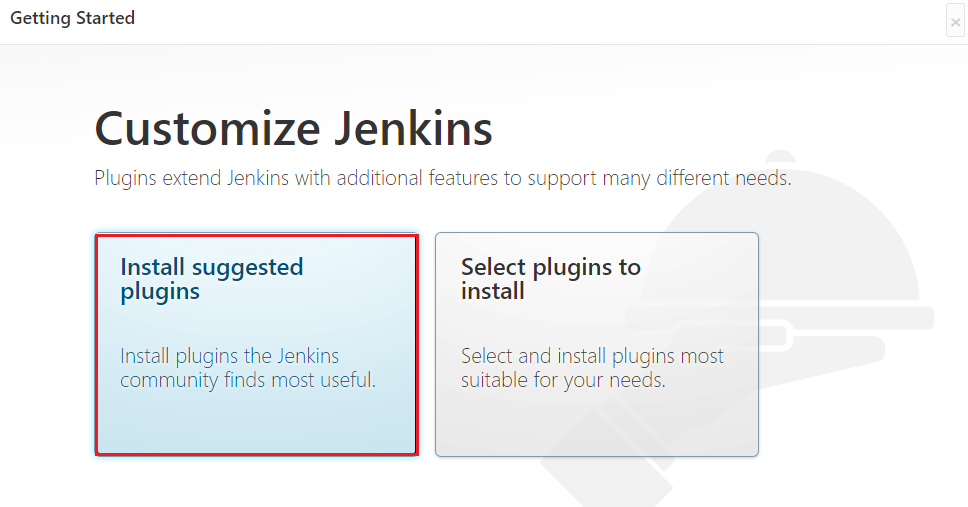
Once select “Install suggested plugins”, it is going to install all default plugins.
It may take 10 minutes to complete.
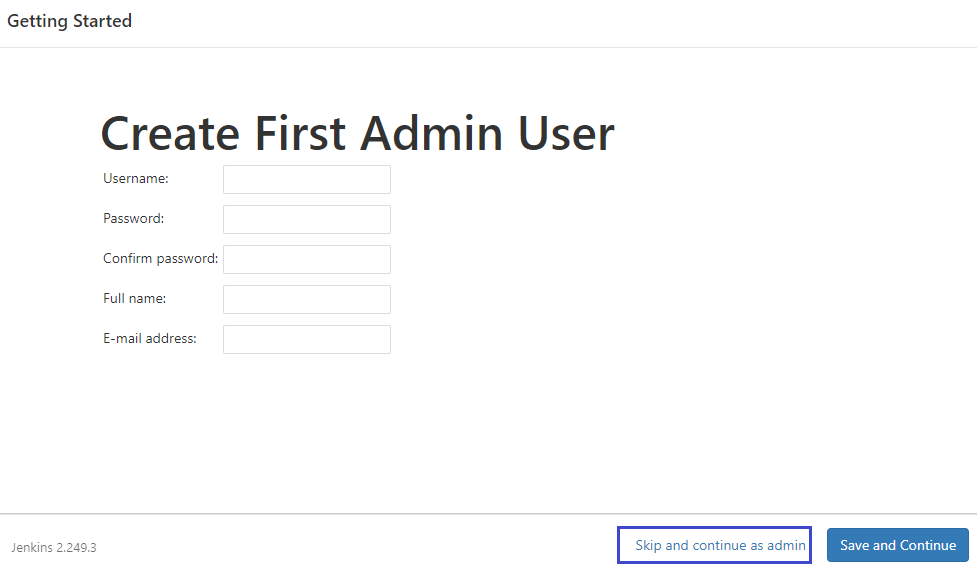
Create First Admin User
Provide required things to create admin user and click on save and continue.
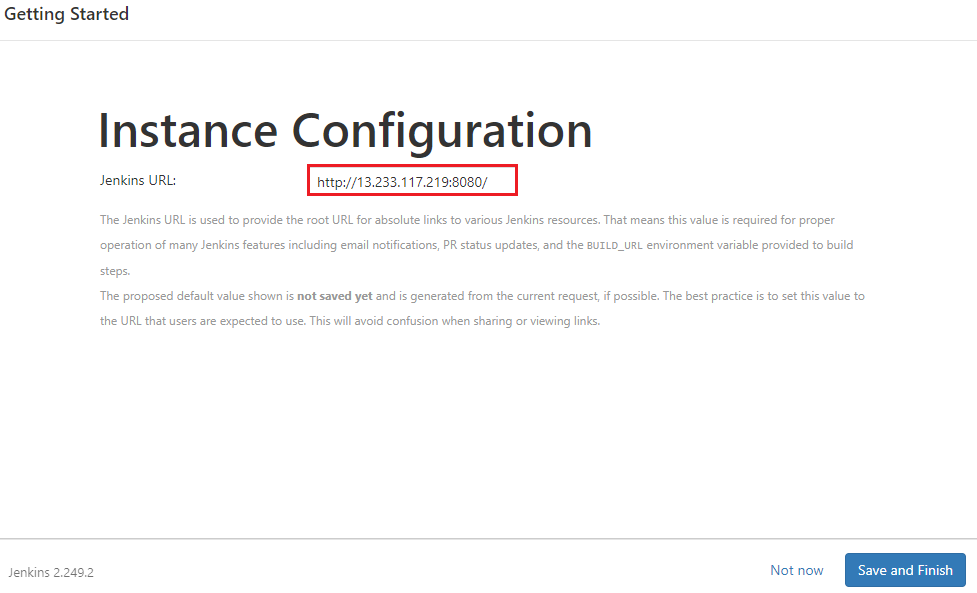
we can see Jenkins URL “http://13.233.117.219:8080/” and Save and Finish.
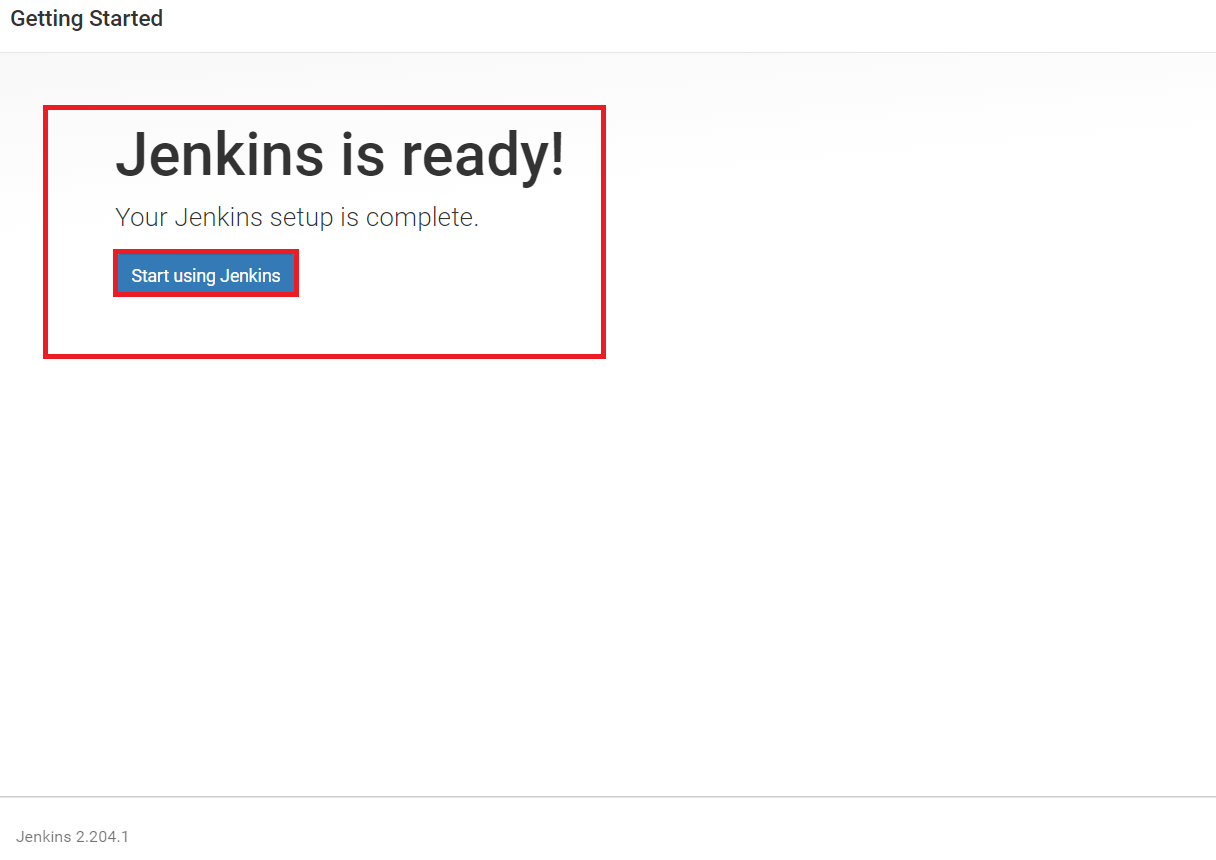
Jenkins is ready to use and click on Start using Jenkins.
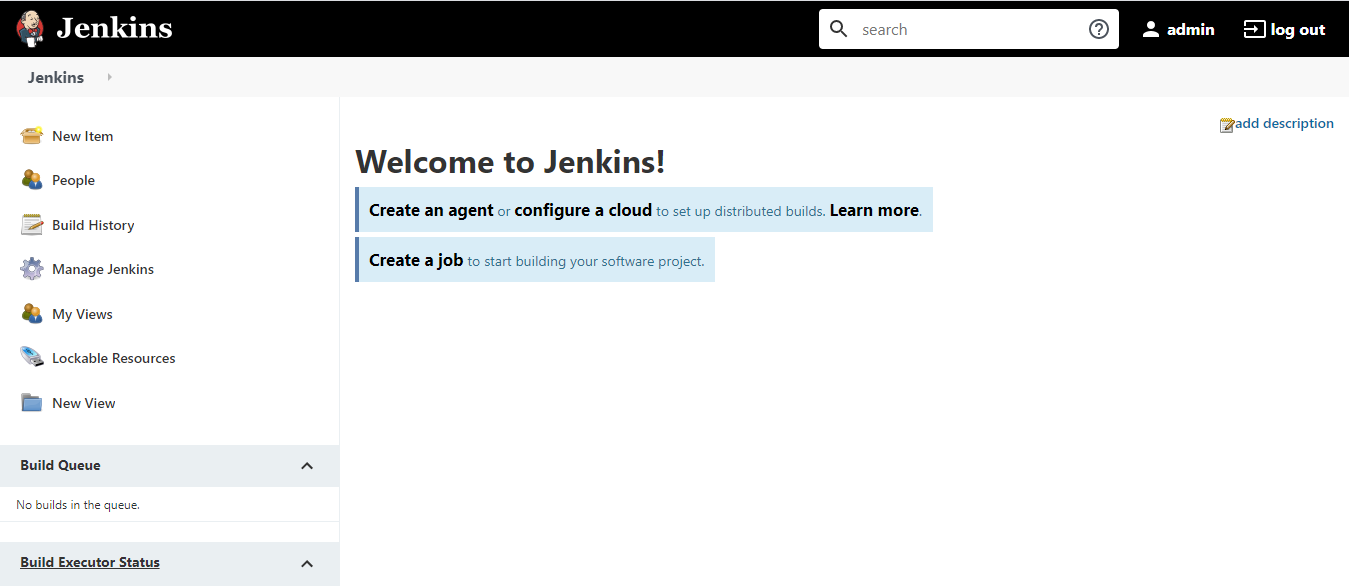
Finally, we can see the dashboard of Jenkins.
Thank you for giving your valuable time to read the above information.
Follow us on
Website : www.ktexperts.com
Facebook Page : KTexperts
Linkedin Page : KT EXPERTS
Follow Me
Ramesh’s Linkedin : Ramesh Atchala